Electric Deer Fence Tips and Resources
 Print This Post
By Luke Freeman, NCAT Horticulture Specialist
Last November, we hosted a workshop in Fayetteville, Arkansas, on constructing a low-cost, solar-powered electric deer fence for a farm, garden, or food plot. Since people are planting their gardens now and the growing season is getting started, we wanted to provide a recap of the workshop with tips on constructing an electric deer fence. You can also find a video of the workshop on our YouTube channel here.
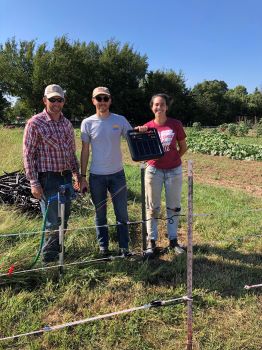
Kenny Simon, Luke Freeman, and Jenni Vaughan after finishing setting up the electric deer fence in September. Photo: Colin Massey, Arkansas Extension
We hosted the workshop at Cobblestone Farms in Fayetteville. We had set up a solar-powered deer fence around incubator farm plots to help limit the deer damage to the incubator farmers’ crops. Many thanks to all of the individuals and small businesses who pitched in to help us purchase the fencing supplies for our incubator farmers. If you’re interested in reading more about the Woolsey Incubator Farm Project, you can find our blog post about it here.
Kenny Simon from the Arkansas Cooperative Extension Service traveled up from Little Rock to help us construct the fence in September. Our local county extension agents Ryan Neal (Benton County) and Colin Massey (Washington County) came to help, too. One of the incubator farmers, Jenni Vaughan, also helped out and learned first-hand how to construct an electric deer fence. In the weeks after the fence was put up Jenni noticed a dramatic reduction in the amount of deer damage on her okra and other vegetable crops.
Electric Deer Fence Elements
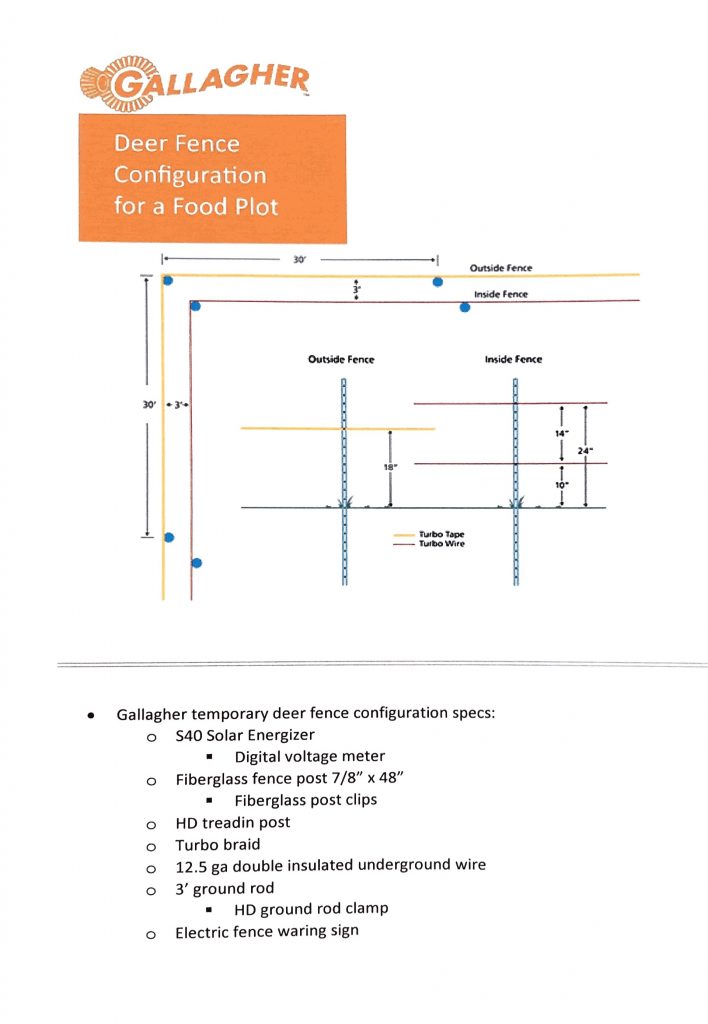
During the November workshop Kenny described the essential components of an electric deer fence. He showed participants how to set one up and check for charge. The fence design we demonstrated is a three-strand fence developed by Gallagher specifically for deer exclusion. You can see a diagram of the fence design at the end of this post. The three-dimensional element of the fence plays against a deer’s depth perception, making them reluctant to jump over. This allows the fence to effectively exclude deer even though it’s only 24 inches tall.
Energizer
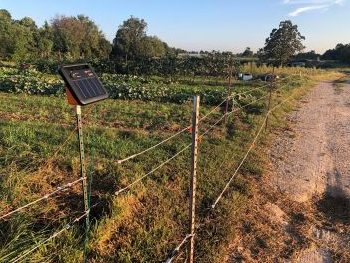
We used a Gallagher S40 solar charger for our deer fence at Cobblestone Farm. Photo: Luke Freeman, NCAT.
The first component of an electric deer fence is the energizer, which creates the electric current. An energizer can be battery-powered, solar-powered, or made to plug in to a 110 volt outlet. We chose a solar-powered charger for our deer fence because we did not have access to a nearby electrical outlet. Our charger is a Gallagher S40 rated at 0.4 stored joules. A rule of thumb is that every output joule can run 3 miles of electric fence. The charger we used also has a wildlife setting that pulses more rapidly at night when wildlife are active.
Grounding
Along with your energizer you’ll need a grounding system. A good ground is essential to delivering a shock when a deer encounters your fence. Most problems with electric fences stem from poor grounding. Another rule of thumb is that for every output joule of the energizer you need three feet of buried ground rod. Install the ground rods in soil that stays moist year-round or that you can easily water. Be sure to space ground rods at least 10 feet apart.
Volt Meter
A volt meter will allow you to test your electric fence and ensure it is working properly. Generally speaking your fence will need to run at 5,000-6,000 volts for deer, which you can check using your volt meter. Best results will come from a volt meter made by the same manufacturer as the energizer.
Wire
There are many options when it comes to the wire you use for your electric deer fence. Kenny Simon recommends using a white turbo-braid or turbo-wire for this type of deer fence configuration because of the visibility and durability. Tying colorful survey ribbon to the fence also helps improve its visibility to wildlife and humans. In general you’ll find that “poly” strands contain six or less wire filaments and “turbo” strands contain nine. The more wire filaments in the strand the greater the voltage and the greater distance the strand can carry the voltage.
Posts
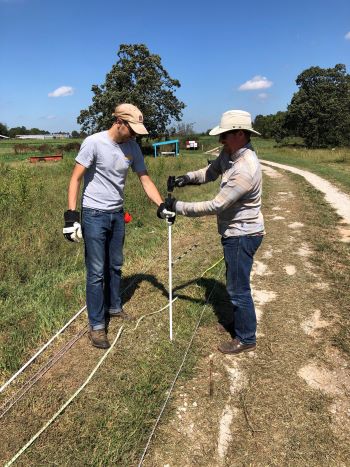
Luke Freeman and Ryan Neal pound in fiberglass in-line posts. Photo: Colin Massey, Arkansas Extension
When it comes to posts Kenny recommends self-insulated line posts. We ended up using a combination of steel t-posts for the corners and fiberglass step-in posts for in-line. Self-insulated line posts will be flexible and support the fence in between the corner posts. Fence posts made from fiberglass, composite material, or plastic don’t carry an electric charge, so you don’t have to worry about adding insulators. You also won’t have the issue of a failed insulator causing a short in your fence. This can compensate for the added expense of self-insulated posts.
If you’re using metal posts like t-posts for your fence you must use high-quality insulators like a bull-nose insulator. The insulator will ensure the electric wire does not come into contact with the metal post, which would cause a short in the fence. In Kenny’s experience many problems with electric fences shorting out come from old insulators that break down. Grass or debris can also cause an electric fence to short out. It is important to keep the area under an electric deer fence mowed.
More Information
To learn more about setting up an electric deer fence for your farm or garden, watch the video recording from our workshop here. You can also find ATTRA Sustainable Agriculture publications on electric fencing for livestock at https://attra.ncat.org/topics/fencing-watering-systems/, including the publication “Paddock Design, Fencing, and Water Systems for Controlled Grazing.”
You can always call ATTRA’s helpline at 800-346-9140 or email askanag@ncat.org if you have questions about deer fencing, other garden pests, or any agriculture topic!
The electric deer fence configuration and supplies list we used at Cobblestone Farm:
This blog is produced by the National Center for Appropriate Technology through the ATTRA Sustainable Agriculture program, under a cooperative agreement with USDA Rural Development. ATTRA.NCAT.ORG.


 NCAT
NCAT