Composting: The Basics
By Tammy Hinman, NCAT Agriculture Specialist and Richard Myers, NCAT Editor
Abstract
This publication provides a foundation of information for those interested in composting. It addresses a wide range of topics, from the materials that are needed to begin a compost pile to techniques for successfully managing the composting process. A “troubleshooting” list describing common problems and how to address them also is included. In addition, the basics of vermicomposting—using worms to generate compost—are described. Finally, the publication contains an introduction to composting for small agricultural operations such as market gardens.
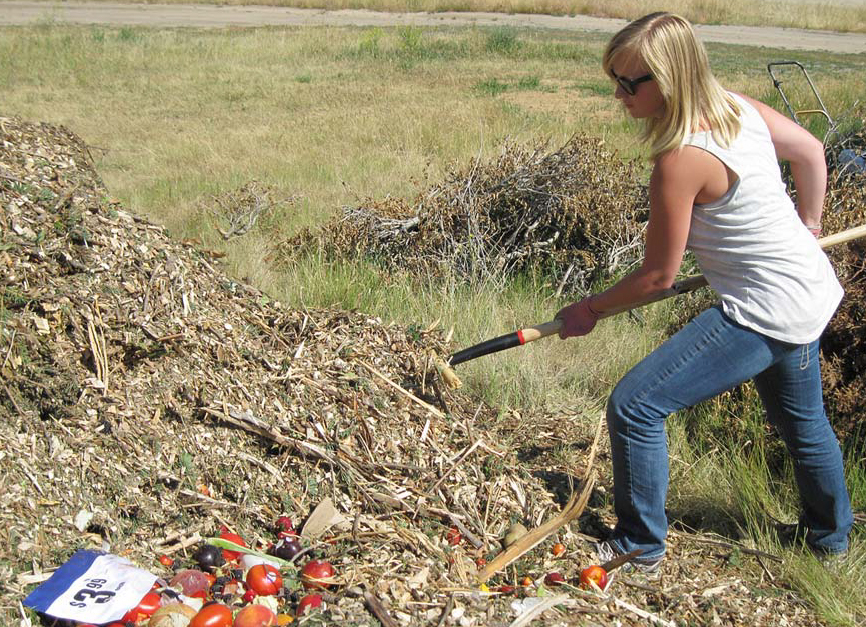
The National Center for Appropriate Technology gathers unsellable produce from area grocery stores several times a week for the compost pile at its Small-Scale Intensive Farm Training (SIFT) program. Photo: Richard Myers, NCAT
Introduction
Adding compost—nature’s own fertilizer—is one of the best ways to make the soil in your garden richer and more productive. And you can easily make it yourself, while cutting back on yard and kitchen waste.
Compost is simply a product of nature’s own recycling program. Anything that is alive, plant or animal, will decompose once it dies. But decomposition isn’t a solitary act. Other organisms, from bacteria to large mammals, do the work of decomposition—consuming the dead matter to use its energy to sustain themselves.
When conditions are right, the end result of decomposition is compost, also called humus—a combination of digested and undigested food that resembles a soft, sweet-smelling, nutrient-rich soil.
Composting speeds along the decomposition process by controlling what is being decomposed and providing the right conditions and decomposition “workers.” Bacteria are the first on the job, followed by fungi and protozoa, and then such larger organisms as earthworms and beetles. At the end of the process, you will have a soil amendment that not only adds nutrients to the soil but also can help break up heavy clay soil and improve the capacity of sandy soil to hold nutrients and water.
The Basics: What You Need to Get Started
A typical turning bin. Graphic: Pierce County, Washington, Public Works Department
A Place
First, decide where you want to compost. Remember that composting takes months, so be sure you can get to your compost pile all year round. The site should be level, have good drainage, and be in a sunny or partly sunny spot. Ideally, the storage container you use for your compost pile should be over bare soil that has been turned to a depth of 6 inches or so to make access easy for worms and other organisms that do the work.
A Container
A portable container bin. Graphic: Pierce County, Washington, Public Works Department
There are many options for either building or buying a container for your compost pile. Generally speaking, they break down into two options:
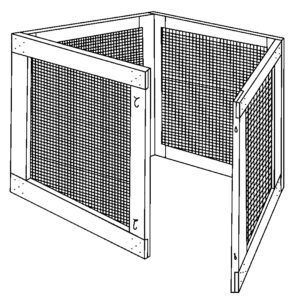
Container bins. These bins simply hold the materials as they decompose into compost. Using stationary container bins can make it difficult to turn the compost. However, many container bins, especially smaller bins, are designed to be moved. They can simply be lifted off the compost pile and moved to a new location, often just to the side of the old location. The compost can then be turned by pitch-forking it back into the bin.
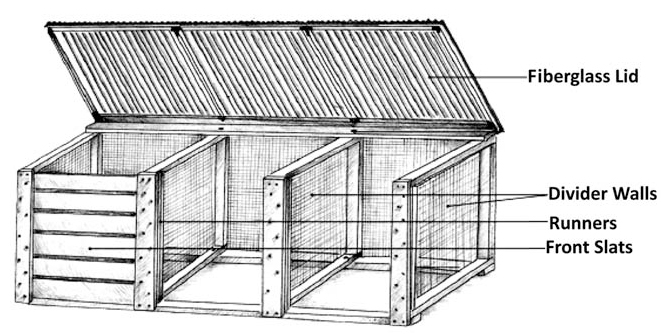
Turning bins. These bins are designed to make turning the compost easy. The traditional style of turning bin is simply large, rectangular enclosure divided into three sections (bins) with an open front. Most people build this type of bin from wood onsite. The composting process begins in the first bin. When the compost is ready to be turned, it is simply moved with a pitchfork or shovel to the next bin, and more compost is started in the first bin. Eventually, the material that has been composting the longest winds up on the bottom of the last bin and can be used while the rest finishes the process. Other styles of turning bins are made from horizontal, circular drums that can be rotated to turn the compost.
A typical container bin. Graphic: Pierce County, Washington, Public Works
Materials to Compost
Any materials you compost will have both carbon and nitrogen in their tissues. Carbon is a source of energy for the microorganisms doing the decomposing, and nitrogen provides the proteins the microorganisms need to grow. A rule of thumb is that materials with a carbon-to-nitrogen ratio (C:N) of 30:1 provide a good environment for compost microorganisms; a 30:1 ratio will give you a hot, quick-acting compost pile. A C:N ratio of 50:1 will work, but the compost will develop more slowly.
However, the idea isn’t to try to find only materials with a C:N ratio of 30:1 for your compost pile— charts with estimates of C:N ratios for various materials are available, but most composters don’t pay much attention to specific ratios.
Rather, the art of composting is a matter of combining different materials—some high in carbon and some high in nitrogen—and keeping an eye on the pile to manage its aeration and moisture in order to optimize the speed at which the materials decompose. Materials used for composting are commonly divided into two categories to make managing a compost pile easier: brown and green.
Brown materials are relatively high in carbon. Here are some common examples of brown materials to add to your compost bin:
-
-
- Sawdust and wood chips. Because they are often available in bulk and are very high in carbon, sawdust and woodchips are time-honored ingredients in a compost pile. But since it takes a long time for the wood to break down, they should be used in very shallow layers or mixed with green materials. It is also very important to be certain the wood sawdust and wood chips haven’t been treated with chemicals, often referred to as having been “pressure treated.” Treated wood will often have a telltale greenish hue.
- Wood ash. Although wood ash can be used as composting material, it should be used only in small amounts because it has a high level of alkaline that can inhibit the microbes doing the work in the compost pile. Charcoal briquettes and commercially available fireplace logs don’t break down quickly enough to be a good compost choice, and they contain petroleum products.
- Dead leaves. Leaves Leaves are a good source of carbon, but they also contain other valuable nutrients. Leaves break down more quickly if they are shredded, and whole leaves might gather into clumps that can choke off the compost pile’s aeration. Some leaves, such as those that feel waxy, take longer to break down than others. Also, many composters avoid walnut leaves, especially black walnut leaves, because the trees contain juglone, a material that inhibits the ability of many plants to grow. If walnut leaves are composted, it should be for an extended period to ensure that juglone will be broken down.
- Hay. Hay is a good source of both carbon and nitrogen. In fact, hay from nonlegume plants often approaches that optimal 30:1 ratio of carbon to nitrogen. Its rough texture also allows easy paths for air to get to microbes in the compost.
- Straw. Straw breaks down easily, and compost that includes straw often has small particles that can help soil with a lot of clay absorb more water and nutrients by opening up its structure. Straw has less nitrogen than hay, but is generally richer in carbon.
- Paper and cardboard. Always shred paper and cardboard before you use them in a compost pile. Avoid glossy paper and paper that is mostly colored or is printed with a lot of colored ink. Some people combine cardboard with water to begin breaking it down, then wring it out until it’s just moist before adding it to the compost pile.
- Tea. Black, herbal, loose or in bags, tea is a good addition to your compost pile.
- Eggshells. A good source of calcium, eggshells are good compost material. They decompose slowly, however, so they work better if they are crushed. Don’t use the yolks and whites of eggs, however.
Green materials have a relatively high amount of nitrogen. Here are a few commonly used green composting materials. - Vegetable and fruit peelings. When you’re preparing food, much of what would have otherwise gone to waste—such as banana peels, apple cores, potato peels, and bits of unused vegetables—is excellent for composting. However, using vegetable leftovers that were cooked with oil can slow down the compost’s decomposition and may attract animals.
- Grass clippings. Long a staple of home composting, grass clippings are high in nitrogen and commonly available. In recent years, however, new generations of long-lasting commercial weed killers applied to lawns have been found to create “killer compost” that can injure or kill plants when it is used. It’s important to know what grass and leaves have been treated with before they are added to a compost pile. Also, many people prefer to leave grass on the lawn, where it can act as mulch and help nourish the soil as it decomposes. When grass is used in a compost pile, it should be applied in thin layers or combined with other green materials. Large amounts of grass can form clumps that don’t break down quickly and can make it harder for air to get to the composting microbes.
- Coffee grounds. Worms love coffee grounds, and compost piles love worms. Coffee grounds are high in nitrogen and do a good job of helping keep the compost pile moist. Paper coffee filters can be used right along with the grounds.
- Fresh manure. Manure is high in nitrogen and is an excellent green composting material. Never use manure from dogs, cats, pigs, or people in your compost because it can cause diseases and carry parasites. Manure from chickens, horses, cows, sheep, goats, and rabbits makes good compost.
- Plant clippings. As you manage your flowerbeds and gardens, remember that you’re growing some excellent composting materials. Remnants from harvested plants, flower tops that have been deadheaded, and even weeds without mature seeds can make good additions to your compost bin. Don’t use any diseased plants.
-
Approximate average C:N ratios of some commonly used composting materials.
• Coffee grounds 20:1
• Corn stalks 60:1
• Cow manure 20:1
• Egg shells 12:1 to 15:1
• Fresh grass clippings 15:1
• Fruit wastes 25:1 to 40:1
• Sawdust 50:1
• Straw 40:1 to 100:1
• Hay from legumes 15 to 1
• Horse manure 25:1
• Leaves 40:1 to 60:1
• Paper 170:1
• Pine needles 70:1
• Poultry manure 10:1
• Seaweed 19:1
• Straw 40:1 to 100:1
• Vegetable wastes 12:1 to 20:1
• Wood chips 100:1 to 500:1

The Process: Hot Composting
When the weather is good for growing plants, it is also good for composting. However, because composting generates its own heat, the composting season is often longer than the growing season.
Composting is a simple process that combines the nitrogen and carbon in the materials you’re using with moisture and oxygen to create an ideal environment for the microbes and other organisms that are doing the work. When you combine those ingredients with a little elbow grease, you can use “hot” composting techniques to support microorganisms that get results in a relatively short period.
In order for the compost to generate enough heat for hot composting, most growers suggest that piles be at least 3 feet high by 3 feet wide and 3 feet long. If you don’t have enough materials for a compost pile that large, store your materials until you do. If the pile is larger than 5 feet by 5 feet by 5 feet, however, the microbes at the center may not get enough oxygen.
If your compost pile is sitting directly on the ground, it’s a good idea to start with some woody materials to provide nooks and crannies for oxygen to get to the compost.
Combine nitrogen-rich green materials with an equal amount of carbon-rich brown materials. Some people prefer to mix the two together, and others prefer to layer them on the compost pile. If you do layer them, make the layers 2 to 4 inches deep. Be sure that your compost pile is well aerated. “Fluffing” or turning the compost pile—essentially moving the materials on the inside of the pile to the outside and vice versa—will serve that function, and there are other strategies such as punching holes in the pile. There are specially designed tools for making aeration holes in compost piles, such as rods with small “wings” at the tip that collapse against the rod as it is being inserted. When the rod is removed, the compost pulls against the wings and unfurls them, which creates a larger hole.
Keep checking the moisture content of the compost pile throughout the season. The compost should be moist, but not saturated. A good rule of thumb is that it should feel about as moist as a wrung-out sponge.
The center of the compost pile will heat up, sometimes as high as 160 degrees Fahrenheit on the inside of the pile, and then begin to cool. There are commercially available thermometers for compost piles, or you can simply use your hand to see if the compost is warm to the touch.
Turn the compost periodically, swapping the material on the inside of the pile for materials from the outside. This step plays a big role in how quickly the compost will be ready. Depending on conditions, a pile that is turned every day or two can produce compost in as little as a month. A hot pile that is turned every week or every other week may take a few months to produce results.

The Process: Cold Composting
Cold composting is often called “slow” composting. The ingredients are essentially the same as they are for hot composting, but materials are added and left on their own to decompose rather than regularly being turned, mixed, and otherwise managed throughout the season. People who don’t have the time or enough materials to manage a hot compost pile often opt for cold composting. Cold piles generally create compost more slowly, often taking several months or even a year, depending on conditions. Finished cold compost often has bits of undecomposed materials that some growers keep and others screen out.
Of course, cold compost piles do heat up as materials decompose, but they rarely reach as high a temperature as will a hot compost pile. Cold piles may be more likely to smell because if they aren’t turned regularly or aerated in some other way, the “aerobic” organisms that begin the composting process will die when the air is used up. They are replaced by “anaerobic” organisms that decompose composting materials more slowly and release smelly byproducts.
Another disadvantage of cold composting is that, unlike hot compost, the piles rarely get hot enough to kill plant diseases and weed seeds in the materials being composted. On the other hand, the heat in hot compost can destroy some bacteria that help combat diseases in the soil.
Aeration: Let Your Compost Breathe
Regardless of whether you’ve opted for hot composting or cold composting, making sure your pile is getting plenty of air throughout will keep fast-acting aerobic microorganisms healthy and generating compost.
The traditional way to aerate a compost pile is to simply turn it, using a pitchfork or other implement to essentially turn the pile inside out. Turning often is done when the temperature on the inside of the pile starts to cool or if the pile begins to smell. Both are signs that the aerobic microbes in the center of the pile may be running out of air. Turning the compost on a regular basis can provide plenty of air to keep the pile percolating.
Turning compost also keeps materials from settling, which can compact the pile and make it much more difficult to keep moist and aerated. In fact, some people call turning a compost pile “fluffing.” That’s a gentle-sounding word for moving around what could easily be hundreds of pounds of compost materials in a 3-cubic-foot container.
Some people make the task of turning their compost easier by setting up a series of three or more bins. As compost needs to be turned in the first bin, it’s moved to the next, which aerates the compost. More composting materials are added to the first bin. The process continues until the compost at the bottom of the last bin is ready to be used.
It’s also a good idea to use sticks, wood chips, and other relatively porous materials as the bottom layer of the compost pile to make air pockets. You can also add such materials as you build the pile to create more air pockets. Paper egg cartons and the paper rolls from inside paper towels, wrapping paper, and toilet paper are other good options.
You can also aerate your compost without turning it. One way is to simply punch holes in the pile with something long and heavy like a piece of rebar or a pipe. This, of course, can be a lot of work. There are tools that can make it easier. A common choice is a rod with small “wings” attached at the tip. The wings collapse against the rod as it is punched into the pile. As the rod is removed, the wings unfold, creating a larger hole and fluffing the surrounding materials. At least one composter has developed a version for small piles that uses an electric drill to make the process easier.
Many composters also use porous aeration “pipes” to provide air without turning the pile. Some are as simple as a bound bundle of corn stalks or roll of wire mesh. Small PVC pipes— no wider than 2 inches to prevent too much heat from escaping—with half-inch holes drilled every few inches are becoming a popular choice. Whatever kind of aeration pipe you use, it’s possible to either build the compost pile around the pipes or dig a hole and insert them.
Open Road of New York has developed an aeration system for 3-cubic-foot bins called the Hot Box. In this system, three PVC pipes are installed horizontally across the bottom of a bin through holes drilled in its side. Another set of pipes are installed a foot higher. A study by Cornell University showed that the system, which requires no turning of the compost, did provide enough oxygen for hot composting to occur. The researchers did suggest that oxygen levels could be improved in the system by making sure porous materials were included in the compost to provide air pockets (Regenstein, et al., 1999).
Troubleshooting
The compost pile has a bad smell.
The compost may be compressed and should be turned to provide more oxygen. Also, add some relatively chunky materials such as twigs or wood chips to provide air spaces. If the material is so wet you can easily squeeze water out of it, mix in some dry brown materials and soil. Shred any clumps that have formed. If the compost smells of ammonia, you have too many green materials and need to add more brown materials and possibly some soil.
The compost is too dry.
Remember that compost should be about as moist as a sponge that has been wrung out. Squeezing a handful shouldn’t produce more than a few drops of moisture, but it should stay together as a ball. Many growers use a tarp over the compost to keep it from drying out too rapidly in the warmth of the sun. If you do add water to a dry compost pile, don’t just add it to the top of the pile because it likely won’t be absorbed. Rather, pull the pile apart and relayer it, adding water as you go.
The compost doesn’t have a bad smell and it is damp, but it won’t heat up.
Chances are you don’t have enough green materials in the compost pile, so it is lacking nitrogren. Mix in more green materials.
The pile is damp and warm, but only in the middle.
The pile isn’t large enough to generate much heat. Gather more green and brown materials and mix them with the old ingredients.
Rodents are attracted to the kitchen scraps I’m using.
Be sure not to use meat, dairy, or food prepared with oil. Cover the kitchen scraps with a layer of soil and/or brown materials. It’s helpful to dig a hole into the pile for kitchen scraps and then cover them to keep rodents away.
Vermicomposting: Using Worms to Compost
Using worms for composting has a lot of advantages for the kitchen composter. Vermicomposting doesn’t use much space and can be done all year around in a warm, dry spot in a basement or garage.
Here’s how to get started on a small vermicomposting project. Your worm farm can be housed in a plastic storage bin. A good rule of thumb is that a 1-foot by 2-foot by 3 ½-foot bin will be large enough for a six-person family. Many people also build vermicomposting bins from wood or use discarded cabinet drawers, trunks, or similar items. Wooden bins can provide better insulation for the worms, but if plastic bins are kept warm and dry, that shouldn’t be an issue.
Drill holes in the bottom of the bin to allow it to drain. The holes should be about a quarter of an inch in diameter, and eight to 12 holes should be plenty. Place the bin on bricks or wooden blocks over a tray to catch the material that drains out.
To keep the worms from getting out, line the bin with a fine, nylon mesh.
Now add bedding to one side of your bin. Lots of people use shredded newspaper for bedding. Tear the paper into shreds and then add enough water to make it moist all the way through. It’s important not to let the paper dry out, but it shouldn’t be soaking wet.
Once the bed is laid, it’s time to add worms. Redworms, the small worms that can often be found in gardens or lawns, are the most commonly used worms for composting. In most areas, composters can gather the worms themselves, and they also are available through gardening catalogs.
Add food for the worms periodically. Waste materials from kitchens such as fruit skins, vegetable peelings, and coffee grounds are good choices. Don’t use meat, dairy products, or food that has been prepared with oils. Also, don’t add too much food all at once—it may spoil before the worms can turn it into compost.
Store your bin in a warm, dark area where the temperatures will remain constant.
About three months later, the bedding and food should be converted to compost. At this point, put fresh bedding and food on the side of the bin that wasn’t being used before. The worms should move to that side of the bin.
A few weeks later, open the bin and expose the inside to sunlight or another bright light. The light will cause the worms to burrow down into the bedding, and you can remove the finished compost without removing the worms. Now the whole process can begin anew.
Beyond the Back Yard: Composting for a Market Garden
How much will you need?
Typically, a small farm will require up to 10 tons of compost per acre—or however much it takes to spread about an inch over the ground being planted. Also, it is a good practice to have your soil tested annually if you use compost in successive years. This will help you determine whether the compost is adding too much phosphorous to your soil. This particular nutrient can build up when manure-based compost is applied over many years, so a soil test will help you determine whether to use more or less that year. Most Cooperative Extension Services will do soil testing for a nominal fee.
Organic Crops
If you are raising certified organic crops, your compost pile must meet the National Organic Program guidelines, or be treated as raw manure.
The Guidelines
- A C:N ratio of 15:1 to 60:1
- A minimum temperature of 131 degrees Fahrenheit for at least three days
- Turning or other measures sufficient to ensure that all parts of the pile reach required temperatures
- A minimum temperature of 131 degrees Fahrenheit for at least 15 days in systems that use windrows
- Turning compost in systems that use windrows at least five times during the 15-day period when the compost is at a minimum temperature of 131 degrees Fahrenheit
- Compost must be cured—kept at a lower temperature for 45 days after the minimum period at 131 degrees Fahrenheit is met
Many state organic certifying agencies use the NOP guidelines; however, they are not the official standards. Producers should check with their certifier about their composting plan and operation.
How to Acquire High-Nitrogen Green Materials
Grocery stores can be good sources of green materials. Managers often will be happy to have someone put the produce that isn’t sellable to a productive use. Sometimes, stores will want you to sign agreements that you won’t use the produce any other way. The most important thing is to develop a good relationship with the store’s managers and try to make the logistics—the best time to come pick up the materials, for example—convenient for the store.
Similarly, coffee shops produce a steady supply of grounds that managers often will be happy to have you take off their hands.
Restaurants also have a lot of food waste. If you do approach restaurants about composting, be certain that the people who will be gathering the materials understand that it can’t include meat scraps, dairy items, or food that has been prepared with oil. The simplest approach is to ask for only for the vegetable and fruit waste the restaurant produces during its food preparation. You might consider supplying the restaurant with a laminated 8-inchby-11-inch list of materials not to put in the container where the compost materials are placed.
Schools and other institutions, such as hospitals and nursing homes, also have kitchens and can be good sources for green materials. The same cautions you would take with restaurant kitchens would also apply to institutions.
Manure
Ranches, dairy farms, horse stables—and anywhere else there is livestock—could be good sources of manure to add to your compost pile.
How to Acquire High-Carbon Brown Material
Straw makes good composting material, as does spent hay. However, if you use hay, be certain that your compost’s temperature is high enough to burn off weed seeds— experts say about 145 degrees Fahrenheit should kill the toughest seeds.
Dried leaves also make good brown composting materials. One way to get leaves in quantity is to take out a classified ad in the local newspaper asking for people to drop off them off during autumn raking season.
Tree-trimming companies also may be willing to supply large amounts of wood chips at little or no cost.
What else will you need to do?
• Find a specific area to put a compost windrow or pile
• Check whether you need any state or local permits
• Be sure you have the equipment you needExisting farm equipment can be used to accomplish much of the composting process. The most costly equipment typically includes a front-end loader and manure spreader. A spreader is very helpful but not absolutely essential.
Cost-share money often is available for capital improvements through the Natural Resource Conservation Service (NRCS). Your farm must be a commercial operation—producing more than $1,000 in revenue annually—to access the NRCS programs.
References
Regenstein, Joe M., David Kay, Paul Turci, and Thomas Outerbridge. 1999. Small to Medium Scale Composting of Food Wastes in New York City. Cornell University and City Green, Inc. Ithaca, NY.
Composting: The Basics
By Tammy Hinman, NCAT Agriculture Specialist
and Richard Myers, NCAT Editor
Published August 2011
©NCAT
IP410
This publication is produced by the National Center for Appropriate Technology through the ATTRA Sustainable Agriculture program, under a cooperative agreement with USDA Rural Development. ATTRA.NCAT.ORG