
Vermicomposting: The Basics
By Richard Myers, NCAT Editor
Abstract
This publication is an introduction to creating and using vermicomposting bins to make compost. It covers the type of worms to use; food and bedding for the worms; introducing the worms to the bin; maintaining the worms through proper feeding and temperature regulation; and removing the compost from the bin. It also discusses various kinds of bins and how to make them. Finally, it includes a troubleshooting” section with frequently asked questions concerning problems that might arise with a vermicomposting system.
Introduction: What is Vermicomposting?
Simply put, vermicomposting is the practice of using worms to turn waste into compost. Of course, it isn’t unusual for worms to be involved in other kinds of composting: a compost pile of any kind that’s open on the bottom will attract worms if they’re in the area. Build it and they’ll come.
But vermicomposting is almost like worm ranching: you provide the worms, their feed, their bedding, and a place for them to live. And in return, you’ll get a nutrient-dense soil amendment in far less time than other kinds of composting takes.
Vermicomposting is an inexpensive way to help nourish your plants and gardens, and you can get started any time of the year. And since the worms’ food and bedding are often food scraps and other waste that would otherwise be thrown away, vermicomposting is a sustainable practice the whole family can do together – never underestimate the attraction of worms for kids. This publication will detail what you need.
How Is Vermicompost Created?
Composting is a matter of getting just the right combination of “brown” materials high in carbon, such as straw, paper, etc., with “green” materials that are high in nitrogen, such as plants. Then, basically, you let them decay. Micro-organisms and some macro-organisms – such as worms – break the material down into compost. Good compost will smell like good earth, rich and fertile. It can add essential nutrients to the soil and improve the soil’s structure (Hinman and Myers, 2012).
Vermicomposting, with its reliance on worms to do the bulk of the work, is a relatively fast way to make compost. That’s not to say there are no micro-organisms or other macro-organisms in the mix, but the worms are definitely the star of the show.
When it’s ready, vermicompost is a harvest of worm “castings,” which are pure worm waste, along with the leftover worm food and bedding, the worms themselves, and the supporting cast of micro-organisms.
Besides the speed factor, vermicompost is very rich in nutrients. However, it isn’t as effective as other types of compost for improving soil’s structure. It’s also a good source of compost for making “compost tea” (Diver, 2002).
Because vermicomposting is a relatively quick process, you can store it to be used later. We’ll get into harvesting the compost later, but first let’s take a look at the worms’ habitat – the vermicomposting bin.
The Bin: Will That Be Wood or Plastic?
There are lots of different options for making a worm bin. Of course, you can purchase one online or at many agriculture supply stores, but they aren’t difficult to make. There are many plans available for building vermicompost bins from wood.
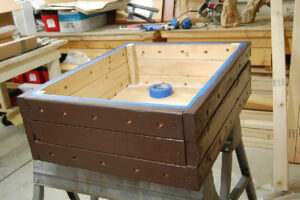
A wooden worm bin is being built. Photo: NCAT
If you do build a bin from wood, it’s important to remember not to use treated lumber. The chemicals that are used to treat lumber can leach into the soil in the bin, which is not good news for your worms. Learn more about natural alternatives in the ATTRA publication Pressure-Treated Wood: Organic and Natural Alternatives. Another popular option is to make bins from opaque plastic storage containers.
It’s an easier process than building a wooden container, and people often have spare containers around the house. Some experts recommend wooden vermicompost bins because they are more absorbent, better insulated, and provide better air flow (Dickerson, 2001). But it certainly is possible to build successful plastic bins, and many people do.
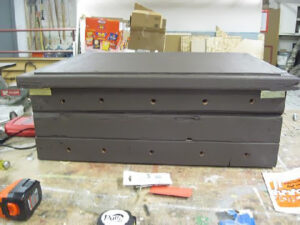
The completed worm bin. Photo: NCAT
Whatever you decide to make your bin out of, it should have certain components:
- The bin itself
- A tight-fitting lid
- A worm-friendly location
The Bin
Worm bins require good ventilation and drainage to keep the moisture, oxygen, and temperature at good levels. That means you’ll need to drill ¼-inch to 1-inch air and drainage holes along the sides and bottom of your bin.

Example of a worm bin. Graphic: NCAT
And since the bins require good drainage, it’s important to have something for them to drain into. In the case of a bin made from a plastic storage container, you can simply place your bin inside another container of the same kind. Put something in the drainage container, maybe a brick in the middle, to create a space for water to drain into if the containers fit together too snugly. Make sure that whatever you use to create that space doesn’t block the drainage holes.
Drainage containers for wooden bins should be part of the design.
The water that drains out of a vermicomposting bin will be rich in nutrients – it’s called compost tea – a plus for your garden plants.
The Lid
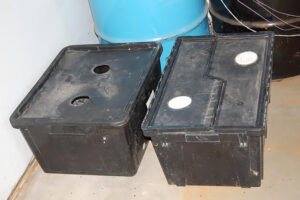
Modified plastic containers make great worm bins. Photo: NCAT
The lid needs to be tight-fitting to help regulate the temperature inside the bin and to keep from penetrating the bedding and getting to the worms. Worms and light don’t mix. An hour in sunlight will paralyze a worm and just a few hours of sunlight can kill it. Besides, you want your worms to be looking for food, not dodging the light.
Location
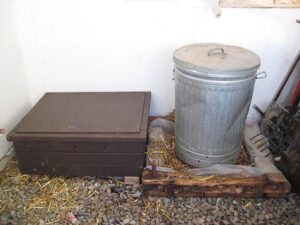
A vermicompost bin is placed in a greenhouse next to a trashcan composter. Photo: NCAT
The worms you will be using prefer temperatures between 65 and 80 degrees Fahrenheit. Where you place the bins will depend on where you live – in northern areas, bins that aren’t extremely well insulated should be indoors during the cold months. Garages can be good locations for bins, and some people keep them inside the house, often in basements, utility rooms, and laundry rooms.
Keeping the bins inside is a good way to regulate its temperature, but it could also bring unwelcome visitors like fruit flies.
Bins that are kept on the ground outside don’t necessarily need to have a solid bottom or base. But if the weather is going to get cold, it will be necessary to add one and insulate the bin or move it inside (Dickerson, 2001).
During good weather, outdoor bins should be out of direct sunlight and in the shade.
Wherever you place your bin, be sure to monitor its temperature to make sure the environment inside is good for your worms.
How Big Should My Bin Be?
The size of your vemicomposting bin should depend on how much food you’ll be providing. A good rule of thumb is that the surface area of the bottom of the bin should be one square foot for each pound of food that’s going into the bin each week (Oregon Metro, 2010).
So a family that produces six pounds of food waste for the bin each week should have bin space with six square feet of surface on the bottom. They might make a bin with a 2-foot by 3-foot bottom. They also could come close with two bins with 1.75-foot by 1.75-foot floors.
The bins should be relatively shallow, between 8 and 18 inches.
Food and Bedding. And Sand?
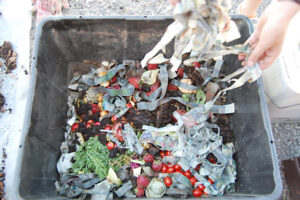
Produce nearing the end of its shelf life makes great worm feed. Photo: NCAT
The recipe for successful compost is a well-managed mix of “brown” and “green” materials. Brown materials are high in carbon, and green materials are high in nitrogen. The ideal ratio for compost is 30 parts of brown materials for every one part of green materials. Vermicomposting is no exception to this 30-to-1 formula.
It’s helpful to refer to the brown, carbon-laden, materials in your bin as the bedding. The green, nitrogen-rich, material is the food.
Food
Worms can eat all sorts of different kinds of organic material. But like any livestock, you want to make sure they get the vitamins, minerals, protein, and carbohydrates they need to thrive. So many kinds of food waste make good worm food, it’s probably easier to list what not to include:
-
-
- Fatty and oily food should be avoided because it will slow the speed at which bacteria breaks down the materials into compost and can cause the conditions in the bin to be more acidic.
- It’s best to avoid meat and bones, fish, fat, and other animal by-products, as well as dairy products, because they can attract flies, rodents, and other pests.
- Don’t use pet or human manure. Livestock manure is fine, as long as it’s free of antibiotics or, naturally, deworming medications.
-
Worms don’t have teeth. That’s a good thing when you’re wrangling them, and it’s a clue that they handle small bits of food better than large ones. So if you break up the food before you give it to the worms, the composting will go much more quickly. Some people even run the food through a food processor to really speed up the process.
You can add food to your bin at any time without interrupting the composting process. It’s a good idea to add food to your bin once a week. Monitor how quickly the worms are going through their food. That will help you learn when to add more food and make sure you aren’t overfeeding your worms.
Bedding
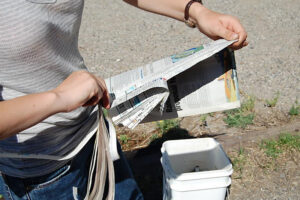
Newspaper torn into strips makes excellent worm bedding material. Photo: NCAT
The bedding does break down, of course, but it does so much more slowly than the food. Generally, the bedding will be made up of coarse materials that don’t pack down tightly. That means it can help maintain oxygen levels by creating air pockets. It also helps maintain the right moisture level in the bin by absorbing excess from the food. Here are some typical examples of bedding for a vermicomposting bin:
-
-
- Shredded paper such as newsprint, paper bags, cardboard, and office paper
- Sawdust
- Composted animal manure such as chicken, rabbit, duck, and goat manures
- Shredded, drying leaves
- Straw
- Aged grass clippings
-
You will need to top off the bedding in your bin every couple of months. It’s always a good idea to vary the bedding materials you use to provide a richer source of nutrients for the worms. Also, be careful about using too much of materials that may have been treated with chemicals, such as office paper.
Soil and Sand
Worms have something in common with chickens – a gizzard. That means they need grit to help them “chew” their food more easily. So add sand or clean garden soil to your bin. A few eggs shells also can make their way into the worms’ gizzards, but remember that the shells may attract pests.
Oxygen
Worms take in oxygen through their skin when it’s properly moist. So it’s important to incorporate coarse materials in your bin’s bedding; they make air pockets that will help keep the bedding from getting matted. Matted bedding keeps oxygen from circulating around your bin, which can endanger your worms and the microbes that help them break down the materials in the bin to create compost.
It’s also important to keep an eye on how moist the bedding is. If it is water-logged, that will also block the flow of oxygen and parts of the bin will become anaerobic, or oxygen-starved.
If your bin isn’t getting enough oxygen, you will be able to tell by the foul smell of decay as anaerobic microbes take over. Keeping your worms healthy will also keep your bin from smelling like a garbage can.
Moisture
A worm can’t breathe well if its skin too wet or too dry. So having the bedding at a proper moisture is critical. Many people who do vermicomposting buy a moisture meter to check their bins; an ideal moisture level for worms is 65 to 70%. A more old-fashioned way to measure the moisture of the bedding is to squeeze a handful. If you can get just a few drops of water between your fingers, the moisture is likely okay.
If you need to add water to the bedding, you can do so with a household gardening can.
If the bedding is too moist, the worms will be sluggish and their breeding rates will decrease. A bin that’s too dry will have your worms struggling to breath, and flies and other pests might move in.
Be sure that your bin is designed to drain away and collect any excess moisture that can become compost tea.
pH Levels
The acidity or pH level of the water is rarely a problem. The ideal pH range for worms is 5 to 9. It is important to remember not to feed oily food to worms because it can slow down the rate that bacteria breaks down the food and can cause the water pH level to become more acidic.
How Many Worms Do I Need?
It’s a good general rule to stock your bin with a pound of worms for every cubic foot of space in the bin. So, for example, a bed that is two feet long, two feet wide, and one foot deep would need about four pounds of worms.
Here’s a simple way to determine how many worms you need:
-
-
- Measure the length, width, and depth of your bed in inches. In our example, that would be 24 inches long, 24 inches in width, and 12 inches in depth.
- Multiple those numbers together. In this case, 24 x 24 x 12 = 6,912.
- Divide that number by 1,728, which is the number of inches in a cubic foot. In this case, 6912 ÷ 1728 = 4.
-
For information on large-scale or commercial composting, see the ATTRA publication Worms for Bait or Waste Processing (Vermicomposting).
What Worm Species Works Best?
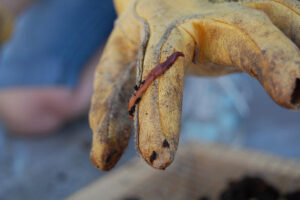
An Eisenia fetida worm, commonly known as a red worm. Photo: NCAT
The standard species of worm used in vermicomposting is known in science textbooks as Eisena fetida. They’re more commonly called red worms, brandling worms, or tiger worms. They’re ideal for vermicomposting because they reproduce rapidly and tolerate being kept in a bin well.
They prefer temperatures of 65 to 80 degrees Fahrenheit, and, as we will see, that preference will have a lot to do with where you decide to keep your vermicomposting bin.
The kinds of worms you’re likely more familiar with, such as common garden worms, don’t work well for vermicomposting because they aren’t capable of breaking down high levels of organic matter. But even though you can’t just go out in your garden and round up worms, red worms are readily available online and at some agricultural supply stores if you aren’t lucky enough to have a local worm farm.
How Do I Introduce and Maintain My Worms?
There are a number of steps to get your bin ready for your worms:
-
-
- Determine how much food you will have available for your worms each week and consequently how big your bin should be. Remember, a good rule of thumb is to have a square foot of space on the bottom of the bin for each pound of food.)
- Determine the appropriate amount of bedding, based on the 30 parts bedding to one part food rule. Another rule of thumb is that when the bedding is moistened, it should fill the bin three-quarters of the way to the top (Dickerson, 2001).
- Determine how many worms you will need. The rule of thumb here, as we saw earlier, is a pound of worms for every cubic foot of space in the bin.
- Be sure that the ventilation and drainage holes in your bin are in the right place and won’t be blocked once the food and bedding is added.
- Find a suitable spot for your bin that is out of the light and allows the bin to be kept at between 65 and 80 degrees Fahrenheit.
-
Once you have all the planning done and the supplies you need, the first step is to moisten the bedding to about the consistency of a damp sponge before you add it to the bin. Remember the rule of thumb that the bedding should reach about three-quarters of the way to the top of the bin (Dickerson, 2001).
Next, add a small amount of sand or clean garden soil.
Then, it’s time to add the feed. Pull back the top layer of the bedding, spread out the feed, and replace the top layer of bedding.
Now for the worms. Simply add the worms directly on top of the bedding. They will disappear within a few minutes as they head toward the bottom of the bin to look for food. After the worms are in the bin, fluff up the bedding slightly to make sure there’s enough air space for the worms to breathe.
Maintenance
Add food and check the bin’s bedding moisture regularly. For most people who use kitchen scraps for their vermicompost, every week or two should work depending on how fast the worms are consuming the food. The worms may eat only the food at first. Eventually, though, the bedding will break down far enough for the worms to consume it as well. At that point, you will need to add more bedding. Be sure that it’s moist, just like the bin’s initial bedding.
It’s likely that some of the bedding won’t be broken down when you harvest your vermicompost. But that bedding isn’t wasted. It can go right back in into your bin for the next go-around.
When you add food, do it in a different spot in the bedding each time. Be sure to pull back part of the bedding, add the new food, and then place the bedding back over the new food. This will help avoid attracting flies, rodents, and other pests (Dickerson, 2001).
Be sure to top off the bedding in your worm bin once every month or so even if you haven’t recently harvested your bin. And make sure to vary the bedding materials you use to provide a rich source of nutrients.
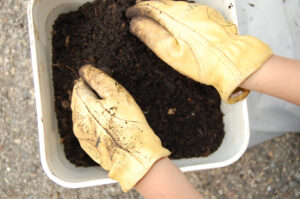
This bucket contains finished and fully separated vermicompost. Photo: NCAT
How Do I Harvest My Vermicompost?
When there is significantly less bedding in the bin and castings have gathered at the bottom, you’re ready to harvest. The trick of harvesting your vermicompost is to not harvest your worms along with it. Here are a few ways to harvest the castings and leave behind the worms and bedding that didn’t break down.
By Hand
This is a simple process, but it has several steps and can is definitely labor-intensive. The good news is that kids love to help.
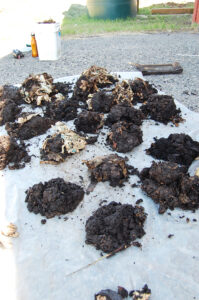
Worm bin castings have been removed from a worm bin and placed into piles that are ready to be separated out into vermicompost. Notice that the piles have been placed on a plastic sheet and are being kept out of direct sunlight. Photo: NCAT
First, remove the bedding and the castings and put them on a sheet of plastic or some other roomy surface you don’t mind getting dirty. Next, use your hands to separate the castings and bedding into several small cones or mounds. Keep a good chunk off to the side to place the worms onto as you remove them one pile at a time.
The worms will move the bottom of the mounds to get away from the light, which does make it easier to find them. If they don’t seem to be moving quickly enough, you can shine a light at the mounds to spur them along.
Once all the worms have been separated from the castings, remember that any bedding that didn’t break down can be used in your bin again.
Fresh vermicompost is ready to add to soil after it has been hand sorted and screened. Photo: NCAT
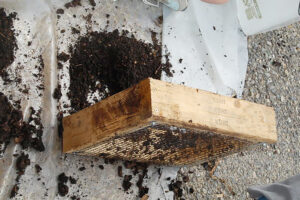
With a Screen
For this option, you will need a box with a screen on the bottom. The screen should have a mesh of about 3/16 to ½ of an inch. Empty the bin onto the screen as space allows, and the small mesh will allow the castings to fall through but not the worms.
You will need somewhere to place the worms; perhaps replace the bedding in the bin and put them there. Once again, any bedding that isn’t broken down can be placed back in the bin.
Move ‘Em Out
You could also put the old bedding on one side of the bin and add new bedding and food on the other side of the bin. In order to keep the two sides separate, you might want to put a screen with a mesh large enough for the worms to get through between the two sides.
The worms will migrate from the old bedding to the new bedding looking for food, although it can take up to a month for them to make the move. Once the worms are in their new digs, you can scoop out the castings and old bedding on the side with no worms and add new bedding and food there. Then repeat the process once the worms have moved again (Oregon Metro, 2010).
Vermicompost Troubleshooting: What’s Going Wrong Here?
The worms in a well maintained vermicomposting bin are living the good life. They have no reason to be stressed out, so it’s pretty obvious when there’s a problem (Oregon Metro, 2010):
-
-
- Worms are climbing up high and escaping the bin.
- Worms are staying low and not coming up to feed.
- Worms are massed together in a ball.
-
A vermicomposting bin that’s having maintenance problems often will have a number of noticeable symptoms. Here are some symptoms and some strategies for dealing with them.
Why Does My Worm Bin Have a Foul Odor?
You may be overfeeding, which can be a boon to the anaerobic microbes that cause the bad smell. If so, break up the feed in the bin to allow more air to circulate through it and add some dry bedding below the feed. Don’t add feed to the bin for a few days.
The bin may not be getting enough air. If this is the case, use a gardening fork or other tool to turn and fluff up the contents of the bid. If there are areas that seem to be concentrated with anaerobic bacteria, remove them and add dry bedding.
The bin may be too wet. If the bin has standing water, add dry bedding to the bottom and top to absorb it. Turn and fluff the contents of the bin to increase the air flow in the bin. Also, check to see that no drainage holes are blocked.
If you put meat or dairy products in the bin, it also could cause a rotting smell. Remove it as soon as possible.
Why Are My Worms Dying?
The bin may have too much moisture. If the contents seem to be too wet, drain any excess water and add dry bedding throughout the bin. Don’t add any more water or feed until the moisture in the bin is at a more desirable level.
On the other hand, the bin may not have enough moisture. If that appears to be the case, add water with a watering can or a spray bottle. Then add some damp bedding to the bin.
Even worms have to eat, and the bin may not have enough food. If you’ve had your bin up and running for a while, it may be time to harvest. But if the contents don’t appear to be ready to harvest, add some food for the worms.
The bin may be too cool or too warm. Remember, the ideal temperature range for a vermicompost bin is 65 to 80 degrees Fahrenheit. Take a thermometer reading and move the bin a new location that matches that temperature range. If the bin is outside, you could move soil or other insulation around it. But if the temperature is too far from the ideal range, moving the bin indoors could be the best option.
What’s With the Flies?
It could be that you’ve used too many kitchen scraps in your bin. Remove the flies and add more bedding. If possible, put fly traps around the bin and don’t add any food waste for a week. If you still have flies, try sucking them out with a vacuum cleaner. Eventually, you may find it necessary to completely change the bedding and clean the bin.
It may also be possible that the food scraps you’re adding to the bin are already infested with fly larvae. If you’re saving scraps of food before you place them in the bin, it’s a good idea to keep them in a closed container to keep them from being exposed to flies and other pests.
Conclusion
There’s more than one way to build a compost pile. But harnessing the appetite of worms can make the process much faster and more efficient – as long as you pay attention. In other ways of composting, the worst thing that can happen if you let things slide is a funky smell letting you know the compost hasn’t been turned enough or is too moist. With a vermicomposting system, on the other hand, the worst thing that could happen is your worms could die. But if you approach vermicomposting as a worm ranch, a system designed to keep your wiggly livestock healthy – the right temperature, moisture, and oxygen levels and a steady source of food and bedding – chances are you’ll do fine.
And the fact that your worms need you and provide periodic harvests of compost throughout the year makes vermicomposting a terrific way to get the whole family involved in an ongoing sustainable practice with easy-to-see results: beautiful flowers and bountiful vegetables. It’s a lesson worth learning.
Build It and the Kids Will Come
It’s easy to get kids’ attention with a “limo” full of worms. Getting them to listen to you afterward is the tricky part.
AmeriCorps volunteer Camille Green was in charge of the National Center for Appropriate Technology’s (NCAT) Small-scale Intensive Farm Training program (SIFT) at Sustainable Intensive Farming program at NCAT’s headquarters in Butte, Montana.
She was looking for new ways to get 4-H clubs in the area involved in sustainable agriculture projects; previously SIFT worked with some are 4-H’ers on “micro sustainable farms” – container tubs that are watered from below to avoid losing water to evaporation.
They learned about sustainable ag and how to plan their farm and measure its inputs and harvests. A number of them used the portable, well … relatively portable, tubs as projects in the county fair. Camille was looking to tailor the experience as much as possible to the kids’ interest. And that meant worms.
“I knew I didn’t want to just sit there and talk at them, so I put together a “worm limo,” – a plastic worm-carrying case and brought all the equipment I needed to show them how to harvest worms and worm castings and to change out worm bedding by hand,” she said.
As the kids dug in, Camille tried to present an overview both of worm composting and hot composting. The parents at the meetings seemed interested in the science, she said, and asked a lot of good questions about compost. The youngsters, though, made a bee-line for the worms.
“The lecture always quickly devolved into all of us just playing with worms,” she said. “That’s great, though. If the parents are interested in the mechanics of it, and the kids are maybe just interested in getting their hands dirty and playing with worms, I see that as a success.”
One 12-year-old 4-H’er was unabashedly onboard. “Yeah, yeah, I want to do this,” he said with a toothy grin, holding a handful of worms up for a photo. On the other side of the table, a cluster of newly hatched worms fell with a plop, and a young girl’s voice chimed, “Ooh, I hate nature.” But she laughed with the others, and no one left the show. That, Camille said, is a good sign.
“In my mind one of the best strategies for getting children involved in sustainable agriculture is showing that it’s really fun, hopefully more fun than watching TV or playing video games,” she said.
But it isn’t all work, as much fun as that can be. Camille also took her worms on the road to spend some time with the Butte-Silver Bow Montessori. The school has a summer garden camp, and Camille taught some of the students, who range from preschool to elementary school age, about worm composting and helped them make their own bin.
“I also taught them a worm-composting song and dance, which my roommate graciously taught to me, that includes a chant: ‘Chomp chomp, wiggle wiggle, poop poop. SOIL!’ It was a big hit.” It might not be surprising that teachers said the chant had “gone viral” at the school.
Vermicomposting: The Basics
By Richard Myers, NCAT Editor
Published October 2013
©NCAT
IP454
Slot 460
This publication is produced by the National Center for Appropriate Technology through the ATTRA Sustainable Agriculture program, under a cooperative agreement with USDA Rural Development. ATTRA.NCAT.ORG
