
Paddock Design, Fencing, Water Systems, and Livestock Movement Strategies for Multi-Paddock Grazing
By Lee Rinehart, NCAT Agriculture Specialist, and Justin Morris, NCAT Regenerative Grazing Specialist
Abstract
This publication covers both the practical aspects and theory of adaptive multi-paddock grazing. It discusses shape and size considerations for paddocks and introduces a range of equipment options for fencing and water systems. Sources of technical and financial assistance and further resources are provided. A detailed appendix presents numerous approaches for moving livestock between paddocks.
Introduction
Adaptive multi-paddock grazing describes the type of management that involves observing conditions, putting a practice into place, and adapting as conditions change. This grazing management relies on “short grazing periods, adaptively changing recovery periods, residual biomass, animal numbers, and other management elements as conditions change” (Teague and Barnes, 2017).
Adaptive multi-paddock grazing necessitates setting up a grazing system that is flexible, allowing the grazier to manage for optimum recovery of forages and to increase overall forage dry matter production. This publication discusses the logistics of setting up a multi-paddock system, including the elements of paddock design, moving animals, tips to get started, and resources for technical and financial assistance. It also offers resources for further study.
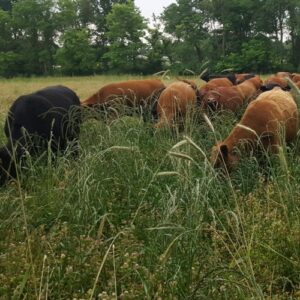
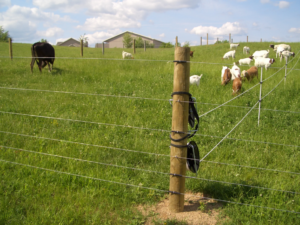
Photo: Understanding Ag, LLC
Adaptive grazing is goal-oriented, focuses on stock density and not stocking rate, and is necessarily flexible. Rotations, grazing-residue heights, rest periods, and grazing seasonality are never the same throughout the year. This grazing system uses frequent movement and adequate pasture rest for plant root-system recovery, and is highly reliant on temporary fencing (Williams, 2016). In an episode of ATTRA’s Voices from the Field podcast, Episode 127. Allen Williams and Adaptive Stewardship Management Grazing, NCAT Agriculture Specialist Lee Rinehart talks with rancher and grazing educator Allen Williams about what he calls adaptive stewardship management grazing and how this could increase the supply of livestock on the market as it helps solve many issues currently associated with animal agriculture.
Designing paddocks and animal movements means following some basic principles of adaptive grazing. There are some principal concepts to follow when developing an adaptable grazing system:
- Goals – What do you want to get out of your grazing system? Ease of use? Simplicity and saving money? Forage harvest efficiency? Improvement in forage yield and diversity? Improvement in water quality? Safety of animals from predators? Managing for wildlife habitat? There are as many goals as there are graziers. Understanding your goals can help you plan and avoid building a system that doesn’t meet your needs.
- Animal species – What are the dominant forage species present? Are the forages matched with the animal species you’ll be managing? Will you graze one species or multiple species together? What kind of fencing and watering systems will you need? The species of animals you raise will determine the type and kind of fencing, watering systems, and handling equipment you will need.
- Grazing period – How long will the livestock be in a paddock before you move them to new forage? Understanding your forage yield, or how much grass is available for grazing while allowing for a residual after grazing, is important for correctly sizing paddocks.
- Recovery period – How long does the forage need to rest after a grazing event until it is grazed again as fully recovered plants? Knowing how long your forages need to fully recover is an important factor in determining how many paddocks you need. For more information see the ATTRA blog The Impact of Grazing Frequency and Recovery Period on Plant Diversity and Soil Health.
- Stock density – How many animals will be grazing at one time on a particular paddock on a per-acre basis? How much impact do you want the animals to provide on the landscape? How will you manage to prevent overgrazing and encourage efficient forage utilization? Generally, stock densities of 100,000 pounds liveweight per acre—or greater—significantly reduce selectivity and increase grazing uniformity across the paddock.
- Animal impact – What does the landscape need to thrive? How can animal impact, through hoof action, grazing, and manure deposition, influence regrowth and forage diversity? Livestock can be used to renovate overgrown and weedy pastures and build soil carbon reserves by grazing plants in the elongation growth phase or later and by trampling ungrazed forages onto the soil surface.
- Adaptation and flexibility – The needs of soils, plants, and livestock are changing throughout the year and from paddock to paddock. Develop observational skills and be prepared to constantly adjust the four dimensions of grazing management: timing, duration, frequency, and intensity (stock density).
Next, we’ll go into detail on the elements of paddock design, discuss the parts of an effective fencing and watering system, and explain how to obtain technical and financial assistance.
Elements of Paddock Design
The best way to begin setting up your grazing system is to start with what you have. If you are just starting out with a large, open pasture where livestock spend several weeks or longer, consider using electric fencing to section off a small piece that would provide sufficient forage for a few days and turn the animals in. Watch them and notice their grazing behavior. Do they scatter about the paddock or stay in a bunch? Do they graze awhile then scatter out and lay down? Notice the condition of the forage after they have been grazing. Is it grazed hard or close to the ground? Are there tufts of bunchgrasses and forbs that weren’t grazed? Is some of the forage matted and trampled down? All these are clues as to how well you sized the paddock, and how well you timed their grazing.
The principal elements of grazing system design covered below include paddock shape and size, vegetation types and biomes, fencing and watering systems, and livestock walkways. The goal of the grazier is to bring these elements together to design a system that is simple and flexible.
Paddock Shape and Size
Ideal grazing paddocks are often conceptualized as flat, symmetrical squares. Square paddocks can work for encouraging uniform grazing and, thus, uniform manure distribution. But, in reality, many farms are not flat and have some slope and aspect to the landscape. Graziers also need to consider the presence of streams, marshes, trees, and other obstacles. Livestock may prefer to graze some slopes or flat areas more than other parts of the paddock. If a paddock has a lot of variation in this aspect, it may be poorly utilized because some areas will be overgrazed and others under-grazed. In this case, it is best to fence according to the landscape or use temporary fencing to control access within the pasture.
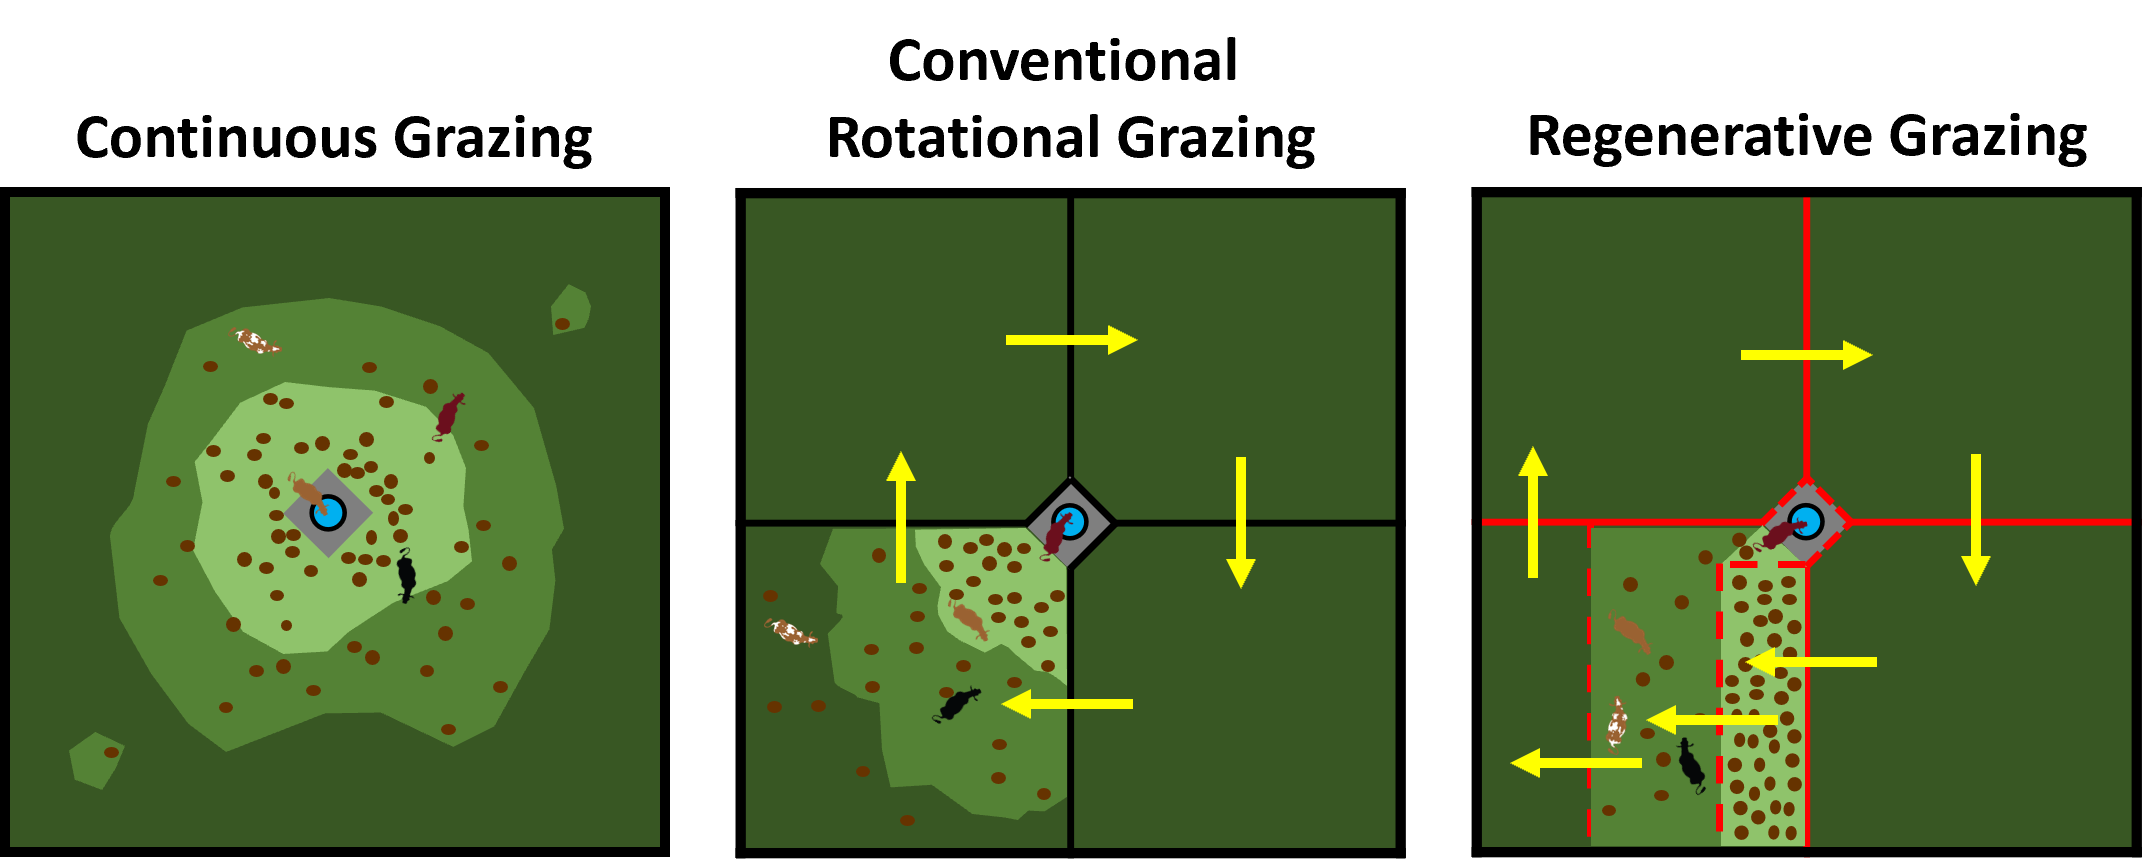
Figure 1. Grazing and Manure Distribution of Three Different Grazing Strategies. Source: Justin Morris, NCAT
Under continuous grazing (left figure), livestock have constant access to 100% of the pasture, resulting in 0% of the pasture recovering. Plant closest to the water trough are grazed down very short (light green). Plants further away are either grazed down very short or not at all (medium green), resulting in a patchy grazing pattern. Plants farthest away are mostly ungrazed, eventually becoming very mature and unpalatable (dark green). Nutrient distribution from manure and urine is very poor, as most is concentrated around the water trough, mineral tubs, or shaded areas.
Under conventionally managed rotational grazing (middle figure), where livestock rotate between four fields, for example, they access 25% of the pasture at a time, resulting in 75% of the pasture recovering. Some plants are grazed to a very short stubble height, while other plants are left completely ungrazed, creating a patchy appearance. Nutrient distribution from manure and urine is improved somewhat compared to the continuous grazing scenario because each field is considerably smaller. But plants may not fully recover before animals are once again grazing the same paddock.
Under a regenerative grazing approach (right figure), improving soil health while maintaining animal health/performance is the primary focus. Forage quality, quantity, livestock nutritional requirements, and soils are constantly monitored to determine on-the-go changes to paddock size and how long livestock spend in one location. Livestock rotate between 12 or more variable-sized paddocks, grazing on 8% or less of the pasture, resulting in 92% or more of the pasture recovering. Since each of the four fields is divided into several paddocks, each paddock is considerably smaller, allowing all plants to be grazed some. Nutrient distribution from manure and urine is uniform, since each paddock is very small. Graphic: Justin Morris, NCAT
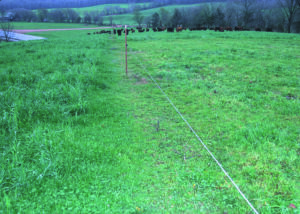
Some graziers suggest that narrow or oblong paddocks don’t work very well because livestock graze one end of the paddock more severely or shorter than the other. This can be true in situations where fields are very large relative to the number of livestock and graze periods are long. But if the same field is divided into long, narrow strips using portable electric fence to create multiple paddocks so that livestock spend a day or less in one area, livestock graze the whole paddock more uniformly. This allows the entire field to be grazed with the same level of severity while also improving manure and urine distribution (see photo below).
Paddock Shape Considerations
Long, narrow paddocks can be extremely versatile, depending on what your goals are as a grazier. For example, if the species and class of livestock are finishing cattle, for which high rates of gain are a priority, one strategy would be to advance the whole length of polywire ahead at the same time so that livestock simply walk forward a few feet to access fresh forage in the next paddock. Then, after three to five days, a back fence of polywire could be installed to prevent livestock from grazing the preceding paddock, so that they don’t consume new growth. See Figures 1 through 11 in the Appendix for example layouts that maximize high rates of gain.
When trampling forage is the priority, it’s best to use livestock that have lower nutritional needs than finishing livestock. A strategy to promote trampling is to create a 10- to 20-foot-wide opening at the far end of the next paddock, preferably where the fence reel is located. Instead of livestock being allowed to walk forward a few steps to access fresh forage, livestock in this scenario can only access the next paddock by walking to the far end. This strategy encourages a lot of trampling because all the livestock enter the paddock through one small opening. As livestock enter the new paddock, when one animal stops to graze, the animal behind it walks past the one grazing before it stops to graze. This pattern of one animal passing another continues until they reach the far end of the paddock (see Appendix, Figures 12 to 25 and 34 to 38).
For leader-follower systems (where livestock with higher nutritional needs are placed in the paddock just ahead of livestock with lower nutritional needs), as well as grazing in wheel line and center pivot irrigation systems, see Figures 16 to 38 in the Appendix for ideas on potential paddock shape, livestock movement, and water placement.
Paddocks should be sized to facilitate uniform grazing. Photo: NRCS
Generally, paddocks should be small enough to promote uniform grazing. Paddocks can be adjusted in size as the season progresses and forage growth slows down. If you must keep animals on a paddock for more than a few days to graze to a set stubble height, this probably indicates surplus forage, which can occur early in the season. If the animals cannot keep up with forage growth during the early season, there are at least two options to consider. One is to reduce the size of the paddocks and cut some of the forage as hay. The livestock can be turned onto the mowed fields later, after appropriate recovery of the pasture.
A second option during fast forage growth is to make paddocks larger so that livestock graze over the fields very quickly—a strategy known as flash grazing. This falls in line with the adage, “When forage grows fast, move (or rotate) livestock fast, and when forage grows slow, move slow.” The principle is that livestock should be moving through the rotation at the rate forage is regrowing. This requires consistent monitoring, kind of like driving a car. You must monitor the road ahead of you and your surroundings, then exert control through the steering wheel, brake, and accelerator to make sure you arrive at your destination and don’t crash. The same principle applies with plant growth. You must monitor the rate of plant growth and then exert control through modification of paddock size and graze period to ensure livestock move through fields at the rate plants are regrowing, to prevent overgrazing.
Paddock Size and Stock Density
How can we best determine how big our paddocks should be and how many animals should graze a given paddock? Perhaps, given the flexible nature of adaptive grazing, it’s best to make an initial determination and adjust as the season progresses. You can build permanent paddocks, but landscapes are seldom uniform, and having the ability to adjust paddock sizes based on productivity goals, animal numbers, or pasture renovation goals is important. Portable electric fence works best for dividing pastures into paddocks because it allows us to change the size and shape of paddocks as forages respond to grazing and seasonality of growth progresses.
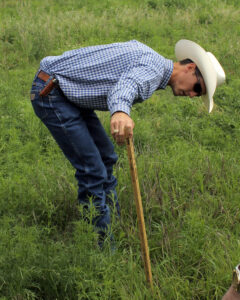
A grazing stick is useful for assessing forage height and density. Photo: NCAT
Imagine you have 50 beef cows, and you want to turn them out into a well-established, dense pasture. How big should the initial paddock be to start the rotation? We first determine the total forage demand for the herd and divide that by the forage available for grazing. If you want to increase the impact on the pasture (through trampling, hoof action, manure, etc.), you can reduce the paddock size, which will increase stock density. If you need to reduce stock density, simply make the paddock a bit bigger. You can adjust (or adapt) based on your observation of how the animals are performing in the paddocks and how the forage recovers after each grazing event. For specific instructions on calculating paddock size and stock density see page 13 in the ATTRA publication Pasture, Rangeland, and Adaptive Grazing.
Vegetation Types
When designing a grazing system, consider differences in the productivity of the land. For example, in a two-day rotation, some paddocks may need to be larger than others to have the same amount of forage available. Many factors go into this equation because landscapes sometimes change abruptly even within a pasture. You might also see differences in vegetation types. In fact, you WANT to see differences in vegetation types. The more diverse, the better. Livestock prefer to graze pastures that express a wide diversity of plants and will consume particular plant species depending on their nutritional requirements. This has often been called nutritional wisdom (Howery et al., 2010), and once an animal has satiated itself on one species, it will select another that may have a different micronutrient or secondary chemical profile.

Native warm-season grasses like big bluestem are managed differently than cool-season grasses. Photo: NRCS
Different plant species have different growth patterns and seasonality. In the spring, cool-season plants grow very rapidly because their optimum temperature for growth is between 65 and 75ºF. In the summer, warm-season plants grow very rapidly because their optimum temperature for growth is between 90 and 95ºF. Cool-season plants recover from grazing slower than warm-season plants when daytime temperatures are at 90ºF or more. Warm-season perennials tend to come on later in the season than cool-season perennials. Annuals should be grazed differently than perennials to achieve an acceptable stubble height post-grazing to allow for rapid regrowth. All these considerations need to be weighed when planning how big the next paddock in the grazing rotation will be. Review the section above on Paddock Size and Stock Density and think about how differences in plant types within your paddocks will impact forage availability and, thus, the size of the paddock.
Biome, Precipitation, and Adaptive Management
A factor that affects variability in vegetation types is the biome or ecosystems in which they grow. We have temperate zones, semi-arid zones, and lots of diversity between them. Annual precipitation, soil types, and adapted plant species are some of the factors that characterize various biomes. Temperate pastures are characterized by well-developed soils, 30+ inches of precipitation, and moderate to rapid nutrient cycling. Semi-arid rangelands are typically characterized by 20 inches or less of precipitation, shallower soils, and slow nutrient cycling. Temperate pastures usually have high biomass production and rapid regrowth, whereas rangelands have the opposite. Adaptive management—and, thus, the construction of grazing systems—on each of these biomes will likely look very different in terms of stocking rate, paddock size, and recovery periods, as well as in terms of ecological and production outcomes.
Native rangeland. Photo: NCAT

Temperate grassland. Photo: NRCS
For example, on a pasture in Pennsylvania receiving 35+ inches of precipitation annually, a grazier might be able to maintain animal productivity while increasing the quality and density of forages with ultra-high stock densities, whereas a grazier on native rangeland that receives 10 to 20 inches of precipitation in Montana might see primarily an increase in desirable plants, decreases in undesirable plants, improved ground cover with more live plants per square foot and/or greater litter cover, and pasture-scale changes in plant population dynamics. Higher precipitation pastures receiving 30+ inches of precipitation may recover quickly from high animal impact, perhaps in as few as 35 to 50 days. With sufficient pre-grazed biomass, these pastures can withstand up to 50%of the above-ground plant biomass removed through grazing while still maintaining good soil cover. Pastures in drier environments receiving less than 20 inches—and especially less than 10 inches—of precipitation may require a year or longer to fully recover. These pastures should be grazed less severely, at no more than 25% of the above-ground biomass. As well, seasonality of grazing, while important for temperate pastures, becomes even more important for grazing rangelands. “Adaptive management (on rangeland) considers the premise that plant species may be influenced differently by grazing which occurs during alternate grazing schedules. Other than changing the number of animals being grazed or the days a pasture is grazed, changing the season of grazing (early spring to early fall, early summer to early fall, late summer to winter) may be one of the main tools for influencing ecological effects on the land” (Sprinkle, 2018). Responses to adaptive grazing are highly variable between landscapes, and grazing systems should be planned based on the goals and objectives of the grazier, taking environmental limitations into consideration.
Fencing
Fencing can be a significant cost and should be designed for ease of use and flexibility of paddock size, since paddock size will change as the growing season progresses and goals change. Two types of fences are used in multi-paddock grazing: permanent perimeter fences and temporary electric fences for interior subdivisions. The perimeter fence should be constructed with wood, steel, composite, or PVC T-posts and high-tensile wire. Power from the perimeter fence can be used to charge the inner, temporary paddock fences. Electric Fencing for Serious Graziers, published by the Missouri Natural Resources Conservation Service, provides more detail on fence construction and the equipment used. The parts and equipment needed to construct electric fencing are described below (Kurtz and Frey, 2005, and author experience).
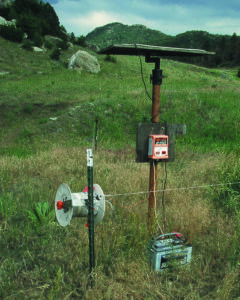
Fence charger with photovoltaic panel and battery. Photo: NRCS
A Charger or Energizer
The power source for electric fencing should be a low impedance, high-voltage charger. These can be powered by a solar panel/battery combination, a battery only, or 110-volt public utility. The NRCS recommends one output joule for every one to four miles of wire, depending on the vegetation load (NRCS, 2017). Remember, this recommendation is for every mile of wire, not every mile of fence. If two wires are energized, you’ll need to double the output joule rating of the energizer. Most people underestimate the power requirement of their fence and purchase too small of an energizer for their needs, thinking to save more money because the energizer is the most expensive component for a power fence. However, well-charged fences deter livestock from challenging the fence, keep predators away from livestock, and help maintain voltage where vegetation loads from tall vegetation can be high.
Grounding Rods
Electric fencing must be grounded to complete the circuit safely and ensure that when livestock touch any two wires (where one wire is energized and the other is a ground return), the animals are shocked, even if standing on dry ground. Proper grounding of the system is essential to proper functioning of the fence. In fence applications, this is usually a minimum of three, 6-foot galvanized ground rods driven to a depth of five and a half feet. Position the ground rods 10 feet apart, in moist soil, and well away from existing utilities.
Wooden, Composite, and Fiberglass Posts
Wood, composite, or PVC T-posts are used for permanent fences, gates, and corner braces. A perimeter high-tensile electric fence should have five to 10 strands, with the top wire at 42 to 55 inches from the ground surface. Every other wire should be energized, and the alternating wires can serve as a ground return. An energized wire around 30 inches from the ground can carry the current to branch off to polywire for paddock subdivisions. Wood, composite, or fiberglass posts work well for perimeter fencing between corners and gates. Fiberglass, composite, and PVC T-posts can be used for corners and gates in polywire applications because the tension on polywire is much less than for high-tensile wire.
For electric fence installations, using posts that are highly conductive (like steel T-posts) is not recommended. Eventually, any insulator attaching the high-tensile wire to the T-post will either crack or break off, allowing the wire to directly touch the T-post and ground out the energizer. And, in portable situations, steel T-posts are heavy and difficult to get out of the ground unless you have a jack or other lifting device.
Composite and fiberglass posts that have no holes drilled in them can be easily relocated using a medium-sized pipe wrench. Simply clamp the pipe wrench on the post and rotate the post clockwise or counterclockwise while lifting on the wrench. Fiberglass posts, especially those that have been exposed to freezing temperatures, should be handled with gloves to prevent slivers.
Tensioners and Insulators
Tensioners are ratchet-operated connections or inline wheel-type tighteners (daisy wheels) that tighten high-tensile wire. High-tensile wire increases in length in the summer and decreases in length in the winter, but a few quick cranks on the tensioner can alleviate this problem and keep the fence functional. Polypropylene, polyethylene plastic, or porcelain insulators are used to isolate wire from wood or steel T-posts. These come in various types, including those that can be nailed or screwed on wood posts with fence staples or snapped onto steel T-posts.
Steel T-posts with clip-on insulators. Photo: NRCS
Ratchet-style wire tensioners. Photo: NRC
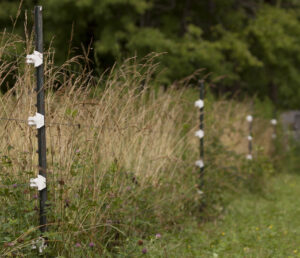
Fiberglass or Step-in Posts
Use fiberglass posts that can be pushed in by hand or step-in posts for temporary fences. Fiberglass posts can split due to weakening of the material from the sun’s ultraviolet light, as well as from freezing. Step-in posts are lightweight, easy to install, and come with integral clips at various heights along the post that alleviate the need for insulators. Temporary posts for polywire or polytape can be set every 40 to 60 feet on flat ground, or closer on undulating ground, and can be moved easily for paddock changes.
High-tensile Wire
High-tensile wire perimeter fence. Photo: On Pasture
High-tensile wire is made of steel or aluminum. Steel wire comes in sizes of 10, 12.5, or 14-gauge. The 12.5-gauge is best because smaller wire like 14-gauge is more resistant to current and harder for livestock and wildlife to see. Thicker wire, like 10-gauge, is more difficult to work with. Aluminum wire comes in sizes of 9, 12.5, 14, 15, and 16-gauge. Steel wire of the same gauge as aluminum wire is less expensive per foot and has a higher breaking strength. On the other hand, aluminum wire is more visible to livestock and humans, conducts electricity four times better, is easier to re-spool, can be hand twisted and tied, is easier to repair and retighten, is rustproof, and can last up to 50 years. Your power supply also might be inadequate to maintain a steady, powerful current with smaller wire sizes. Use crimping sleeves to connect wires together or make loops and use line taps to connect a wire to a wire run. A crimping tool should be used instead of twisting wire together, as crimping makes a better connection. When it is twisted together, wire is weakened and resistance increases. Insulated wire in plastic conduit can be used for burying wire under gates. In these applications, high-tensile galvanized steel or aluminum wire should be used, never regular copper home wiring.
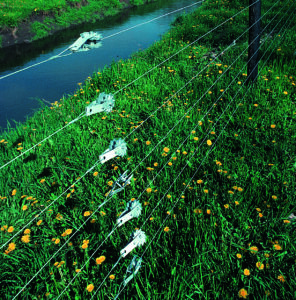
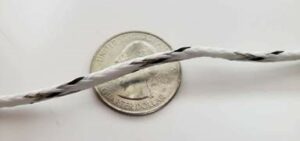
Polywire
Polywire and polytape are used for sectioning off paddocks. Current to charge them can be sourced from a high-tensile wire on an adjacent perimeter fence. Polywire generally has six to nine small strands of stainless steel or tinned copper conductors woven into the polypropylene threads. For paddock subdivisions, one strand of polywire works for cattle and two or three strands are good for small ruminants, depending on how used to electric fencing your animals are. These wires should be set at about shoulder level for the species being grazed. Two strands are appropriate for pigs, oriented about four and 12 inches off the ground. Polytape is more visible than polywire and is generally used around horses. Two polywires can be joined together by twisting conducting wires together, then tying the poly material with a square knot. Polywire can be connected to the electrical source by simply using jumper leads (looks like a very small set of jumper cables) to clip onto the high-tensile wire or another polywire or by hanging the fence reel on the perimeter fence wire and using jumper leads to connect the high-tensile fence to the metal loop on the side of the reel that touches the polywire. For best results, use polywire that has at least six wire strands, as those with fewer strands are not as conductive because of higher resistance.
Polybraid. Photo: Powerflex Fence
Polybraid is a specific type of polywire that is braided rather than twisted. Although it’s initially more expensive than twisted polywire, the advantage of polybraid is that it generally lasts considerably longer because it does not unravel and catch on foreign objects as easily while being dragged across the ground. This can reduce downtime and long-term costs associated with more frequent polywire replacement.
Reels
Reels make the process of unrolling and rolling up polywire very fast and easy. Reels come in two versions, non-geared and geared. Both have their advantages and disadvantages, discussed below.
Non-geared reels are the least-expensive reel type and are better suited for short fencing distances because of the increased effort to roll up the polywire. With non-geared reels, each rotation of the crank handle rotates the reel one revolution. But with a little modification, a non-geared reel can be the fastest way to wind up very long lengths of polywire. This is done by building a mounting rack on the back of a UTV or ATV, on which the reel can rotate freely. A cordless drill connects directly to the axle of the reel where the crank handle would normally be and is operated with the left hand, with the drill turning clockwise. Meanwhile, the right hand in a glove guides the polywire evenly across the inside width of the reel as the polywire is being rolled up. Alternatively, an electric motor powered by the UTV or ATV can accomplish the same thing as a cordless drill. This method allows graziers to wind up several hundred feet of polywire in a matter of seconds, while standing in one spot. Since this method drags the polywire across the field while rolling it, the polywire will likely wear out faster compared to methods that don’t drag the wire across the ground.
Geared reels are heavier and cost more because they contain a gearbox that allows one rotation of the crank handle to rotate the reel three times. This provides easy rolling up of polywire while walking and collecting step-in posts at the same time. Since this approach generally does not involve dragging polywire across the ground for long distances, the polywire will likely last longer before needing to be replaced. It is not recommended to mount a cordless drill onto a geared reel, as the resistance created from dragging the polywire across the ground combined with the speed and torque from the drill can break the gearbox, destroying the reel.
Tools
Finally, graziers can keep necessary tools to construct and maintain electric fences in a truck, ATV, or UTV. These would include a spinner for rolling out wire, plastic fence reels for rolling up polywire or polytape, a hammer for nailing insulators to wood posts, diagonal cutters for cutting high-tensile wire, crimping pliers, crimping sleeves for connecting high-tensile wire, and a ratchet or handle for tightening fence tensioners. Other tools needed are lightning arrestors, surge protectors to protect the system, and a voltmeter to check if the system is energized prior to performing maintenance.
The ATTRA podcasts Episode 191. Electric Fencing 101. Part 1. and Episode 192. Electric Fencing 101. Part 2 discuss ways to use electric fencing for cattle, goats, hogs, and poultry, as well as discussion of NRCS cost-share programs, how to adapt existing fence, and other ways electric fencing can be used to contain and manage livestock.
Water Systems
Water is the most important nutrient for livestock. An adequate water supply is necessary to renew the animal’s body-water content lost daily through milk production, urine and feces, sweating, and exhalation. Water should be delivered to livestock in the most efficient manner possible. Tanks can be placed in each paddock or can be made portable so that they move to individual paddocks as the livestock rotate. Solar pumping systems are effective for delivery from wells or ponds, and low-input technologies such as ram pumps can supply minimum water flow to tanks from running streams and can even pump water uphill if sufficient head is achieved. Ram pumps utilize stream flow to pump water and can lift water from a stream to a tank without electricity. Clemson University has plans and specifications for building a ram pump in their publication Homemade Hydraulic Ram Pump for Livestock Water. Finally, nose pumps can be a great choice for remote areas to supply water from streams or shallow wells. Detailed information on water systems, including further resources, can be found in the ATTRA publication Solar-Powered Livestock-Watering Systems.
Water systems should be designed for ease of operation and maintenance. A typical watering system includes a water source (pond, well, or municipal water supply), a pump, a pressure gauge, piping and fittings, water troughs, and automatic watering valves. Black poly plastic piping is relatively inexpensive, easy to install, comes in 100-foot rolls, and can be buried in trenches or laid on the surface along fence lines for ease of movement during paddock changes if necessary.
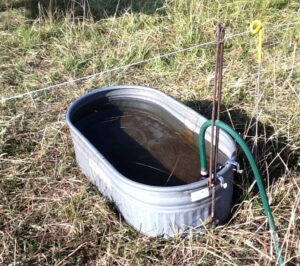
Portable livestock waterer ideally sized for multipaddock grazing. Note the float valve and hose jumper, which can be connected to a standpipe or a black poly header. Photo: Tracy Mumma, NCAT
Many producers use gravity-flow or solar pump systems with plastic pipe on top of the ground. This works well when the temperature is above freezing. Pipe made of burst-proof plastic stays intact during the winter without draining. Install tees in the pipe at intervals to branch off to portable livestock water tanks. Small tanks can be dumped and moved with ease when livestock are moved to another paddock. Small containers, about the size of half of a 55-gallon drum, can water up to 150 head of cattle and have worked well for some producers. Use a full-flow float valve to make sure that water is being replenished quickly. Side-mounted float valves do not fill as quickly and can leave livestock without water. A watering system made up of an automatic float valve that discharges five to eight gallons of water per minute and a water-supply pipe larger than 1.25 inches in diameter is adequate for replenishing water in the tank.
Detailed information on livestock water can be found in Watering Systems for Serious Graziers. This NRCS publication includes information on sourcing water, tanks, and delivery systems; locating tanks and installing pipelines; developing springs; protecting watering areas; and maintaining your system.
Freeze Protection
There are several ways to keep watering and storage tanks from freezing. Each livestock-watering situation is unique, so you’ll need to tailor a solution to your site, weather, and terrain. Some ideas to think about are using enclosed tanks painted black to absorb the sun’s warmth; using thermostatically controlled float valves that open when temperatures drop below a certain point; using large heavy-equipment tires as watering tanks; placing an insulated cover over a large part of the surface area of the tank; or partially burying a watering tank to take advantage of the ground’s warmth to prevent freezing. You can also take advantage of ground heat by installing a culvert under the tank and circulating water from the culvert into the tank with a solar-powered pump. Or, for areas that don’t freeze often, you can use an in-tank propane heater or a bubbler from a propane bottle. Lastly, energy-free livestock waterers can be purchased from vendors such as Gallagher.
More detailed information on keeping livestock water frost-free is included in the ATTRA publication Solar-Powered Livestock-Watering Systems and the ATTRA blog Providing Water to Livestock in Frigid Weather.
Forage Utilization and Distance from Water
A general recommendation is to allow livestock access to water within 800 feet of any point on the paddock. Research has shown that if animals must walk more than this distance to water, they tend to under-graze areas farther from the water source. Cattle tend to travel to water in groups when a lane is used or when they are far away from the water. This can be important in determining the type of water system to use and is also a consideration when laying out fencing and paddocks. The appropriate distance to water, however, can vary depending on terrain, type of livestock, forage availability, and grazing goals of the producer. The recommendation of no more than 800 feet is best used in a system designed for more intensively managed pastures where livestock are moving frequently.
Water placement is important for achieving the best livestock distribution in the paddock, ensuring more uniform grazing. Even so, manure tends to accumulate closer to the water source, especially as the temperature increases. Shade and extra water sources can help alleviate this problem. Water tank placement, short grazing periods with high animal density, and more paddocks can maximize grazing distribution. In a well-designed pasture system, animals will deposit about 85% of their manure and urine within the paddocks, about 12% around water sources, and the rest in the lanes and, for dairies, the milking parlor.
Streambank Crossings and Watering Points
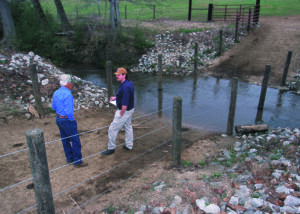
Streambank crossing designed to minimize damage to the streambank. Photo: NRCS
Many times, pastures may be bordered or transected by streams and creeks. When livestock must cross streams to graze in adjacent paddocks or access creek water for drinking, take care to prevent streambank damage and loss of vegetation, which can result in erosion, nutrient loading, and the compromise of habitat for aquatic animals and vegetation. To do this, many graziers construct stream crossings designed to minimize negative impacts of livestock movement on the stream and streambank.
Stream crossings and water access points can be constructed from rock, geotextile materials, culvert, or concrete. They should be perpendicular to the direction of stream flow and outside shady riparian areas to discourage livestock from loafing in the stream. Side slopes of cuts should be no steeper than about 2:1 (horizontal to vertical) and approaches to the stream crossing should have gradual ascent and descent grades that are no steeper than about 4:1. Control livestock access using fencing and gates, and consider cross-stream fencing with wire, swinging gates, hanging electrified chain, or other devices to prevent damage from floodwater and to allow debris to pass during high water flows (NRCS, 2018).
See the Technical and Financial Assistance section below for help and cost-share options for constructing stream crossings and water access points on your farm.
Walkways, Paths, and Lanes
Livestock can damage soil and vegetation in areas where they travel and congregate. Every farmer has had to deal with muddy trails, hoof-compacted walkways, and denuded ground, especially around water facilities. Depending on the topography and layout of your grazing paddocks, you might find that having a common access trail from the barn to the fields or to watering points is necessary. It’s possible to construct paths and walkways that improve animal access to forage, water, working/handling facilities, and shelter while also improving grazing efficiency and distribution and protecting ecologically sensitive or erosive sites (NRCS, 2015).
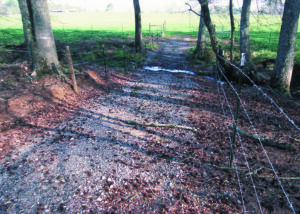
Livestock walkway and water crossing for pasture access. Photo: NRCS
Walkways and paths should allow livestock and equipment to be moved between paddocks. A lane width of 10 to 12 feet is recommended for livestock, and 14 to 16 feet for moving machinery. Walkways for livestock should be fenced off and used for animal movement only, in order to ensure that manure is deposited in the paddocks instead of the walkways (Ogejo, 2019).
The design and placement of walkways should protect wetlands, streambanks, and ecologically sensitive areas and should have minimal impact on the surrounding vegetation and soils. To properly design a walkway, consider keeping the grade to 10% or less and minimize embankments that could encourage erosion. For areas where water will run in the walkway during rain or snow melt, construct swales for upslope runoff into the surrounding vegetation to divert water flows, follow the contours of the landscape, and minimize any perpendicular or upslope walkways as much as possible, while using switchbacks for uphill sites (NRCS, 2015).
Finally, consider the surface of the walkway. The surface can be either vegetated or unvegetated, and the surface material should be selected based on whether you have well or poorly drained soils. Vegetated surfaces should be seeded with species that will achieve the density and vigor needed to withstand periodic animal traffic. For unvegetated walkways, surface materials like granular material, driving surface rock aggregate, or stone dust over a binder and base course work for well to moderately well-drained soils. For poorly drained soils, these materials should be placed over non-woven geotextile fabric (NRCS, 2015).
See the Technical and Financial Assistance section below for sources of help and cost-share options for constructing lanes and walkways on your farm.
Moving Animals
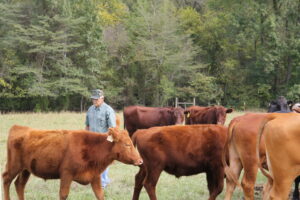
Moving animals daily is an efficient way to observe animals for health and nutritional status. Photo: NCAT
Moving animals from one paddock to the next in rotation yields many benefits, not the least of which is the provision of fresh, nutritious forage. Frequent livestock movements also provide an opportunity to observe your livestock and allow you to gain an understanding of herd health and nutrition. Observing animals daily as you move them lets you assess each animal’s status as it walks and interacts with other animals. Here, you can monitor for disease, injury, nutritional status, calving/lambing/kidding, and anything else that is important for herd health and productivity. In addition, you can assess the condition of the forage in the new paddock and determine how long they should graze before being moved to the next paddock. Also, gaze back at the paddock most recently grazed to assess the impact the livestock had on the forage stand. Then, evaluate other paddocks grazed earlier to assess plant recovery. You can calibrate your system by making these observations and adjusting the amount of time animals remain on subsequent paddocks.
Livestock that have become accustomed to frequent moves anticipate new forage, and this makes the movement of animals from one paddock to the next much easier. For instance, cattle will approach when you enter the field to open a gap in a fence or move polywire. Simply open a wide gap and let the animals through into the next paddock. You can count animals and observe their status as they pass you. Then, it’s just a matter of making sure the waterer is accessible, closing the fence gap, and building the next paddock so it’s ready to go when you come back out again. Now you’re ready to walk the paddocks to assess the impact and make adjustments in your mind for upcoming rotations. Not a bad way to spend the morning!
For more detail on moving animals, see the video Regenerative Grazing from the Ground Up and video #3 in the Adaptive Grazing with Allen Williams series, Adaptive Grazing. Forage Density, Paddock Size, and Animal Movement. Also see the Appendix for various strategies for moving animals.
Technical and Financial Assistance
The USDA Natural Resources Conservation Service (NRCS) provides technical assistance and potential funding to offset the added costs for installing conservation practices such as fencing, water development, livestock and vehicle traffic lanes, grazing plans, and other practices that benefit graziers and address natural resource issues or problems.
NRCS also provides services to graziers to develop a site-specific grazing plan that addresses one or more resource issues or problems on grazing lands. Grazing plans are written by NRCS grazing specialists or certified Technical Service Providers (TSPs). Potential funding for installing fence, watering systems and other practices comes from the Environmental Quality Incentives Program (EQIP) through contracts with eligible farmers and ranchers. Grazing specialists or TSPs will evaluate existing conditions, including plant species diversity and condition, animal types (including wildlife), acres available, waste handling, and storage systems. Producers receive a conservation plan that documents resource assessment results, including erosion potential, water availability, soil fertility, and specifications on the application of practice standards. In addition, an NRCS grazing specialist or a TSP will prepare a grazing plan for key grazing sites and species, a soils map with ecological site descriptions and interpretations, including a forage suitability index for grazing activities, contingency plans for winter, drought, and other climatic issues, and an animal demand/forage balance sheet.
For more details on NRCS technical and financial assistance for grazing lands, contact your local NRCS Field Office. You can use this Local Service Centers Directory to locate it.
Finally, ATTRA agriculture specialists can assist you in writing a grazing plan that meets your site-specific needs through free one-on-one technical assistance. Contact ATTRA at 800-346-9140 or askanag@ncat.org for email and phone assistance and, where feasible, possible site visits to discuss your grazing operation and develop a plan.
Tips to Get Started
Here are some tips to make getting started easier, adapted from University of Vermont Extension (UVM, no date):
- Learn from other farmers right off the bat. Attend pasture walks and field days from Extension and grazing groups on farms in your area. Get to know the graziers and learn from their experiences.
- Determine your goals and the resources you have at hand. Write this out in a narrative and post it conspicuously and refer to it often, adapting when needed.
- Get a support system with other graziers, farm groups, educational organizations, and agencies. There is a lot of assistance out there, including NRCS programs, Extension educational events, and grazing groups. Check with the National Grazing Lands Coalition for details on grazing groups in your state. Also, wintertime is an opportunity to attend any one of the many sustainable agriculture conferences that occur around the country.
- Assess your forage availability and animal forage demand. There are ATTRA resources to help you do this. Pasture, Rangeland, and Adaptive Grazing has information on determining forage yield and matching it to animal needs.
- Determine your fencing and water needs and make a map of your property with fencing, water sources, lanes, and topographical details. This will allow you to visually conceptualize your system based on soil types and topography and can help with planning rotations. Consider, as well, using a grazing chart. Troy Bishopp, a Grazing Specialist with the Madison County (NY) Soil and Water Conservation District, designed a grazing chart that works well to plan rotations.
- Develop an initial grazing plan, a place to start that you can adapt as situations change. ATTRA’s Grazier’s One-Stop Resource Packet has a Grazing Plan Checklist to help you get started.
Summary
In this publication, we discussed designing a grazing system based on the principles of adaptive grazing. Some of the elements to consider include paddock size, herd or flock density, vegetation types, wildlife habitat, and soil and water quality. We covered fencing design and watering systems, as well as the elements of designing good walkways and paths. Finally, we introduced financial and technical assistance options. Remember, when starting out, try to go slow, work with what you have, and minimize your expense. Visit other farms and get some ideas. And don’t get overwhelmed: it’s a biological system we are working with, and change is always on the horizon. Observe, implement, and adapt.
Appendix: Livestock Movement Strategies
Justin Morris, NCAT Regenerative Grazing Specialist
Figure 1:
Livestock are prevented from grazing all recovered forage at once using a portable single polywire fence (dashed red line) powered by a high-tensile electric wire (solid red line). Light green background depicts a fully grazed pasture, medium green background depicts a partially grazed pasture, and a dark green background depicts a fully recovered pasture. Water trough and mineral feeder tub are mounted on skids and connected to each other so both can be moved simultaneously. An above- or below-ground pipeline (blue line) delivers water to the field, while a short hose with quick-connect couplings conveys water from pipeline to water trough. An additional polywire fence is placed beyond the front polywire fence containing livestock, to prevent livestock from accessing the entire field if the polywire directly in front of the livestock is breached, and to create the next paddock.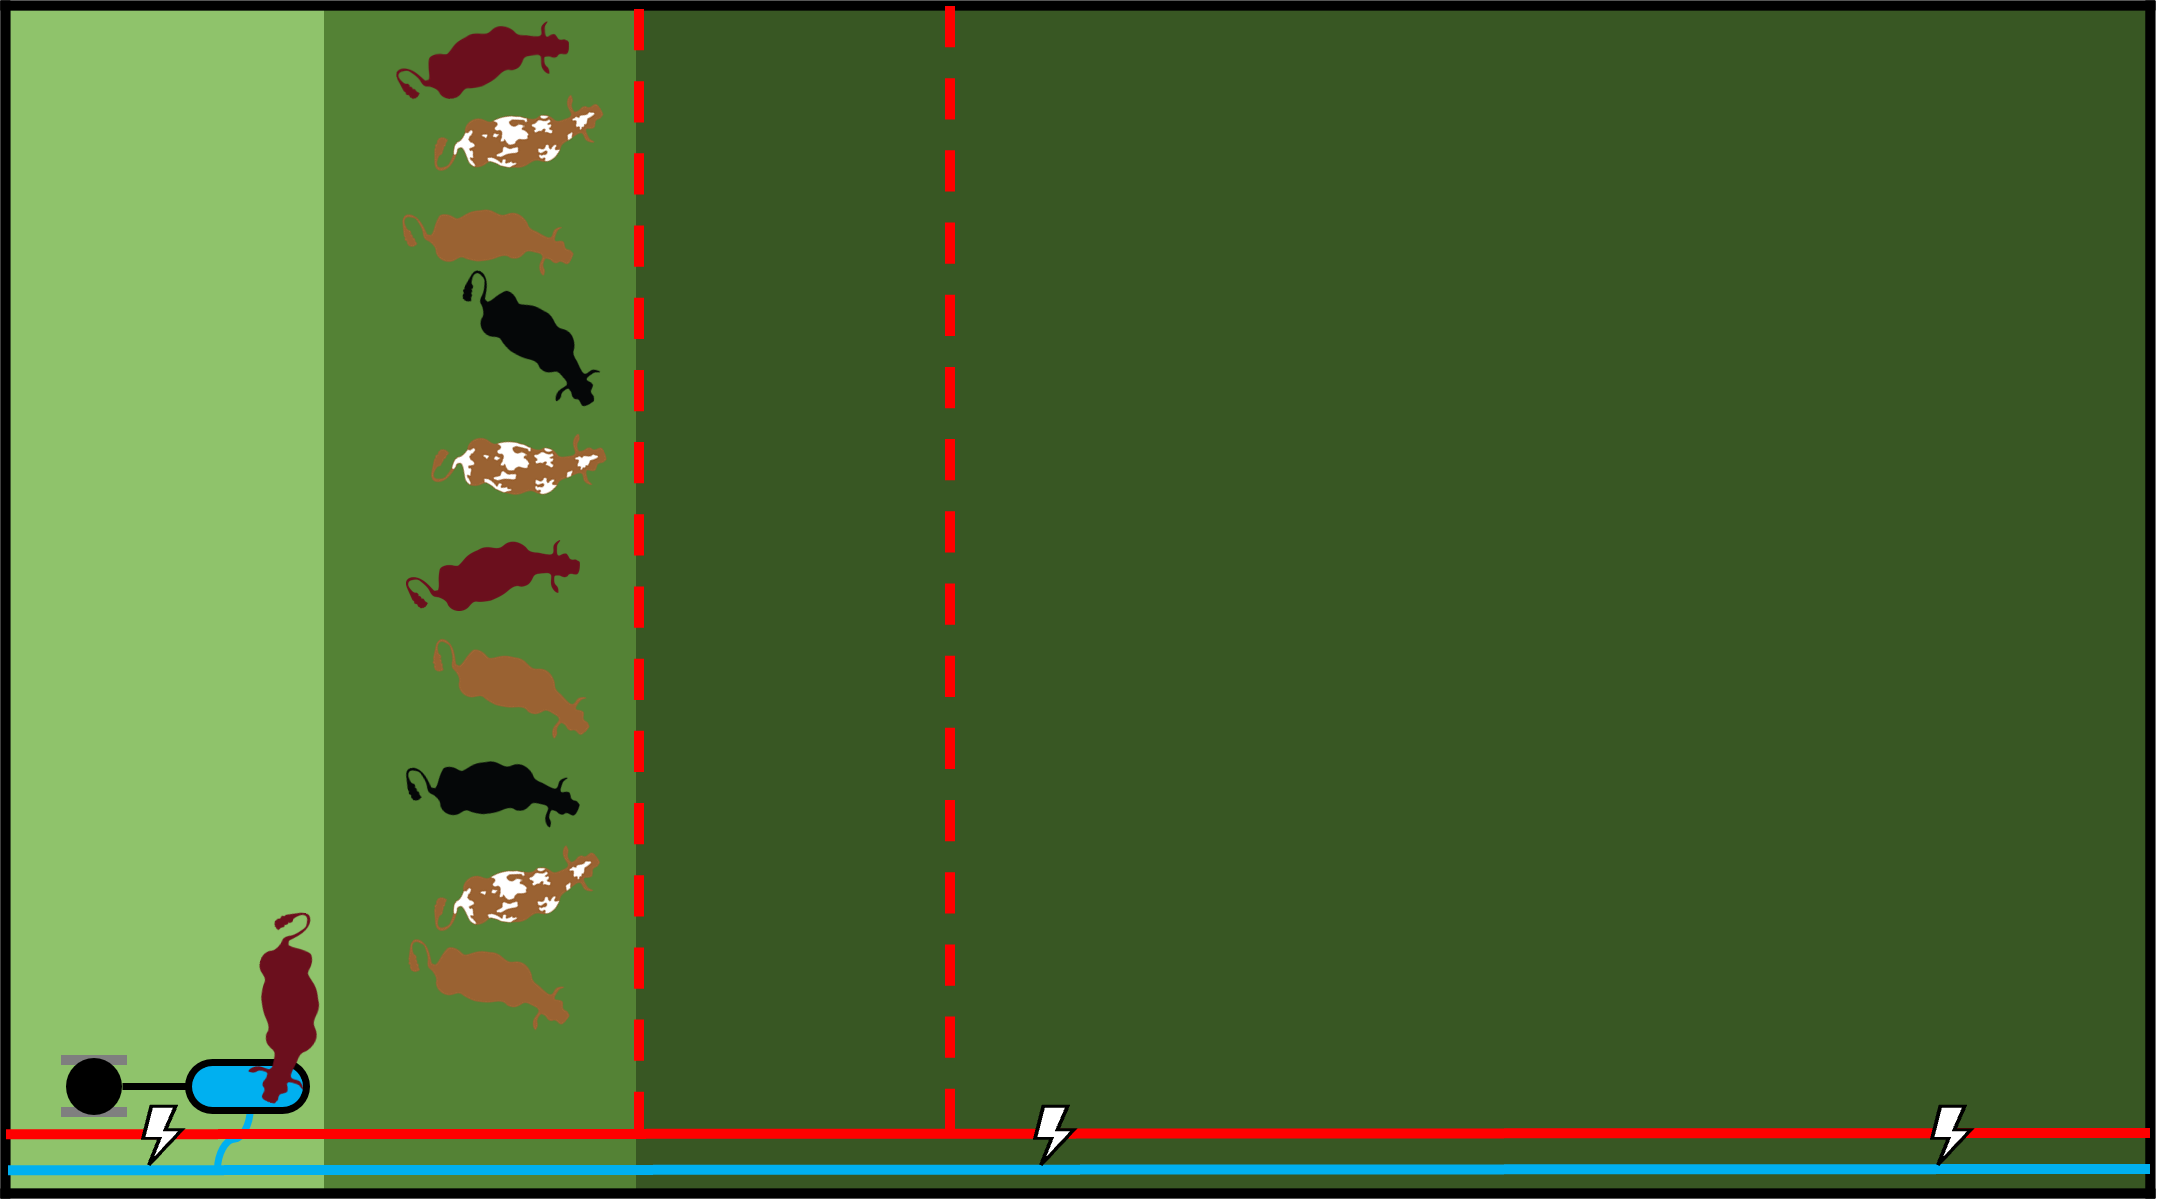
Figure 2:
Livestock are admitted to the next paddock by rolling up the polywire and collecting step-in posts. As the polywire is rolled up, tension is maintained to keep the polywire visible to the livestock. Livestock walk forward a few feet to access the next paddock.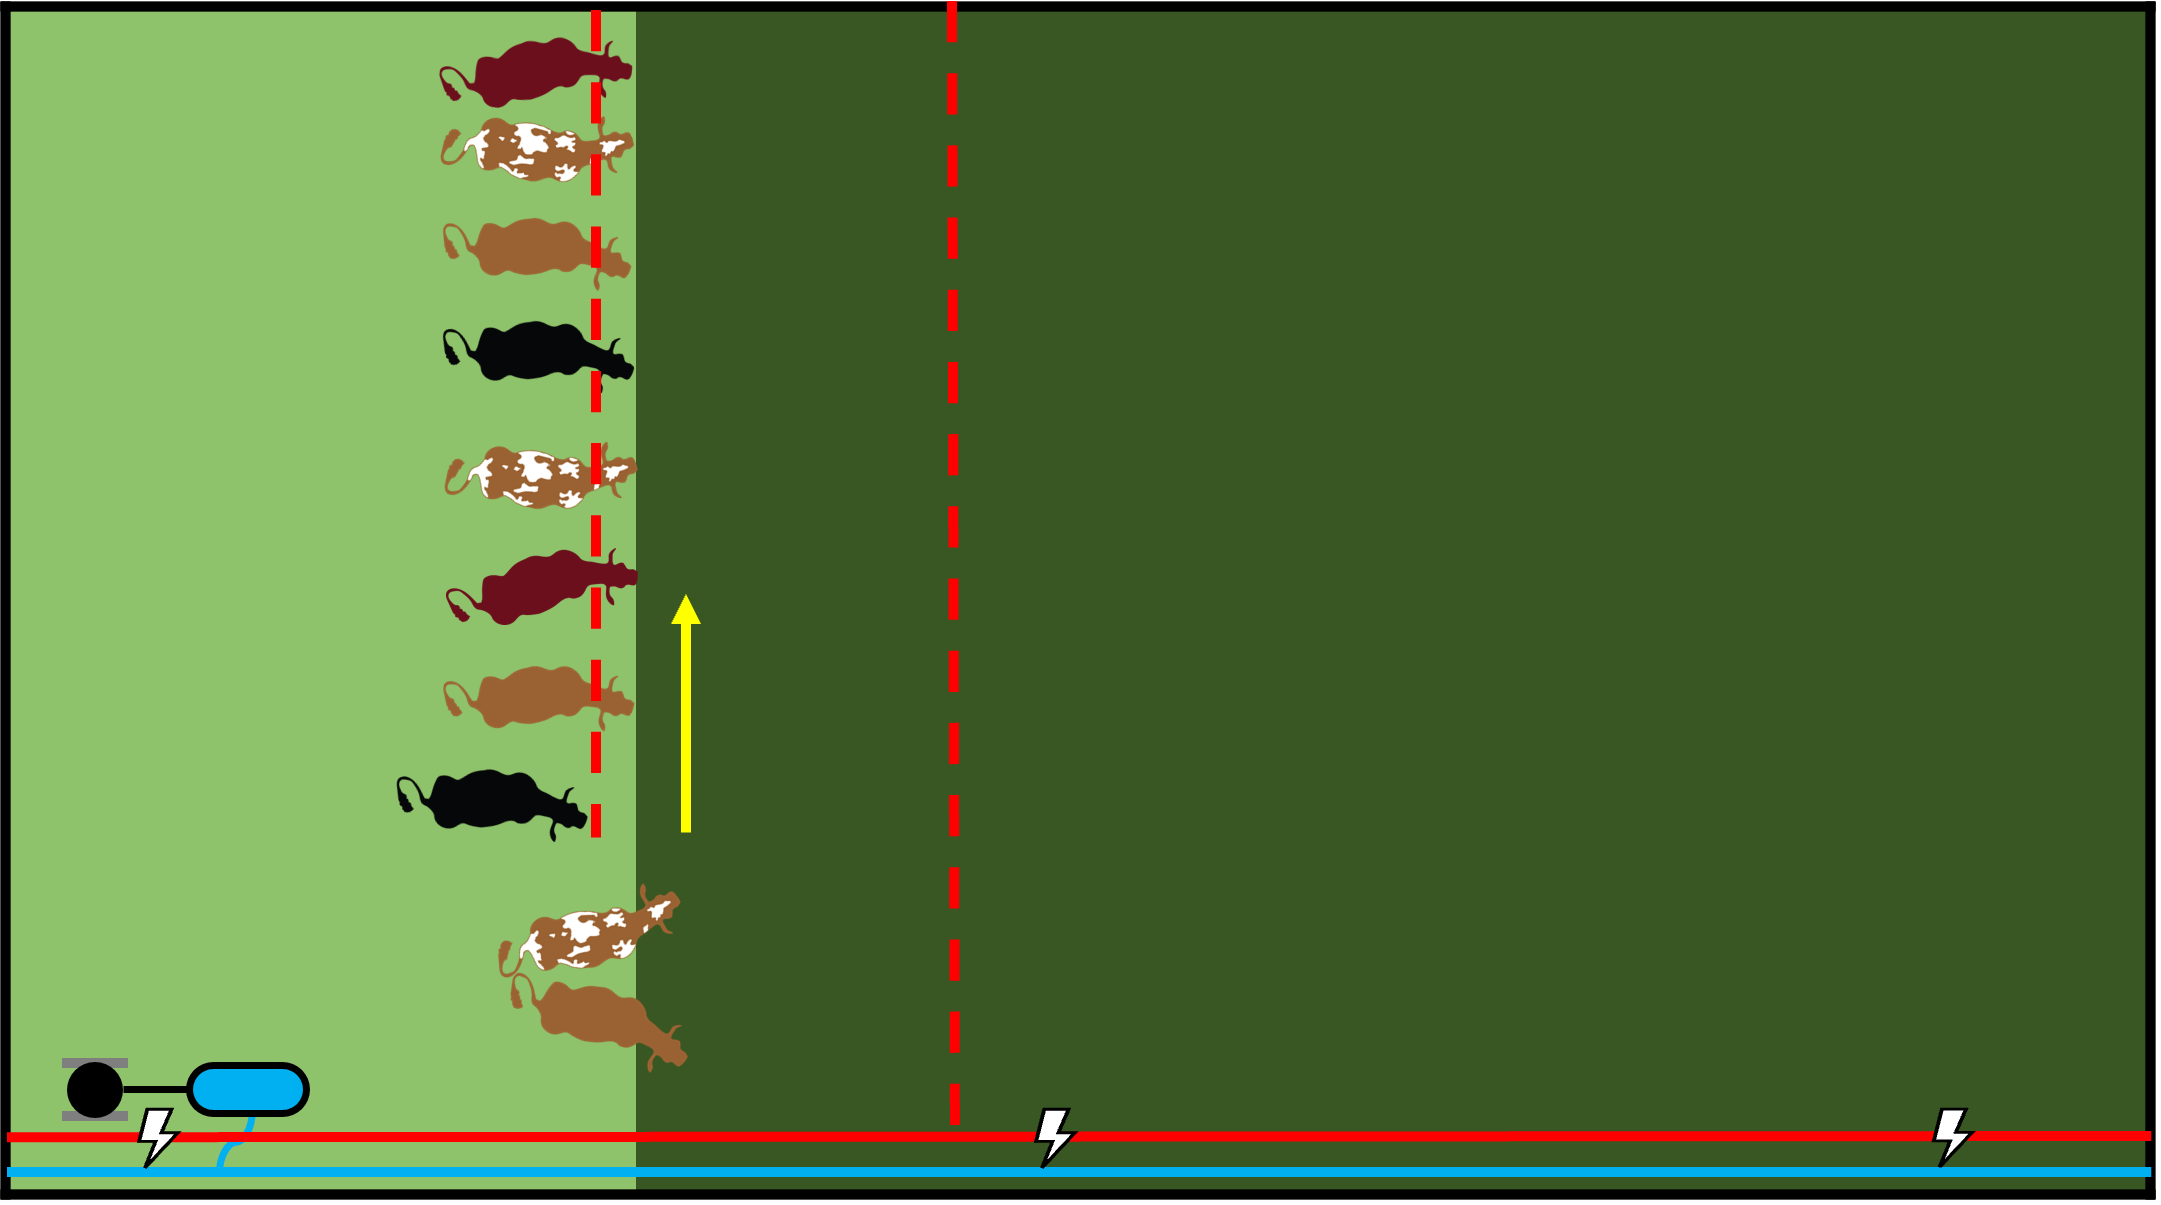
Figure 3:
Once the portable electric fence is rolled up, all livestock advance to the next paddock.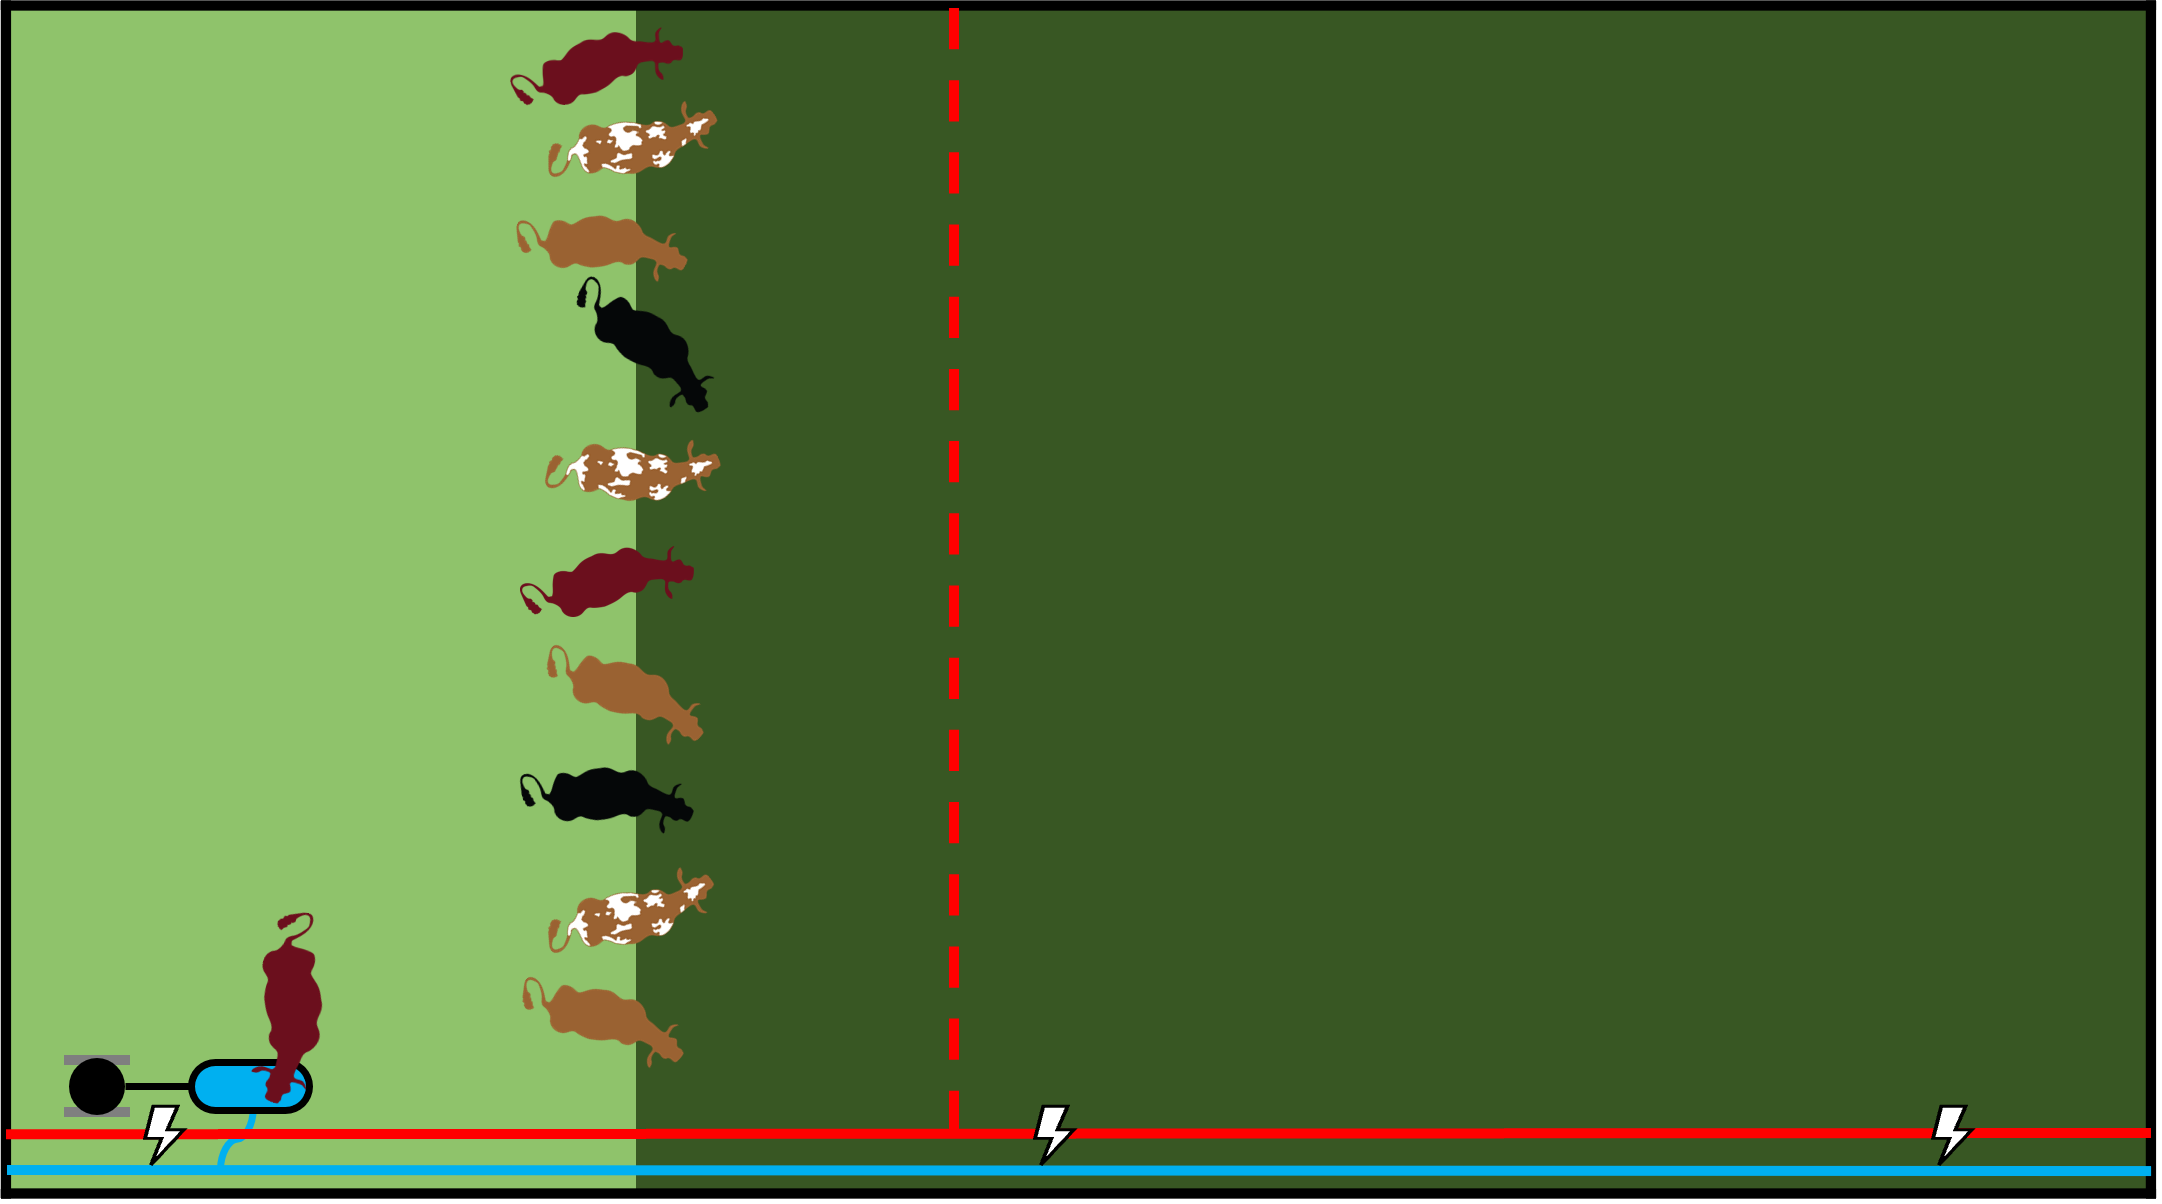
Figure 4:
Livestock slowly advance themselves into the next paddock by walking forward a few steps. Pasture quality, quantity, and livestock demand are evaluated to determine where the next polywire fence should be built. The front polywire fence that was just rolled up is unrolled to create a new paddock.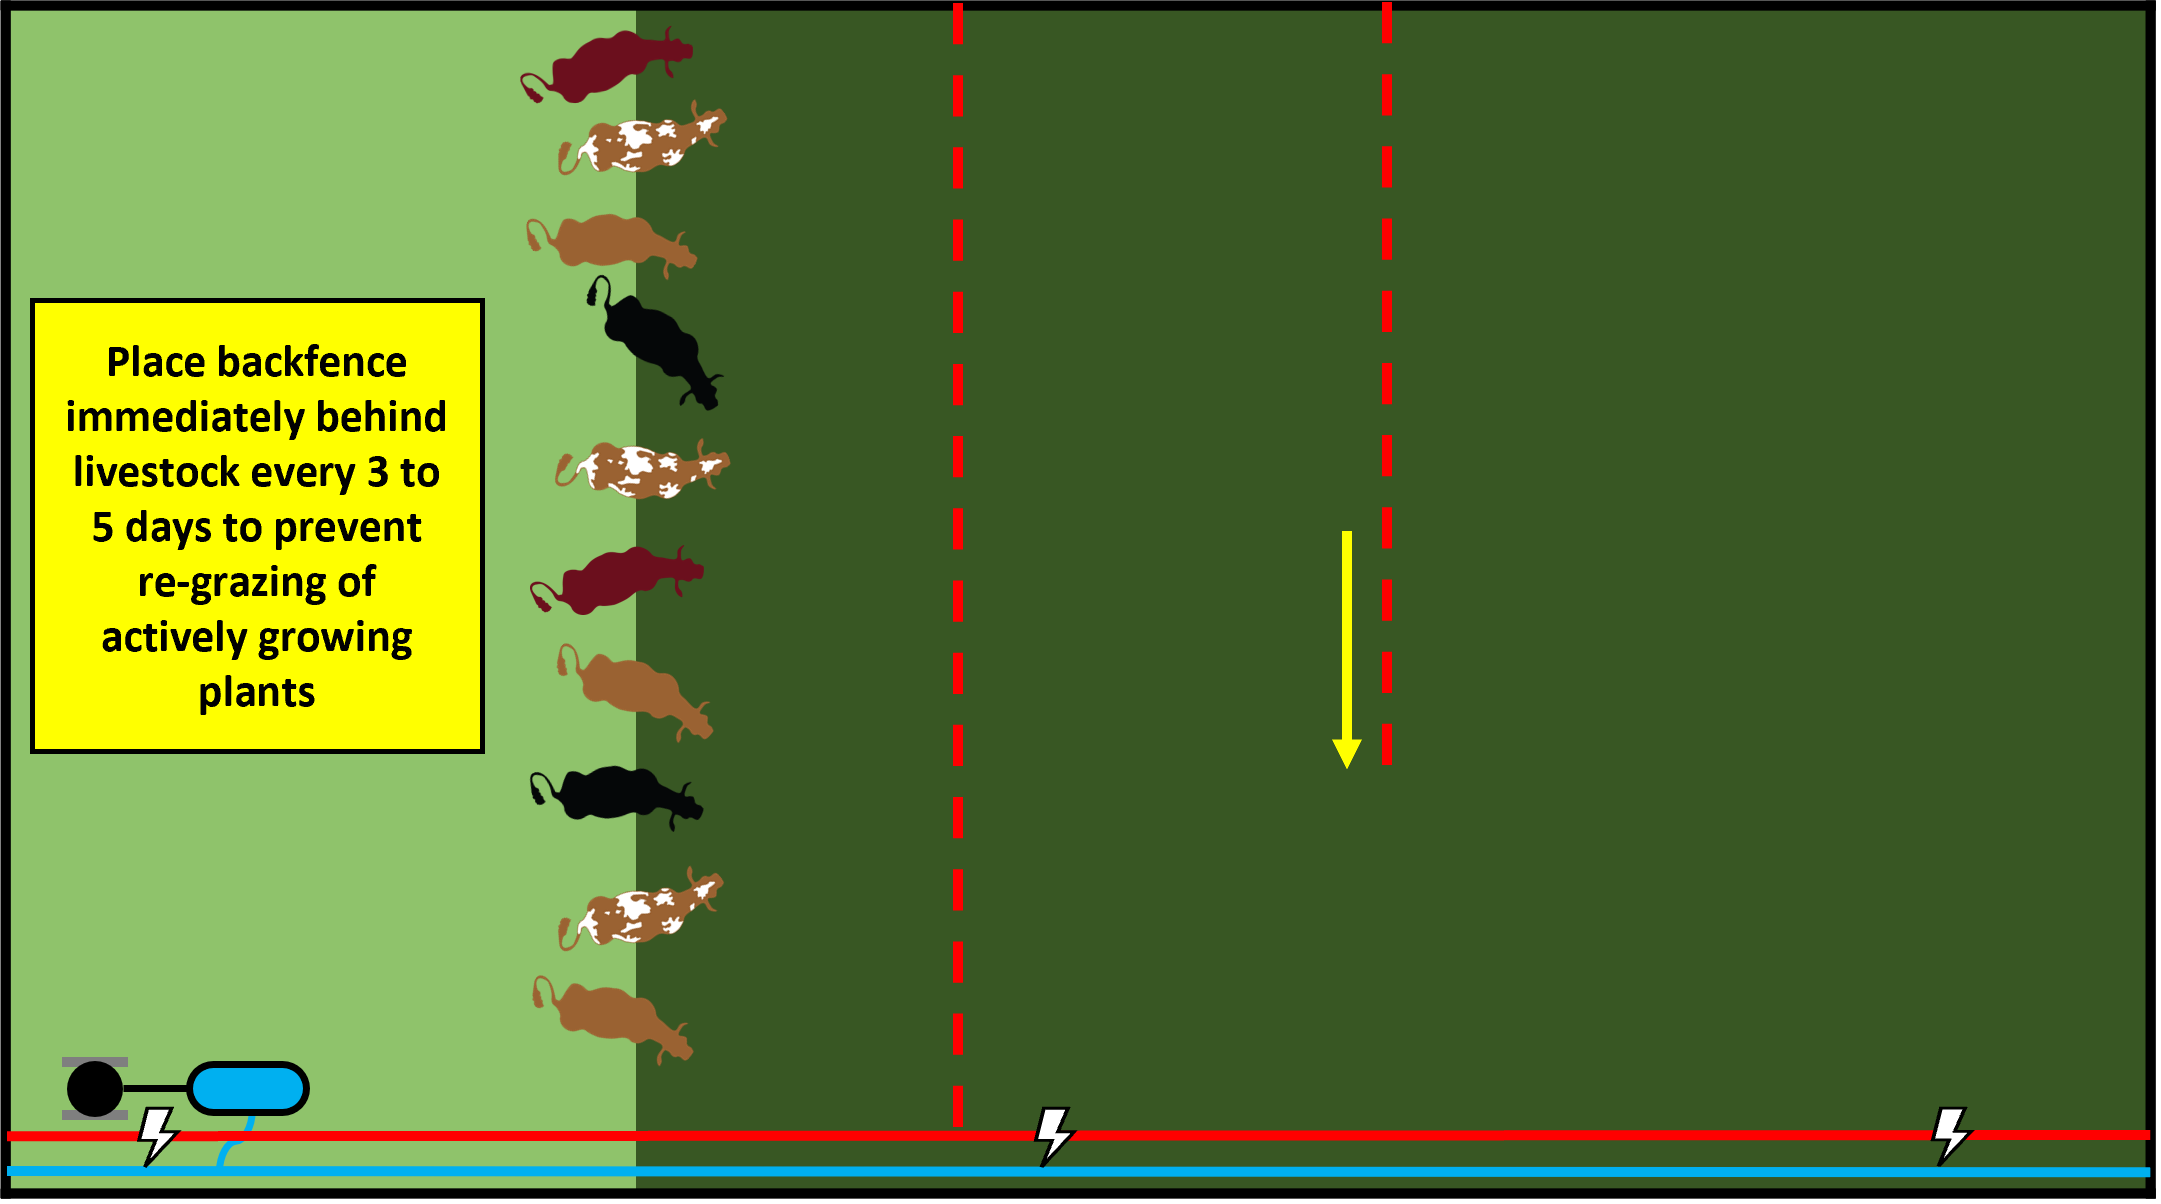
Grazing for Higher Intake – Step-In Post Advancement Method
Figure 5:
See description for Figure 1.
Figure 6:
Polywire fence reel is disconnected from high-tensile electric fence (solid red line) and moved forward along the high-tensile electric fence while unrolling a little polywire to provide some slack and maintaining enough tension to keep the polywire visible to the livestock. The fence reel is rehung on the high-tensile electric fence. While the grazier is walking along the polywire fence, each step-in post is barely pulled out, moved forward as far as the polywire fence slack allows, then stepped back in while the polywire remains on each post. This process continues all the way to the opposite side of paddock. This allows the fence to be moved while the electric fence is on and does not require gathering step-in posts.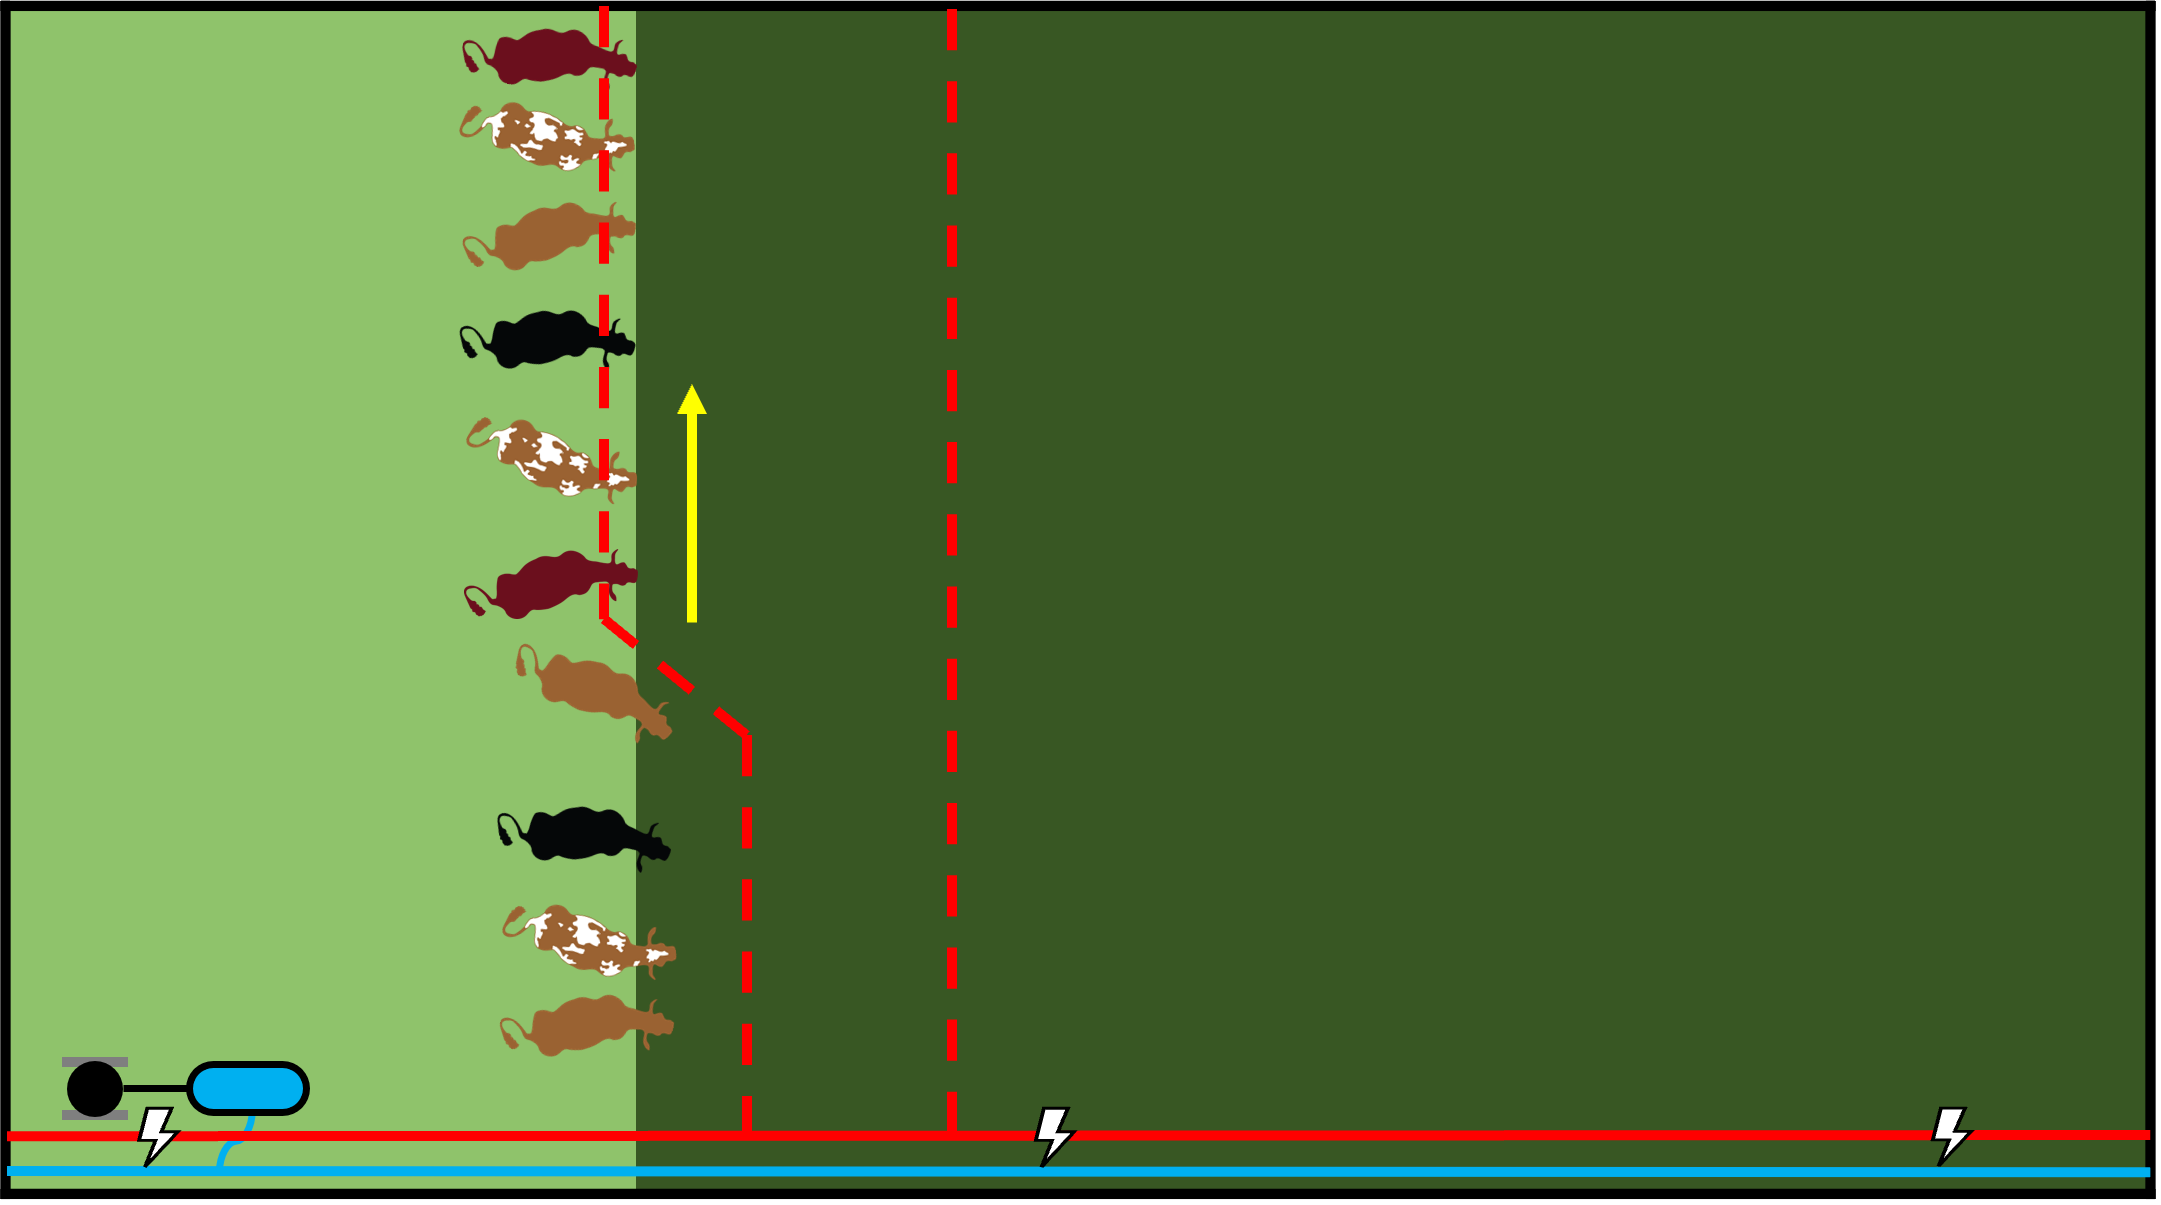
Figure 7:
If more area is needed to provide sufficient forage, the process in Figure 6 is repeated while walking back towards the fence reel at the bottom of the figure.
Figure 8:
Once the polywire fence is moved, polywire is re-tensioned to keep wire at the proper height. The secondary containment fence is re-positioned using the same method as the front fence.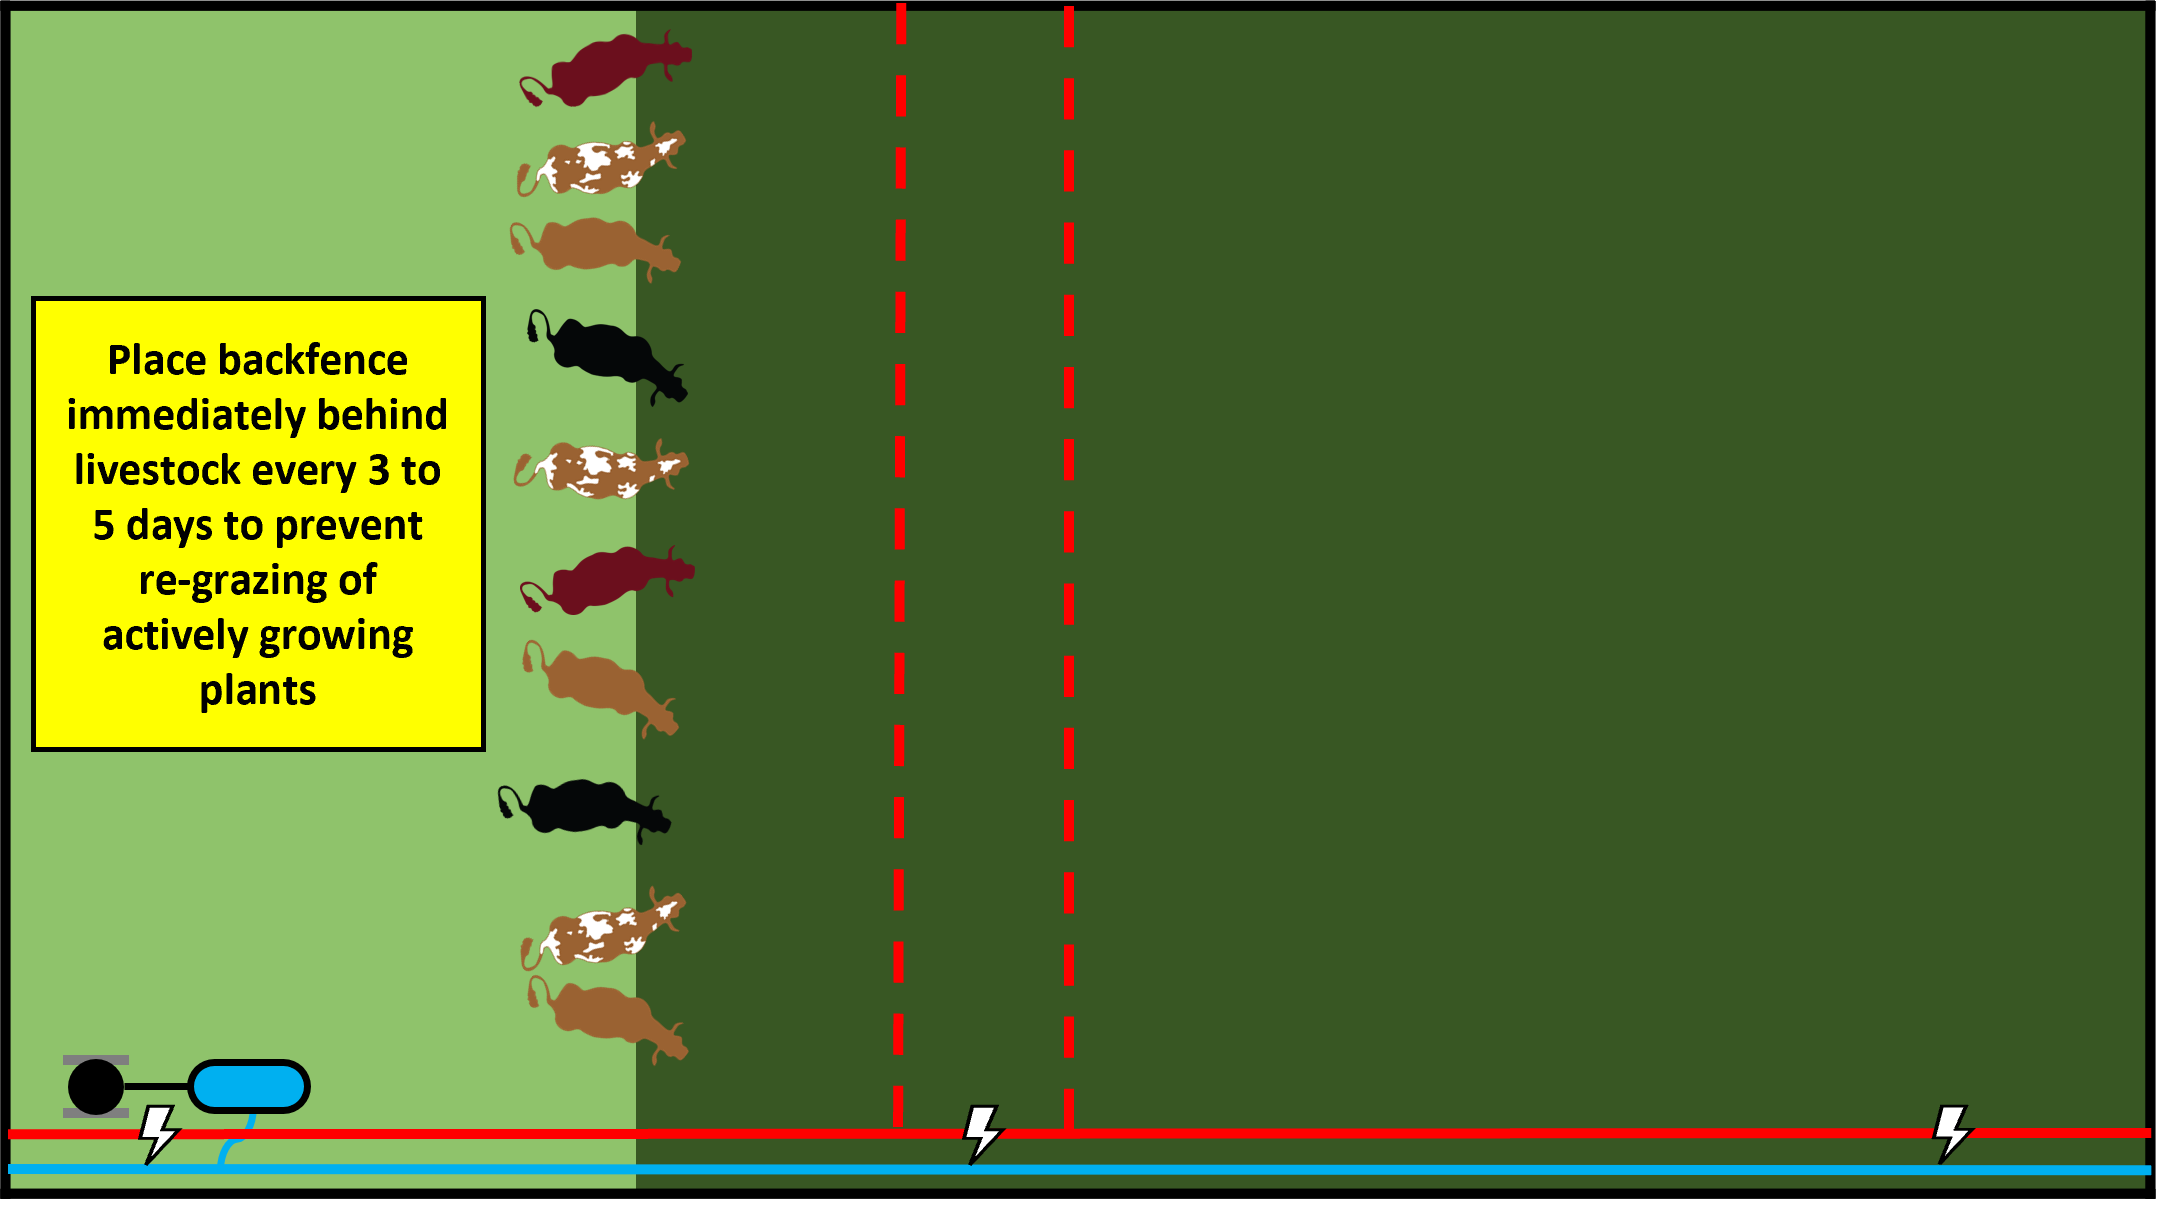
Grazing for Higher Intake – Tumble Wheel Method
Figure 9:
Tumble Wheels are six-spoked wheels that hold just one polywire at 31-inches high and are best suited for beef cattle.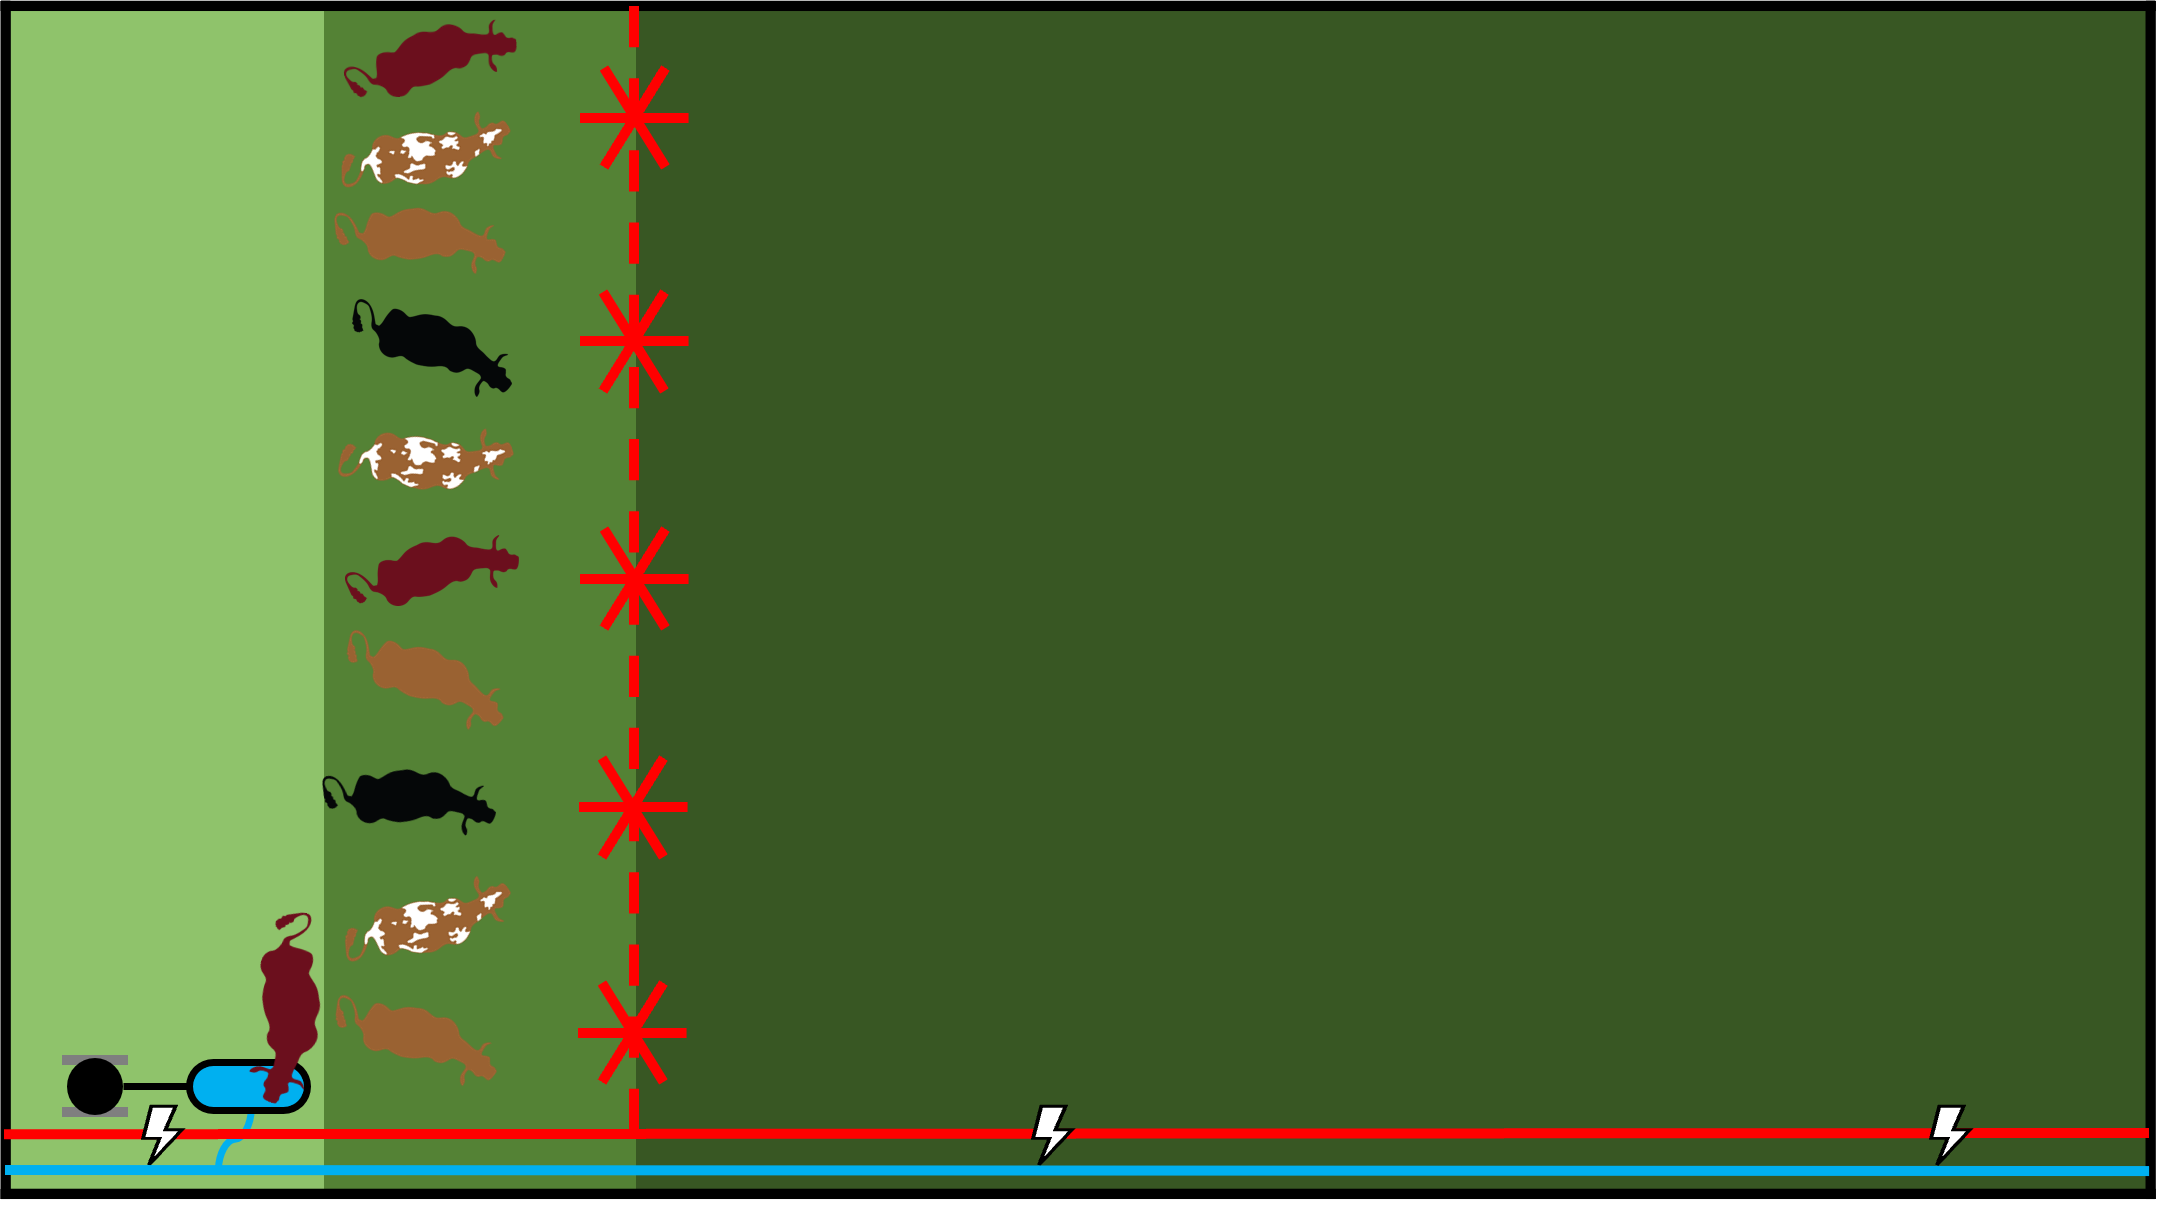
Figure 10:
The fenceline is advanced one end at a time by disconnecting the fence reel from the high-tensile electric fence and moved forward along the high-tensile electric fence while unrolling a little polywire to provide some slack and maintain tension on the polywire so the Tumble Wheels roll forward. Fence reel is rehung on the high-tensile electric fence and a triangular area of new pasture is created.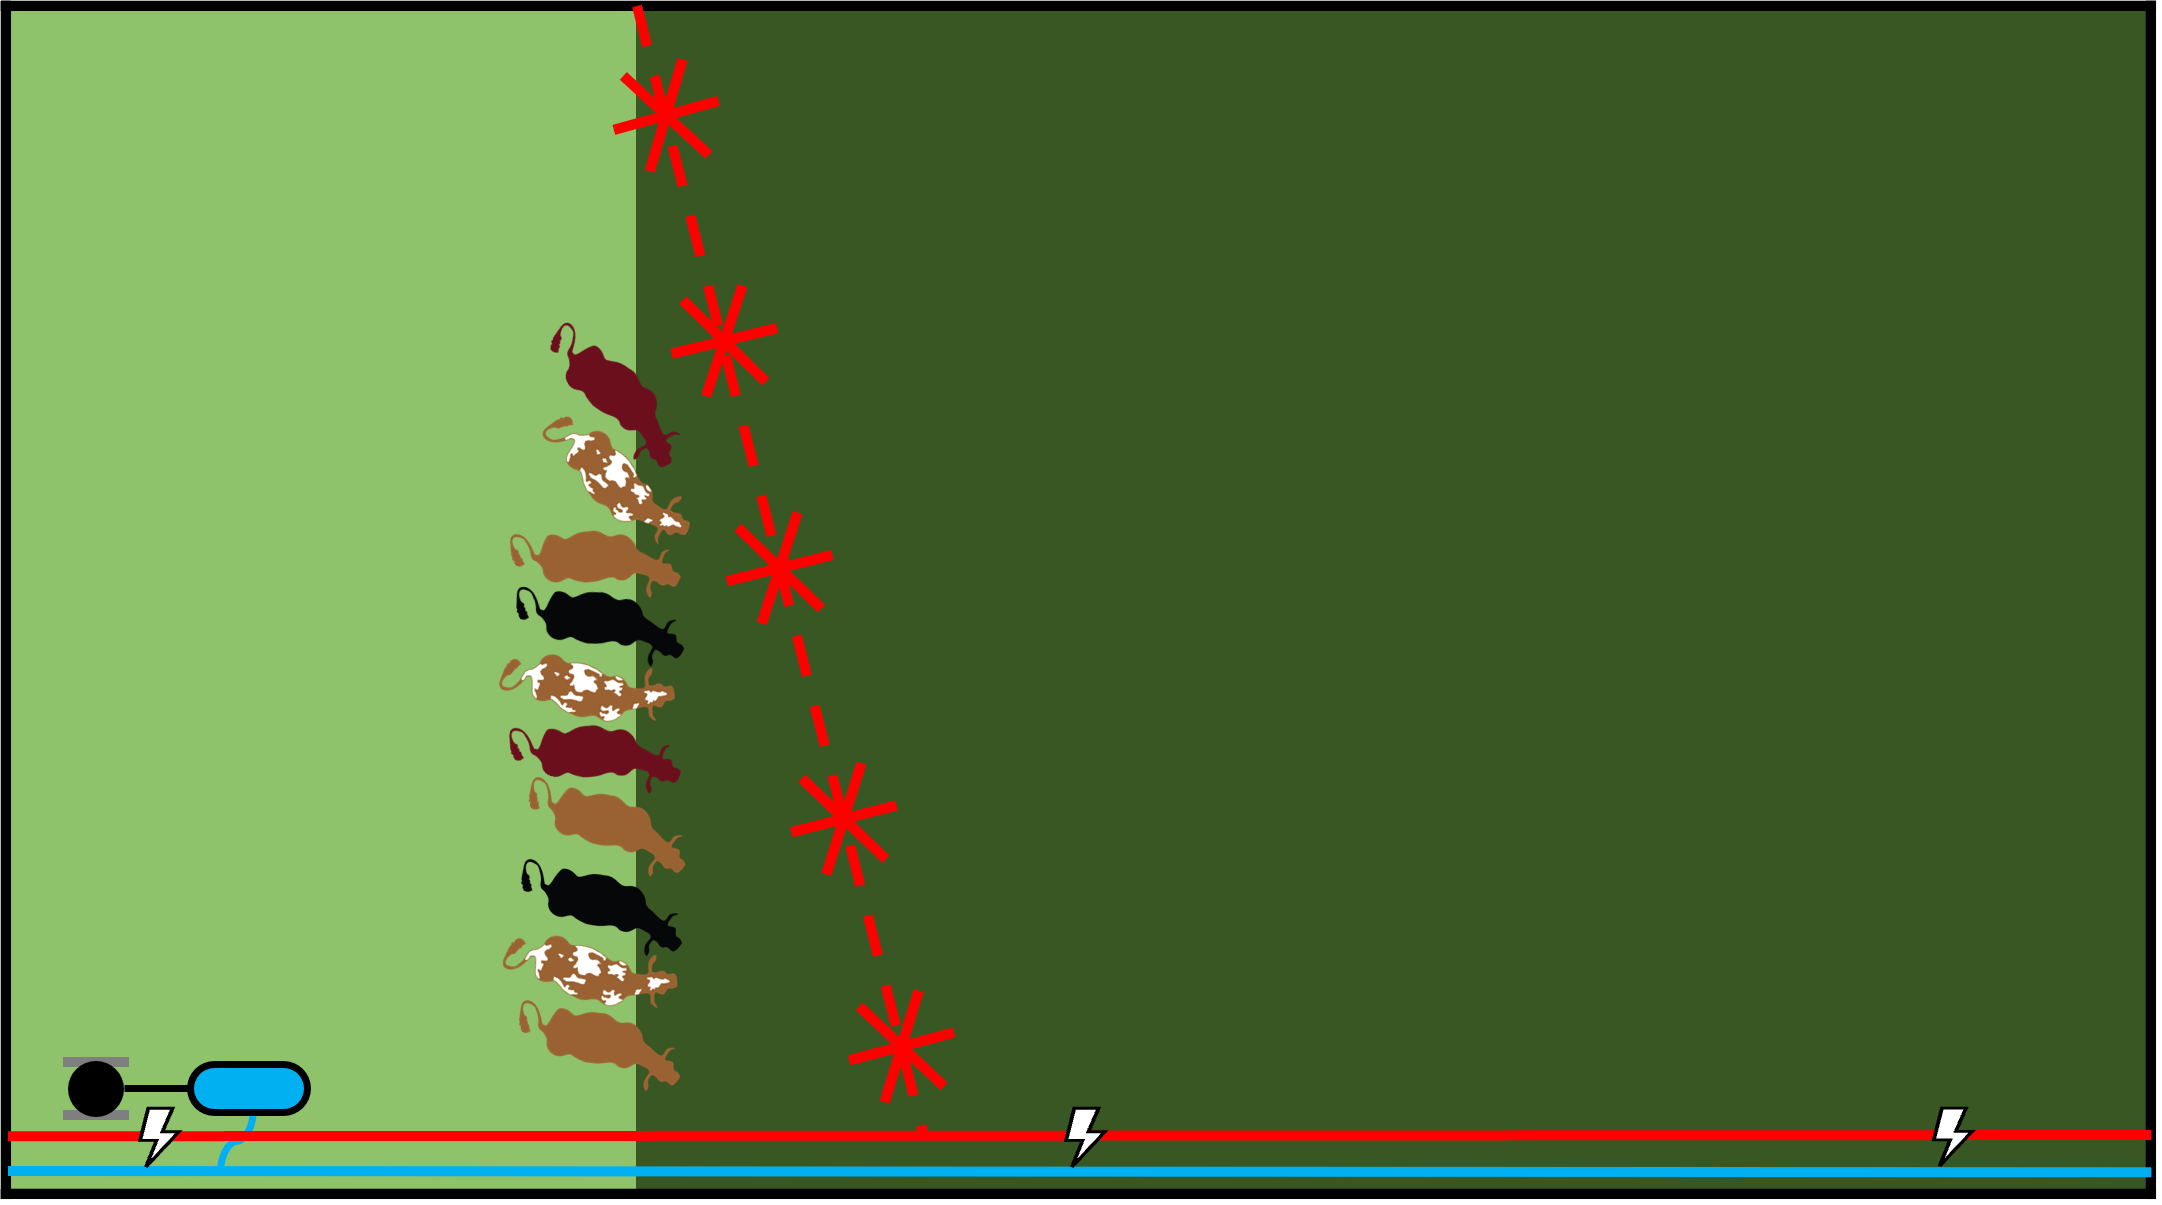
Figure 11:
When more pasture is needed, the opposite end of the Tumble Wheel line is advanced in the same way as Figure 10, to create another triangular area of new pasture.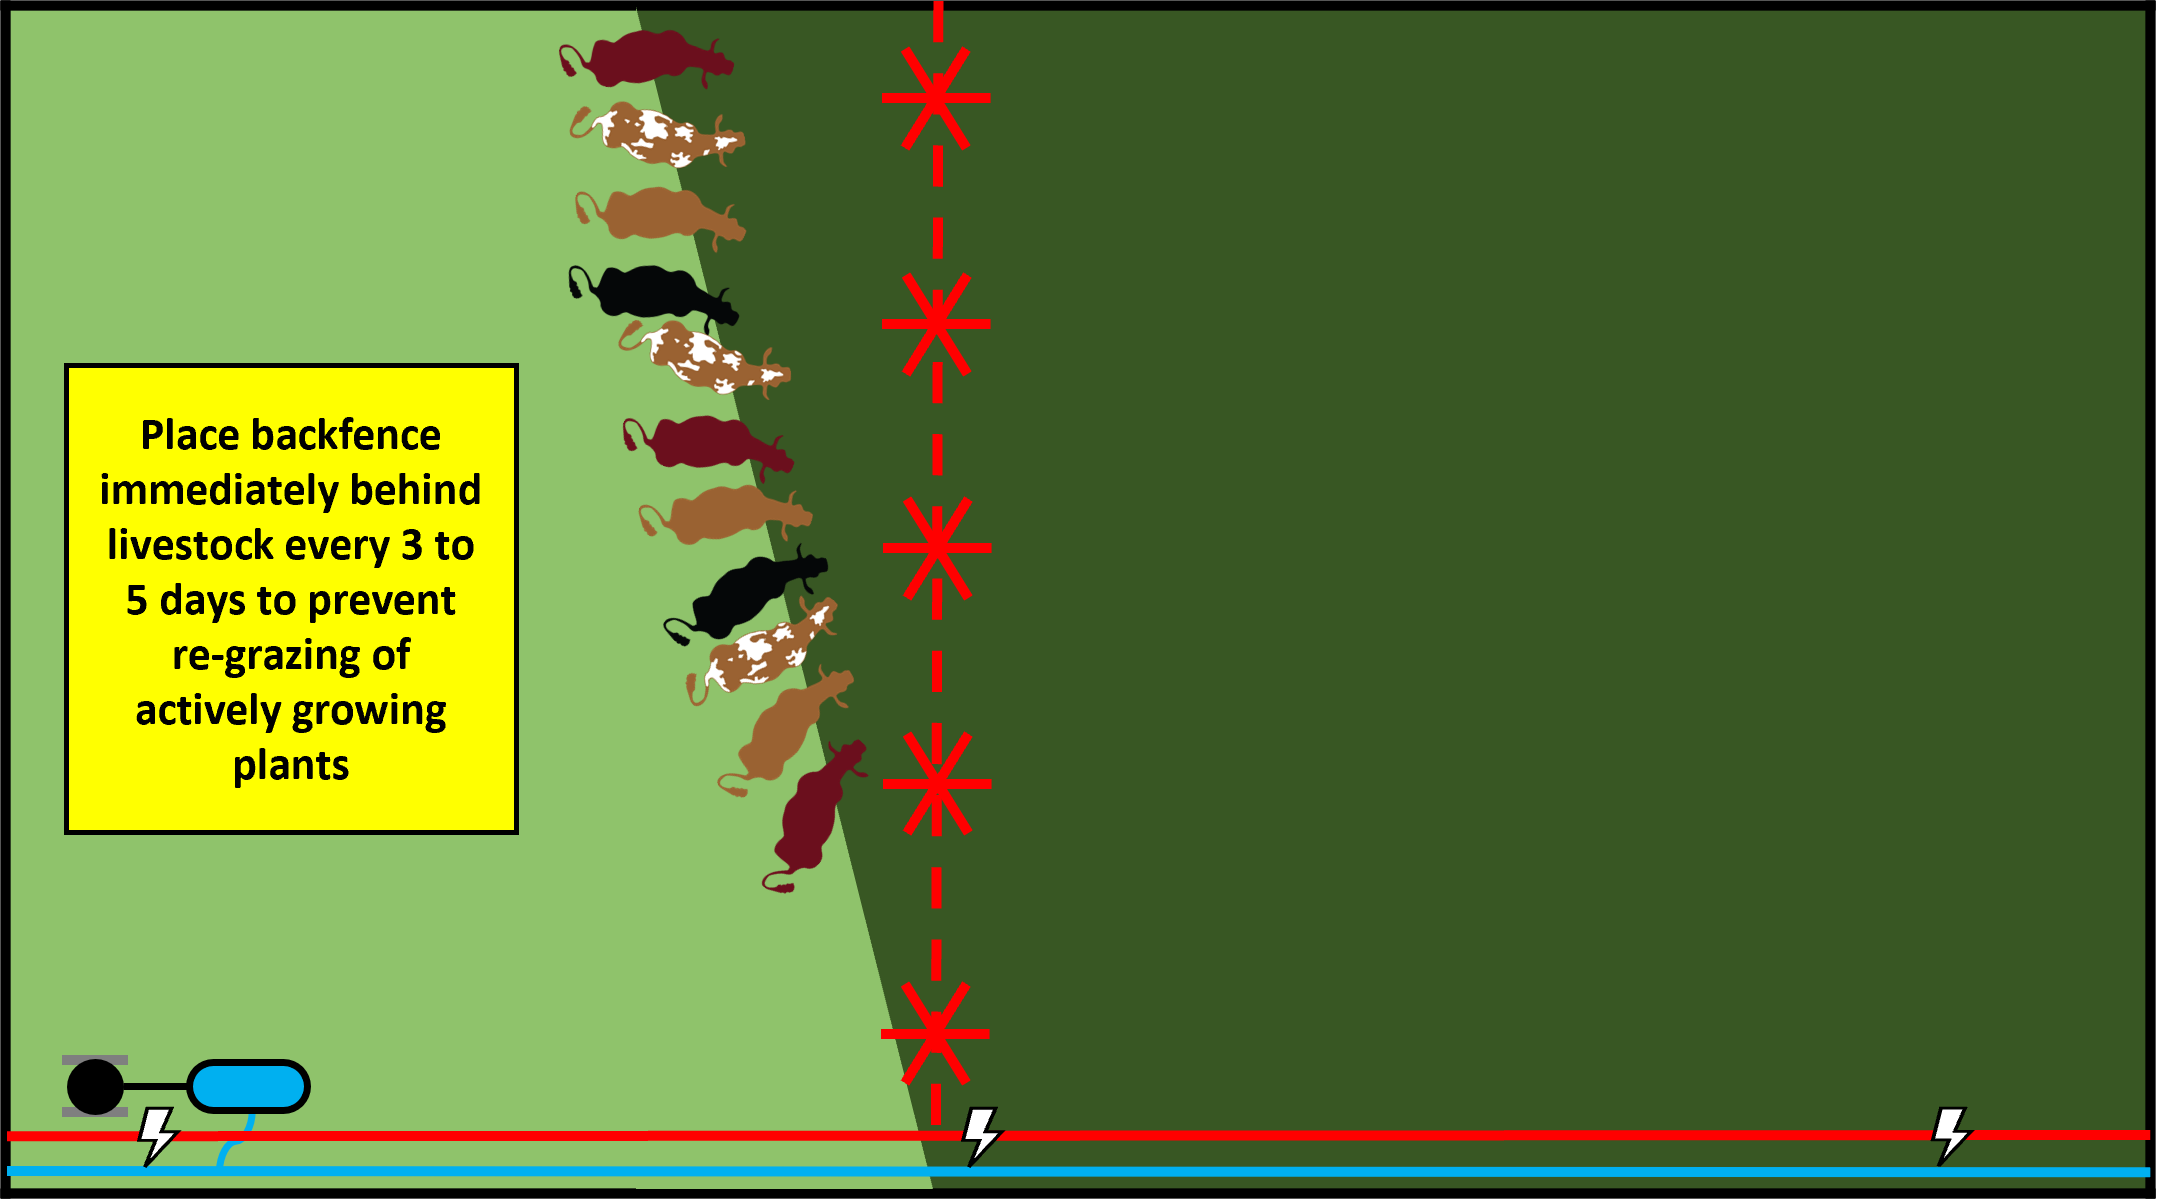
Grazing for More Trampling
Figure 12:
Using a polywire back fence to maintain stock density and prevent re-grazing of recently grazed plants, livestock are contained to a rectangular strip. The water trough and mineral feeder tub are connected to each other and positioned on the line between two paddocks to reduce the labor for moving water and mineral. Polywire fencing is directed around the water trough and mineral feeder tub, so that the water trough and mineral feeder tub are moved only every other paddock move.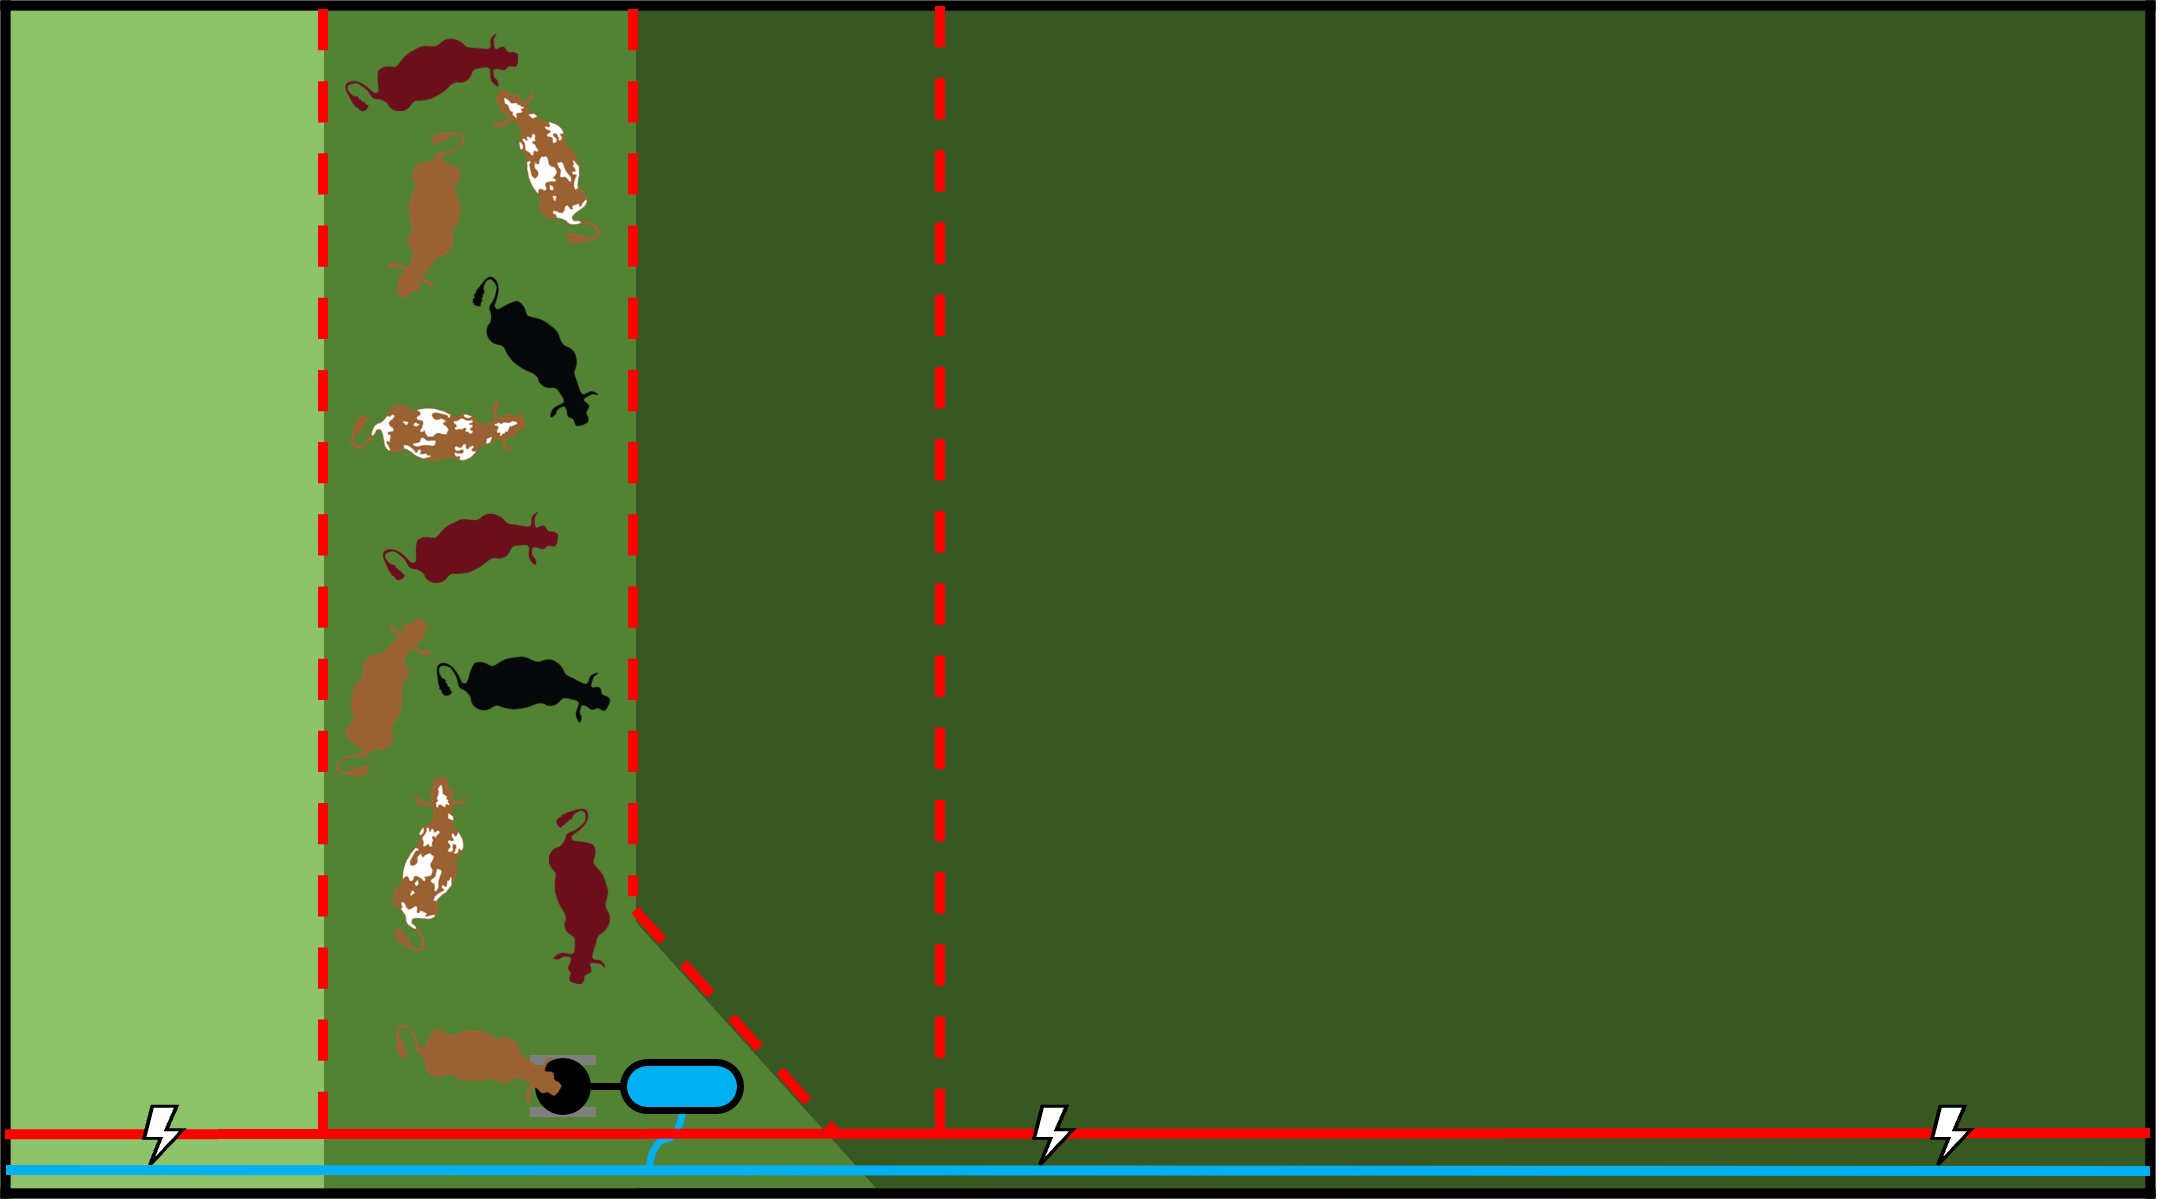
Figure 13:
Livestock are advanced to next paddock at the very end, near the water trough and mineral feeder tub, by rolling up 10 to 20 feet of polywire while maintaining tension on the fence.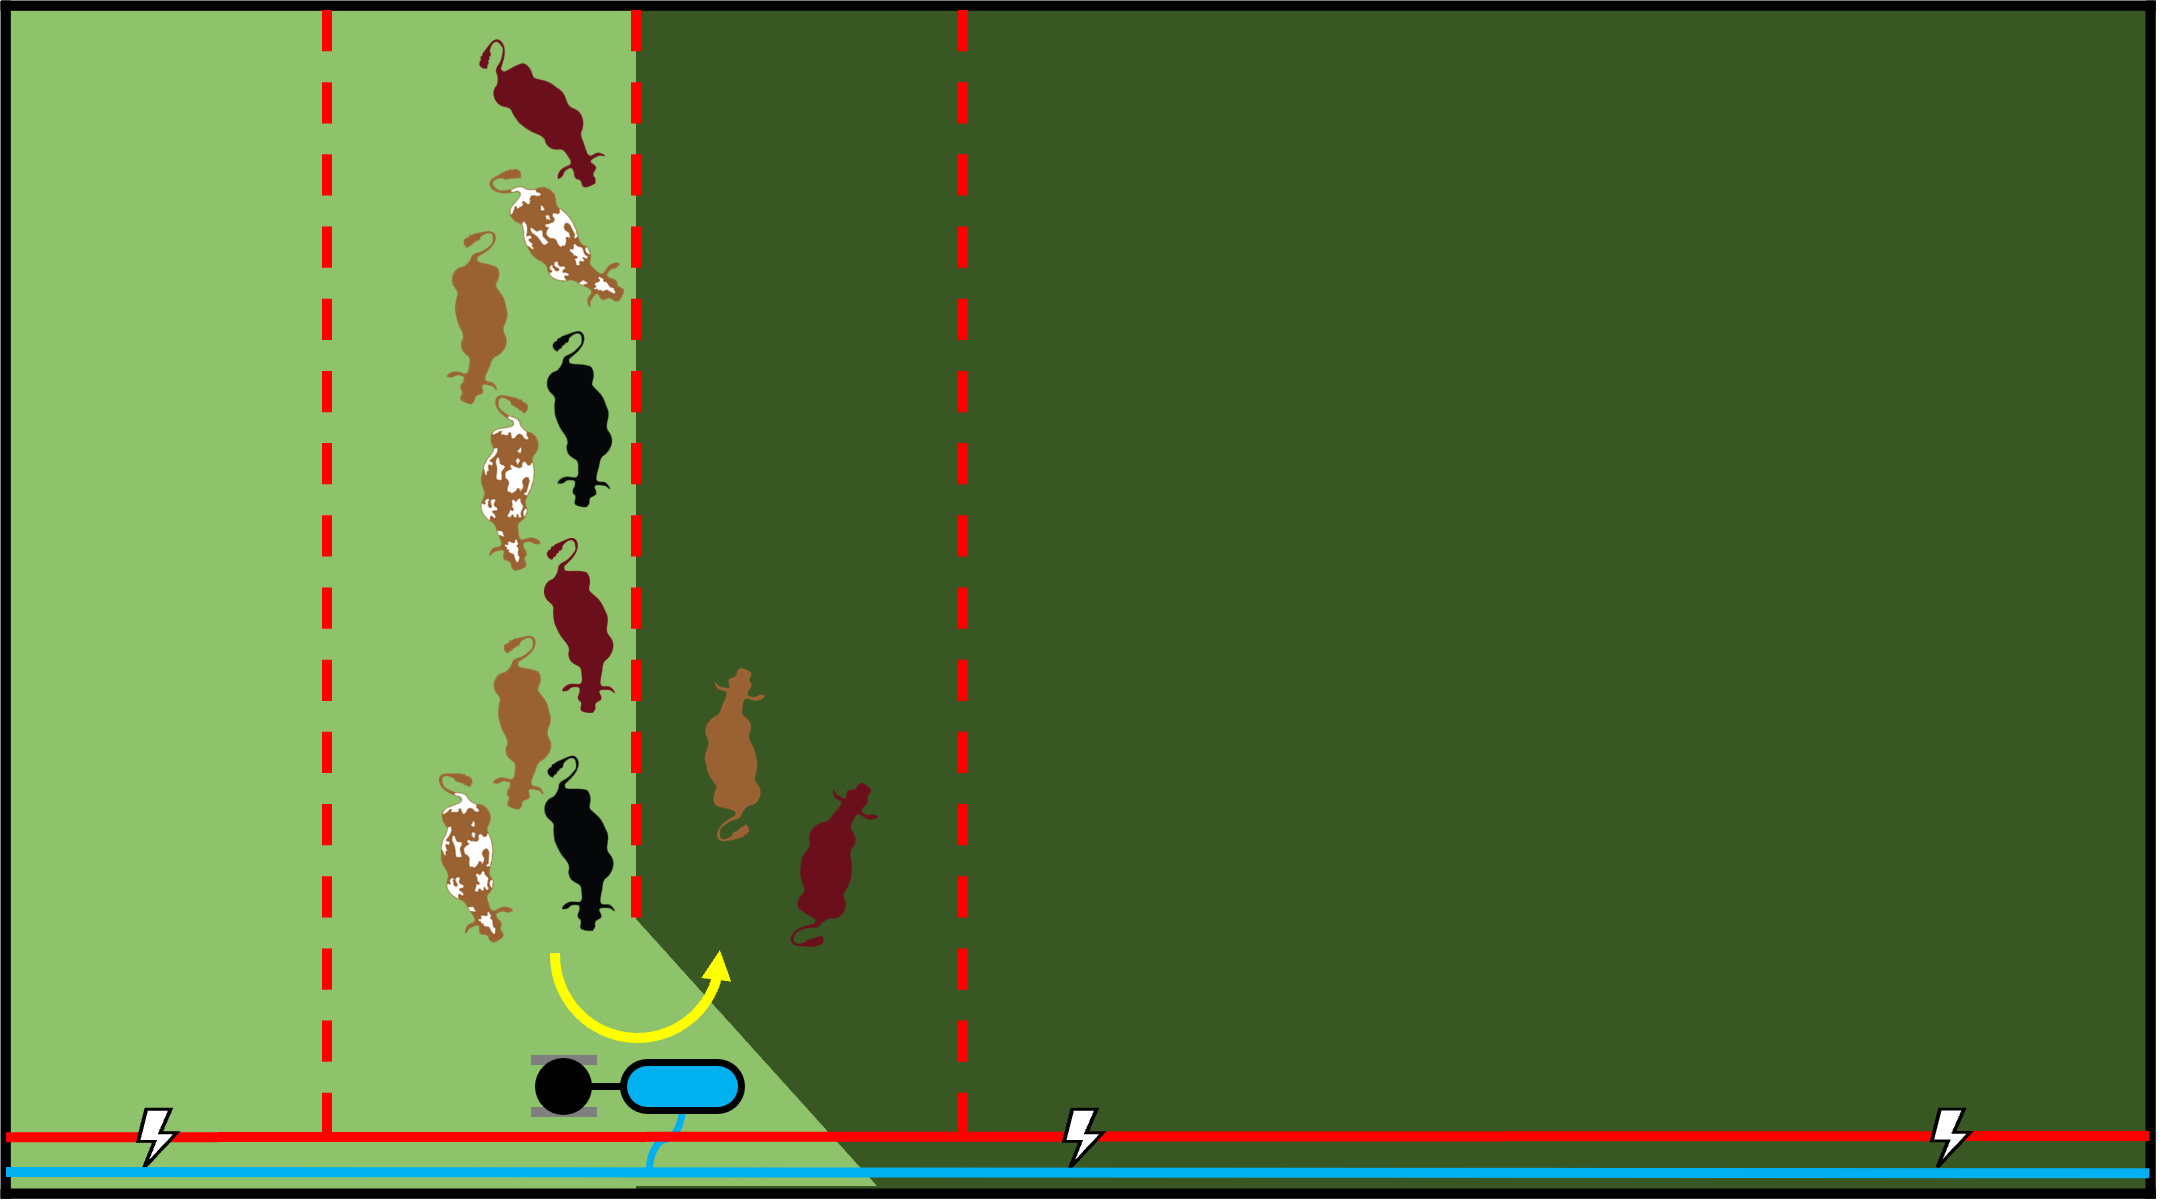
Figure 14:
As livestock enter the new paddock, they pass each other, working their way to the far end and trampling a large amount of forage.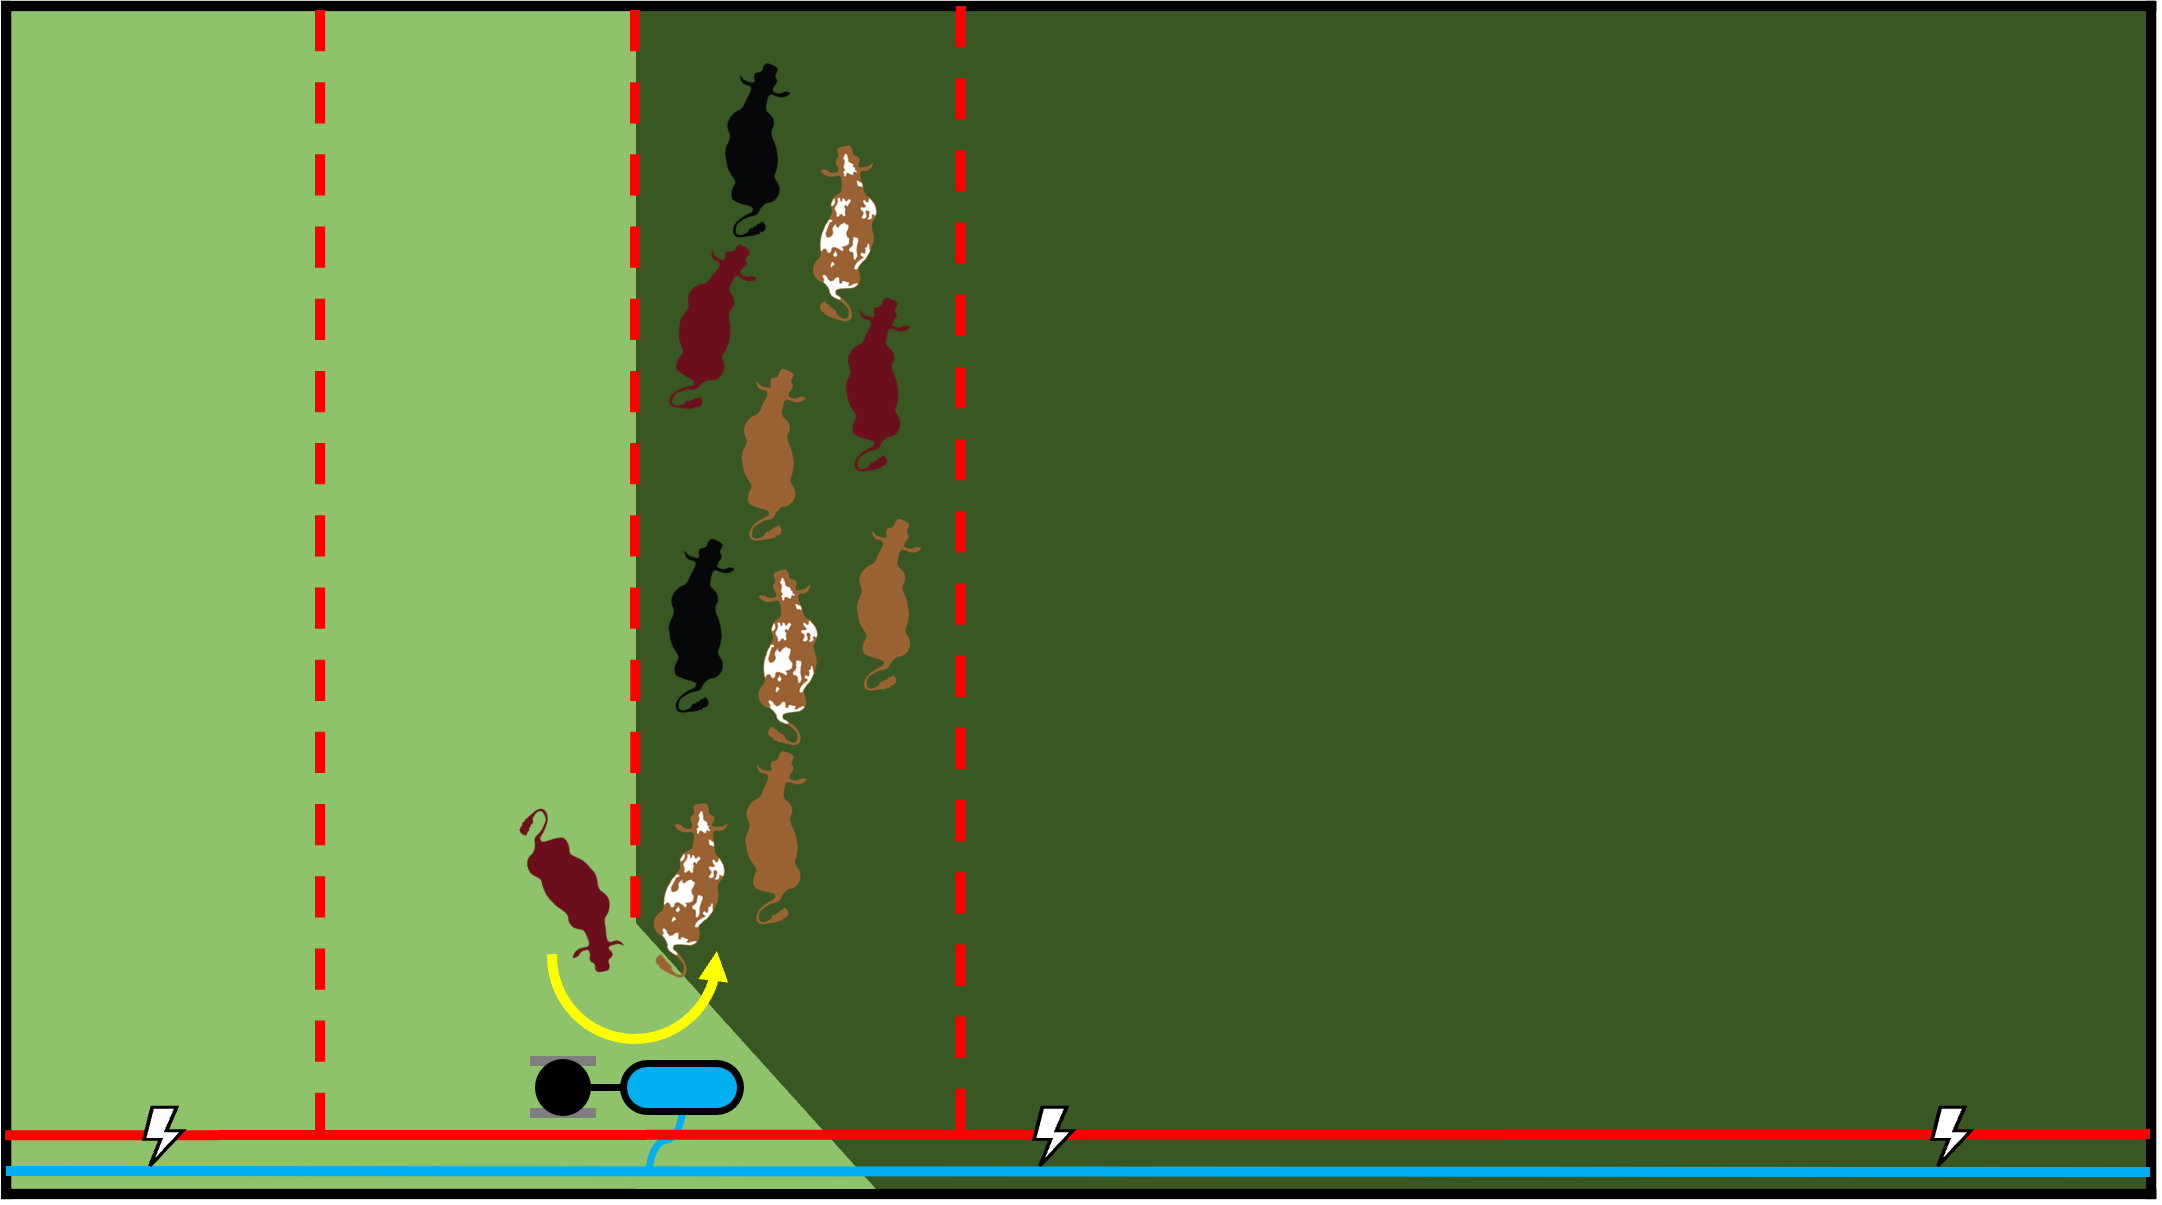
Figure 15:
Once livestock are in the next paddock, the polywire fence is re-connected, but on the other side of water trough and mineral feeder tub (step 1). The former back fence is rolled up (step 2), moved beyond the currently grazed paddock (step 3), and unrolled to create a new paddock (step 4).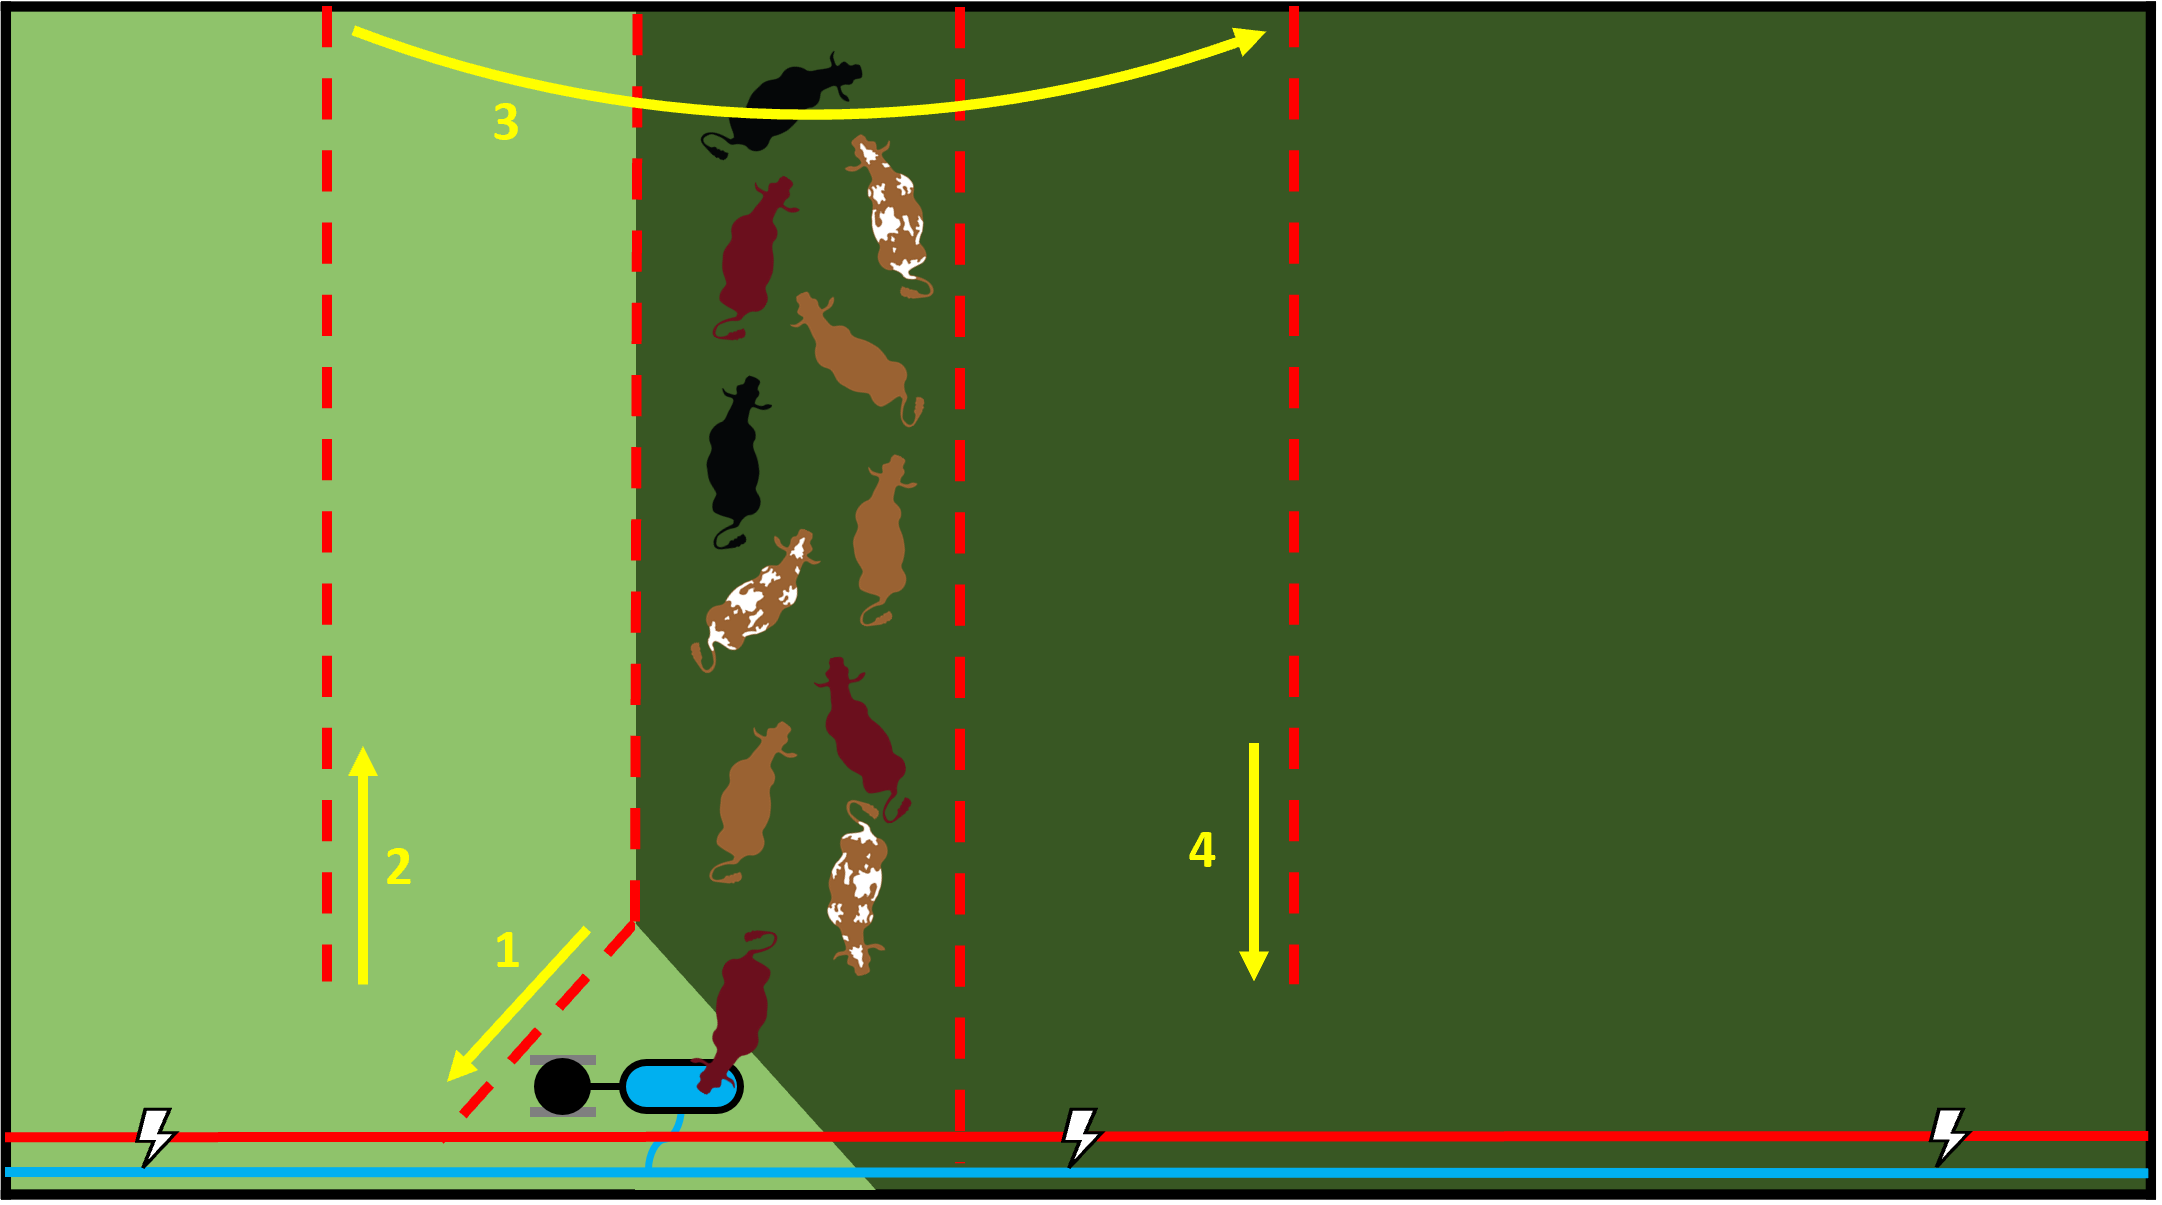
Leader-Follower Grazing
Figure 16:
Two different classes of livestock are placed in paddocks next to each other. The leading group, with higher nutritional requirements, grazes recovered pasture first, followed by a group with lower nutritional requirements that grazes lower-quality forage. A portable water trough and two mineral feeder tubs that are connected to each other via cable or chain straddle the polywire fence between the two groups.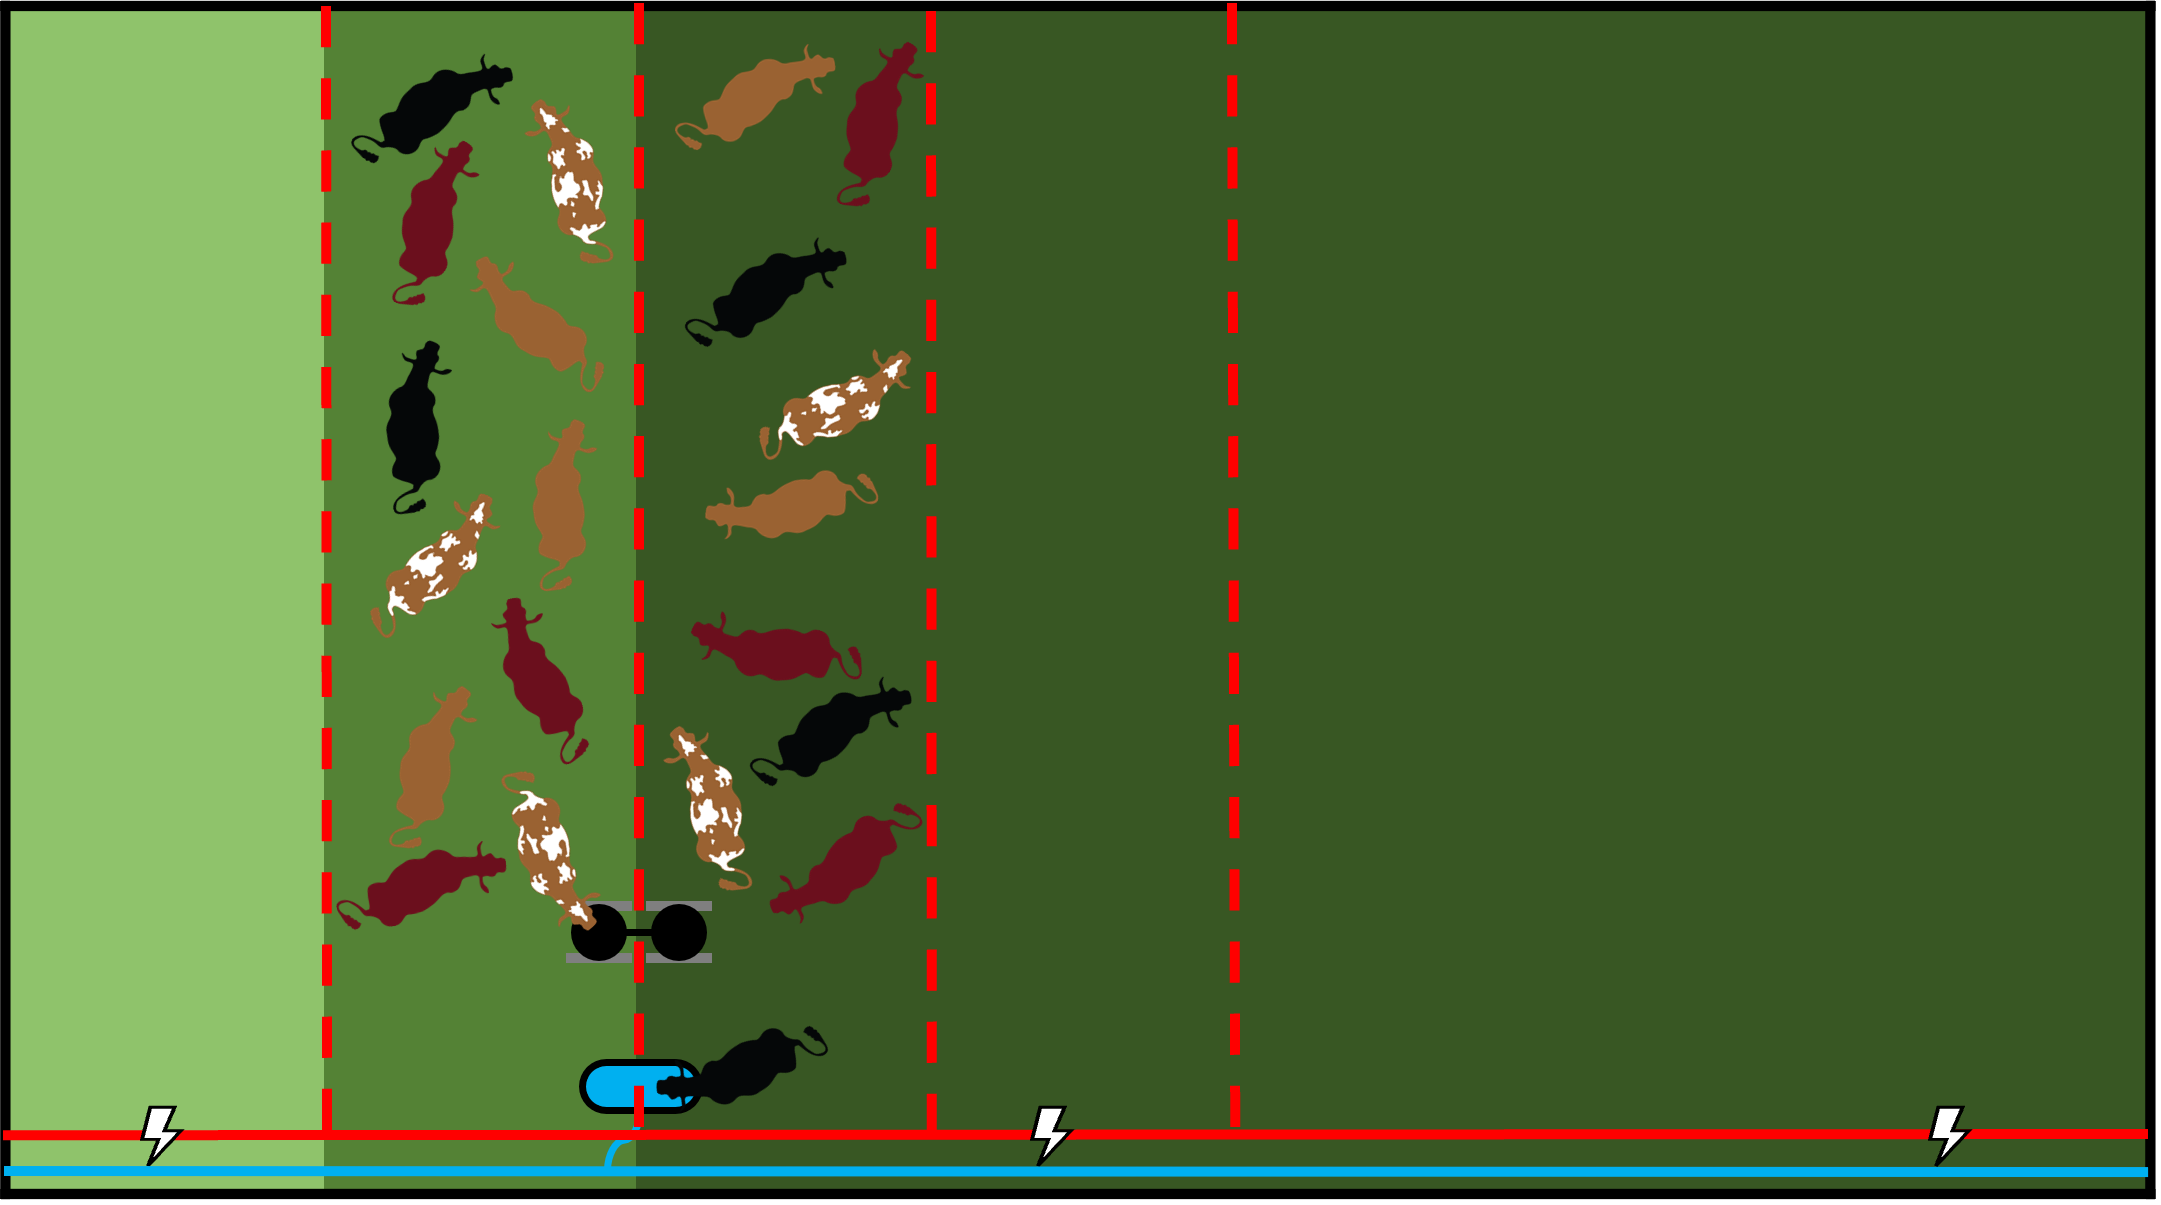
Figure 17:
Front polywire fence is rolled up 10 to 20 feet for the leader group to move to the next paddock.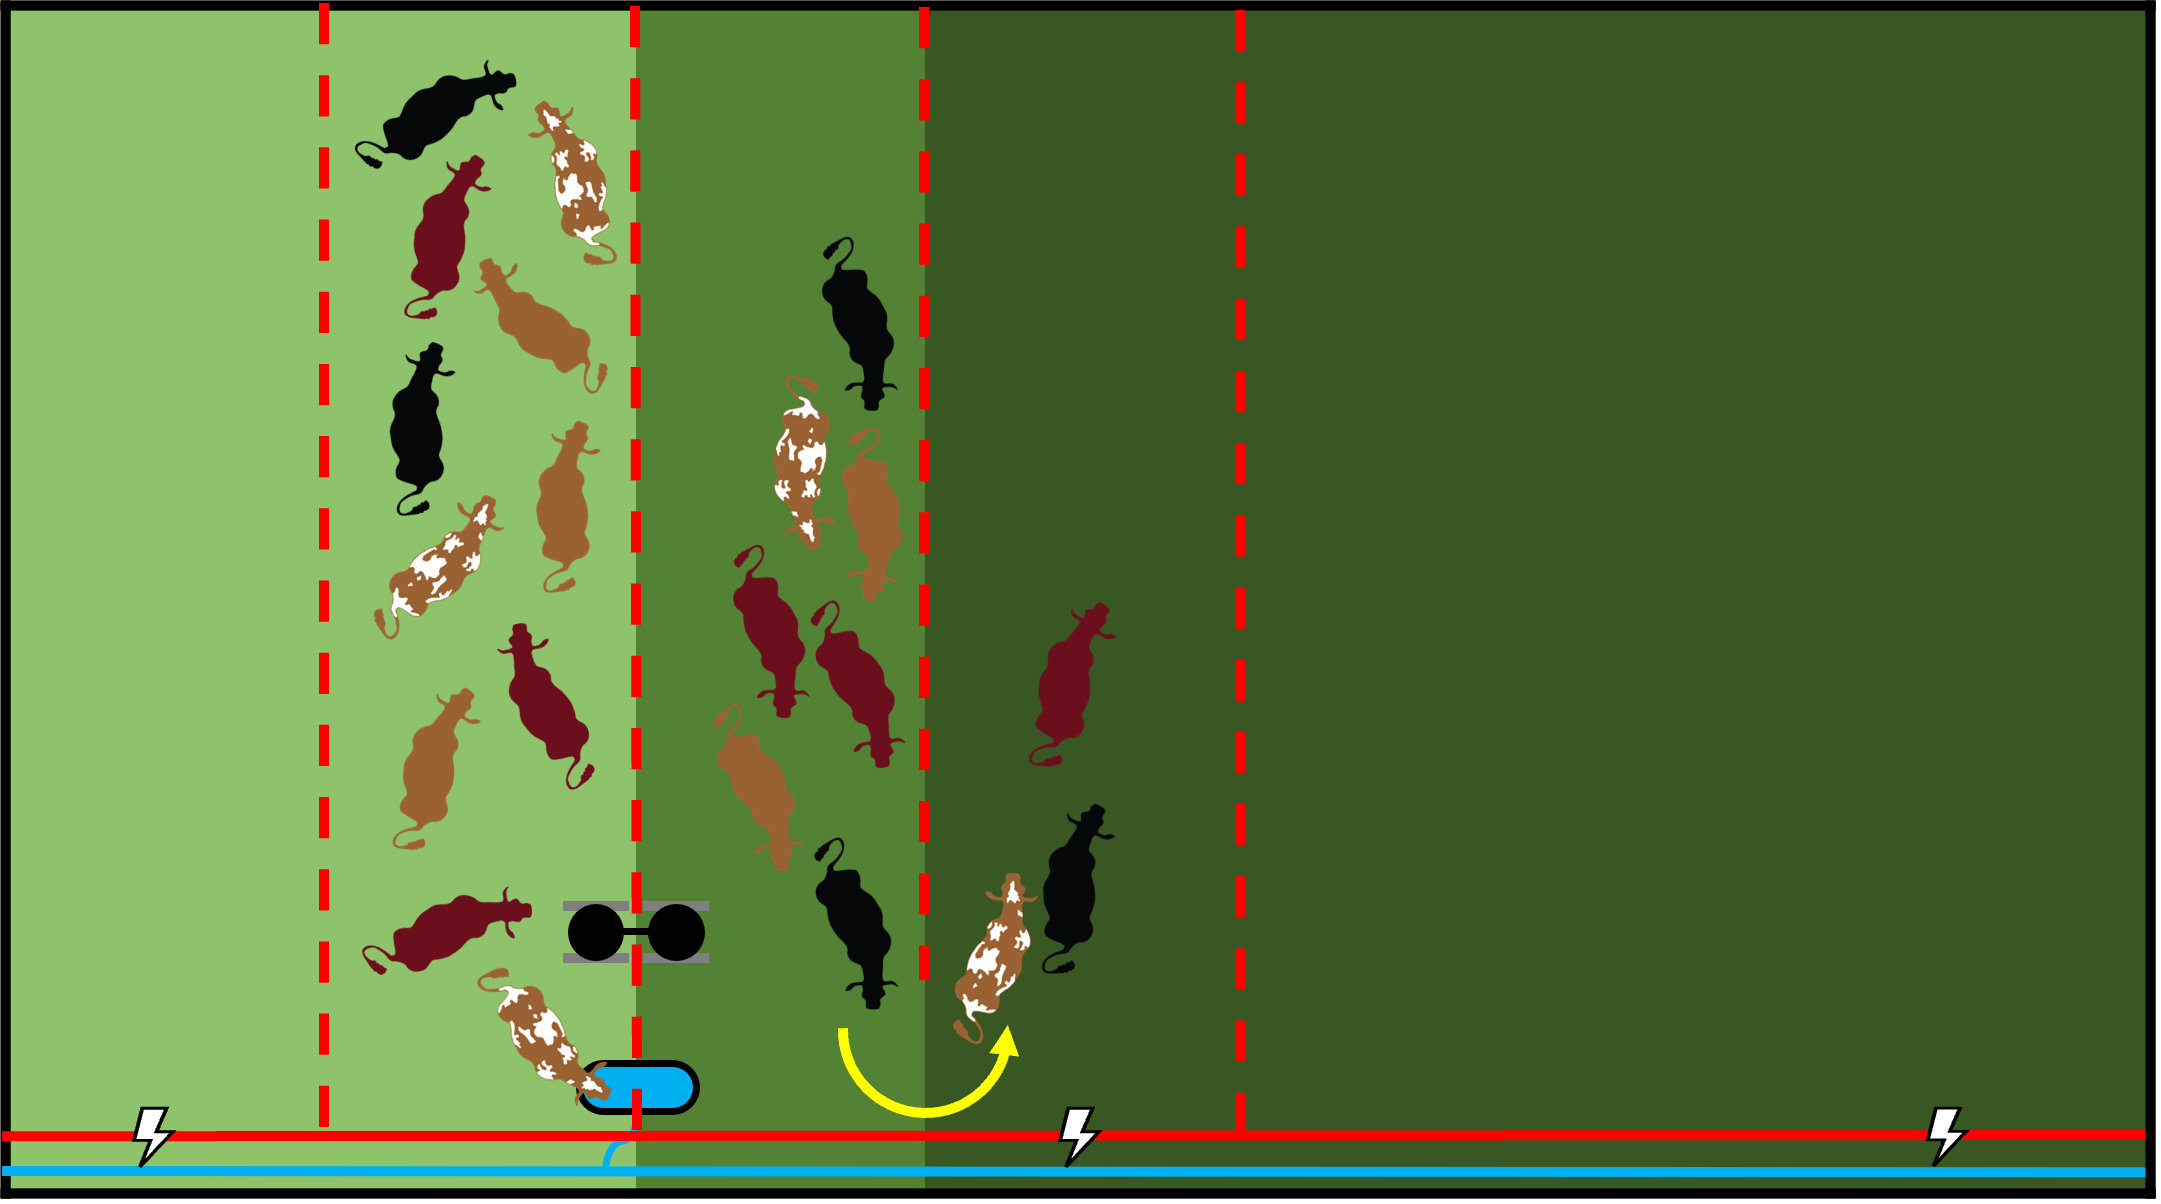
Figure 18:
The portable water trough and both mineral feeder tubs are moved to the next fenceline while the fence is open.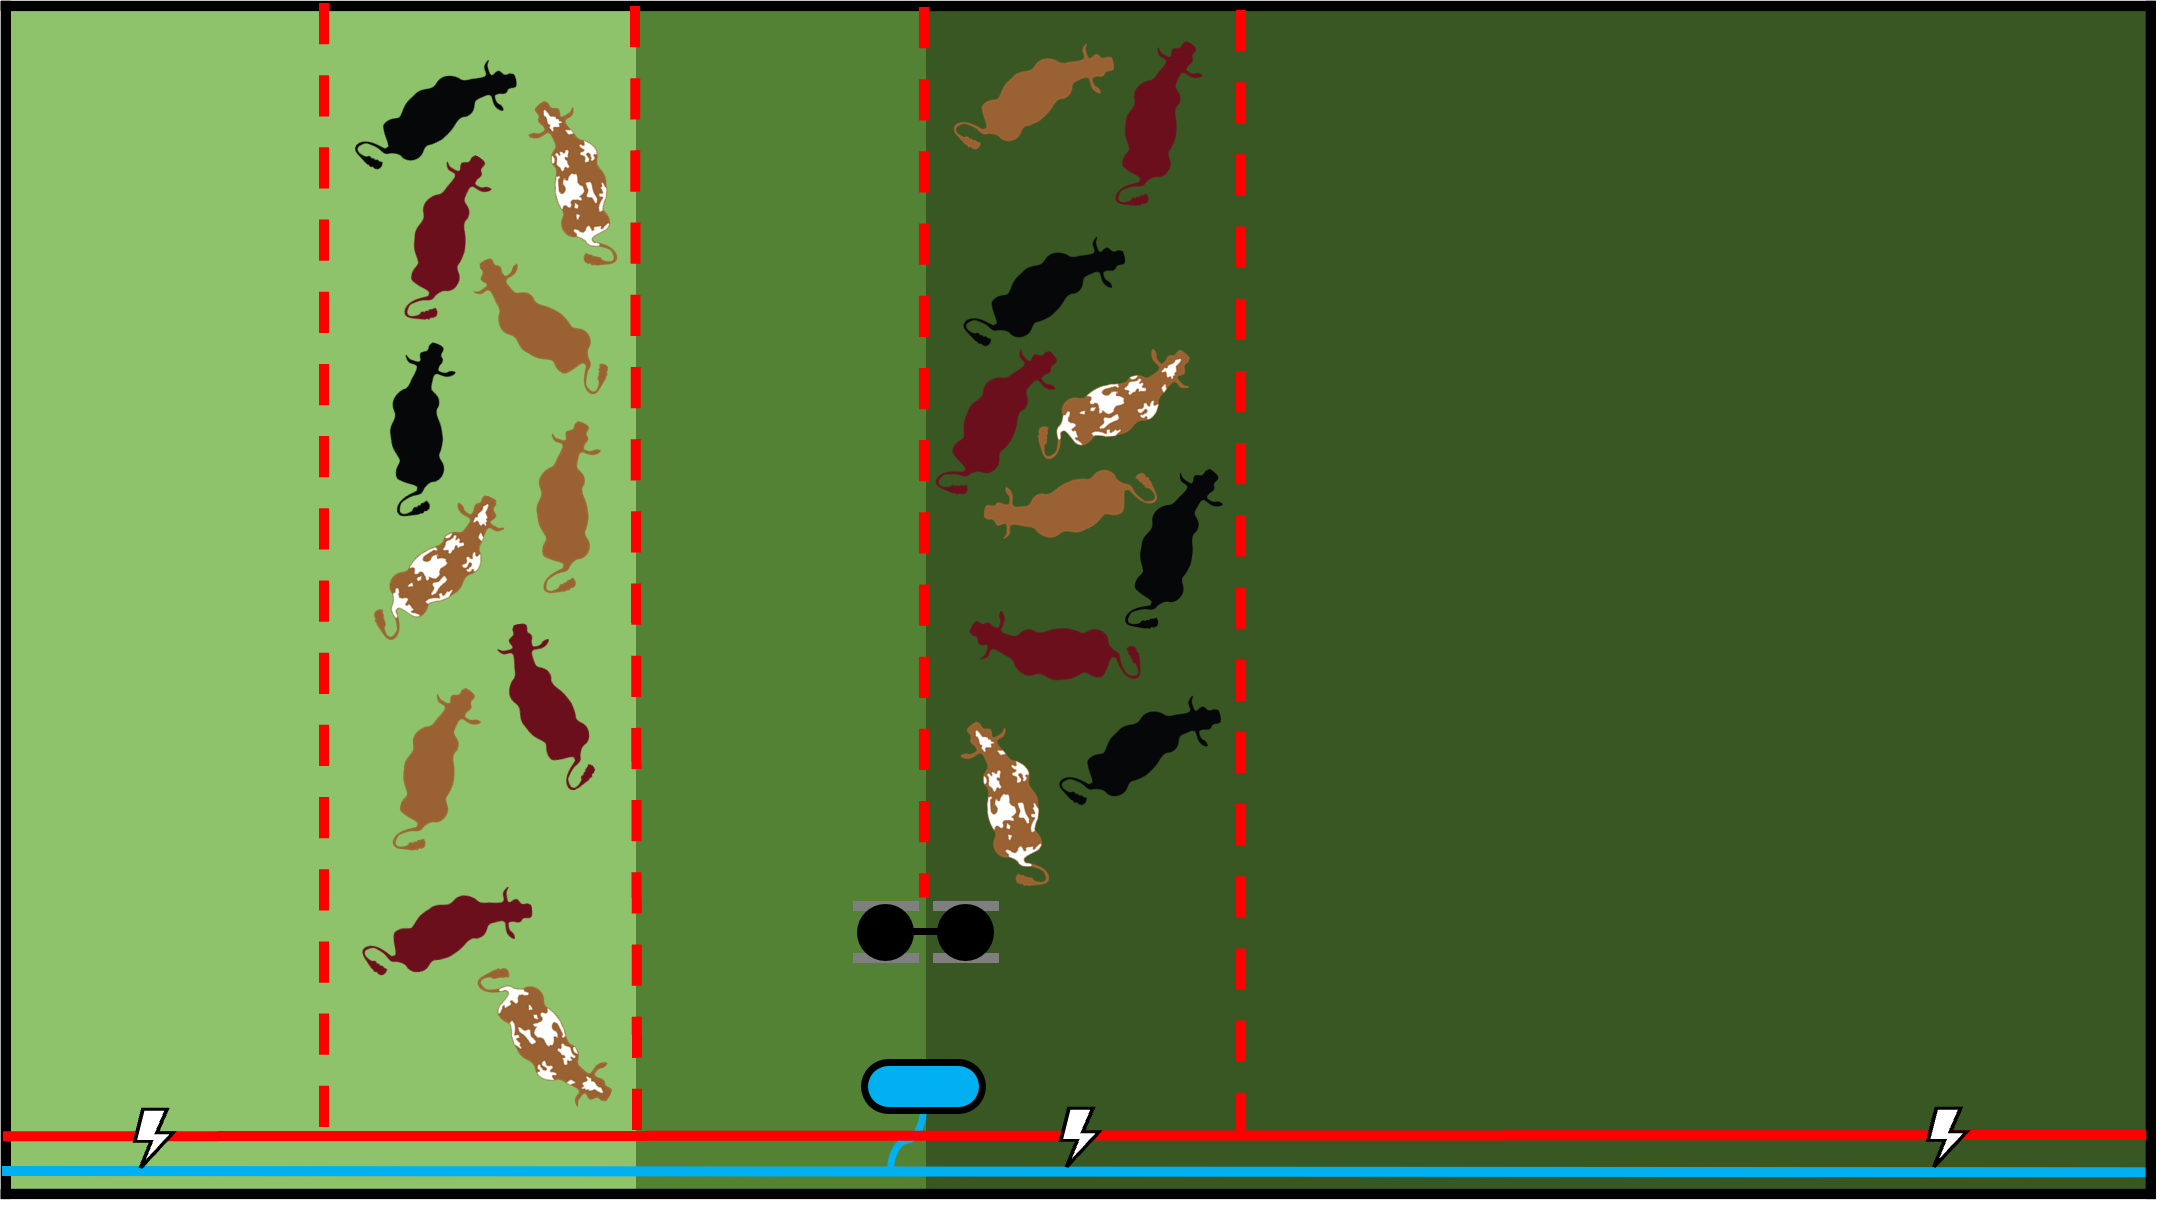
Figure 19:
The portable water trough and both mineral feeder tubs are moved to the next fenceline while the fence is open.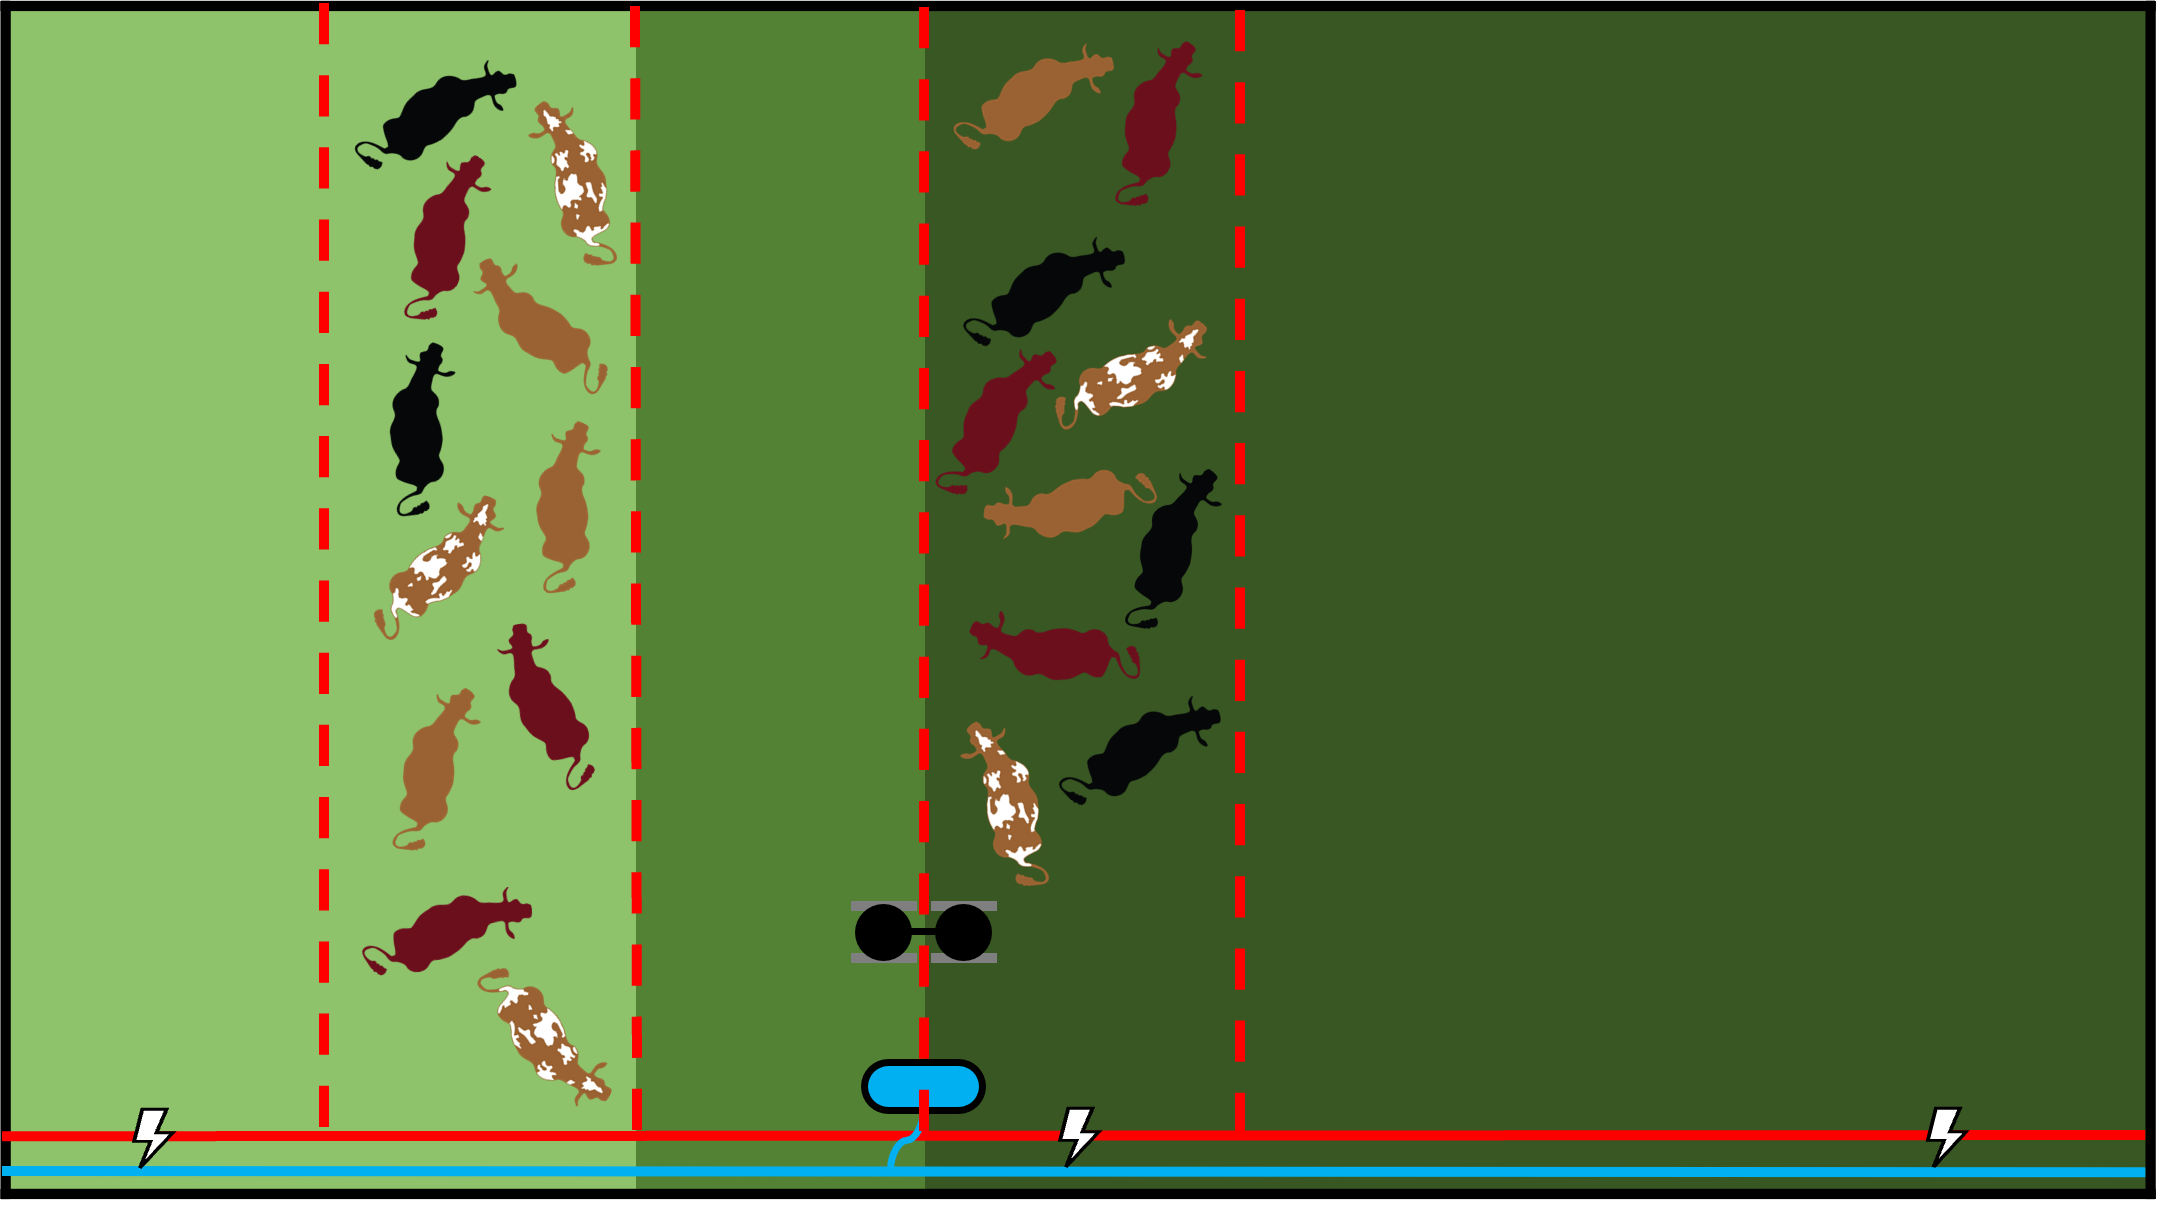
Figure 20:
Front polywire fence for the follower group is rolled up and the follower group walks forward to the paddock that formerly held the leader group.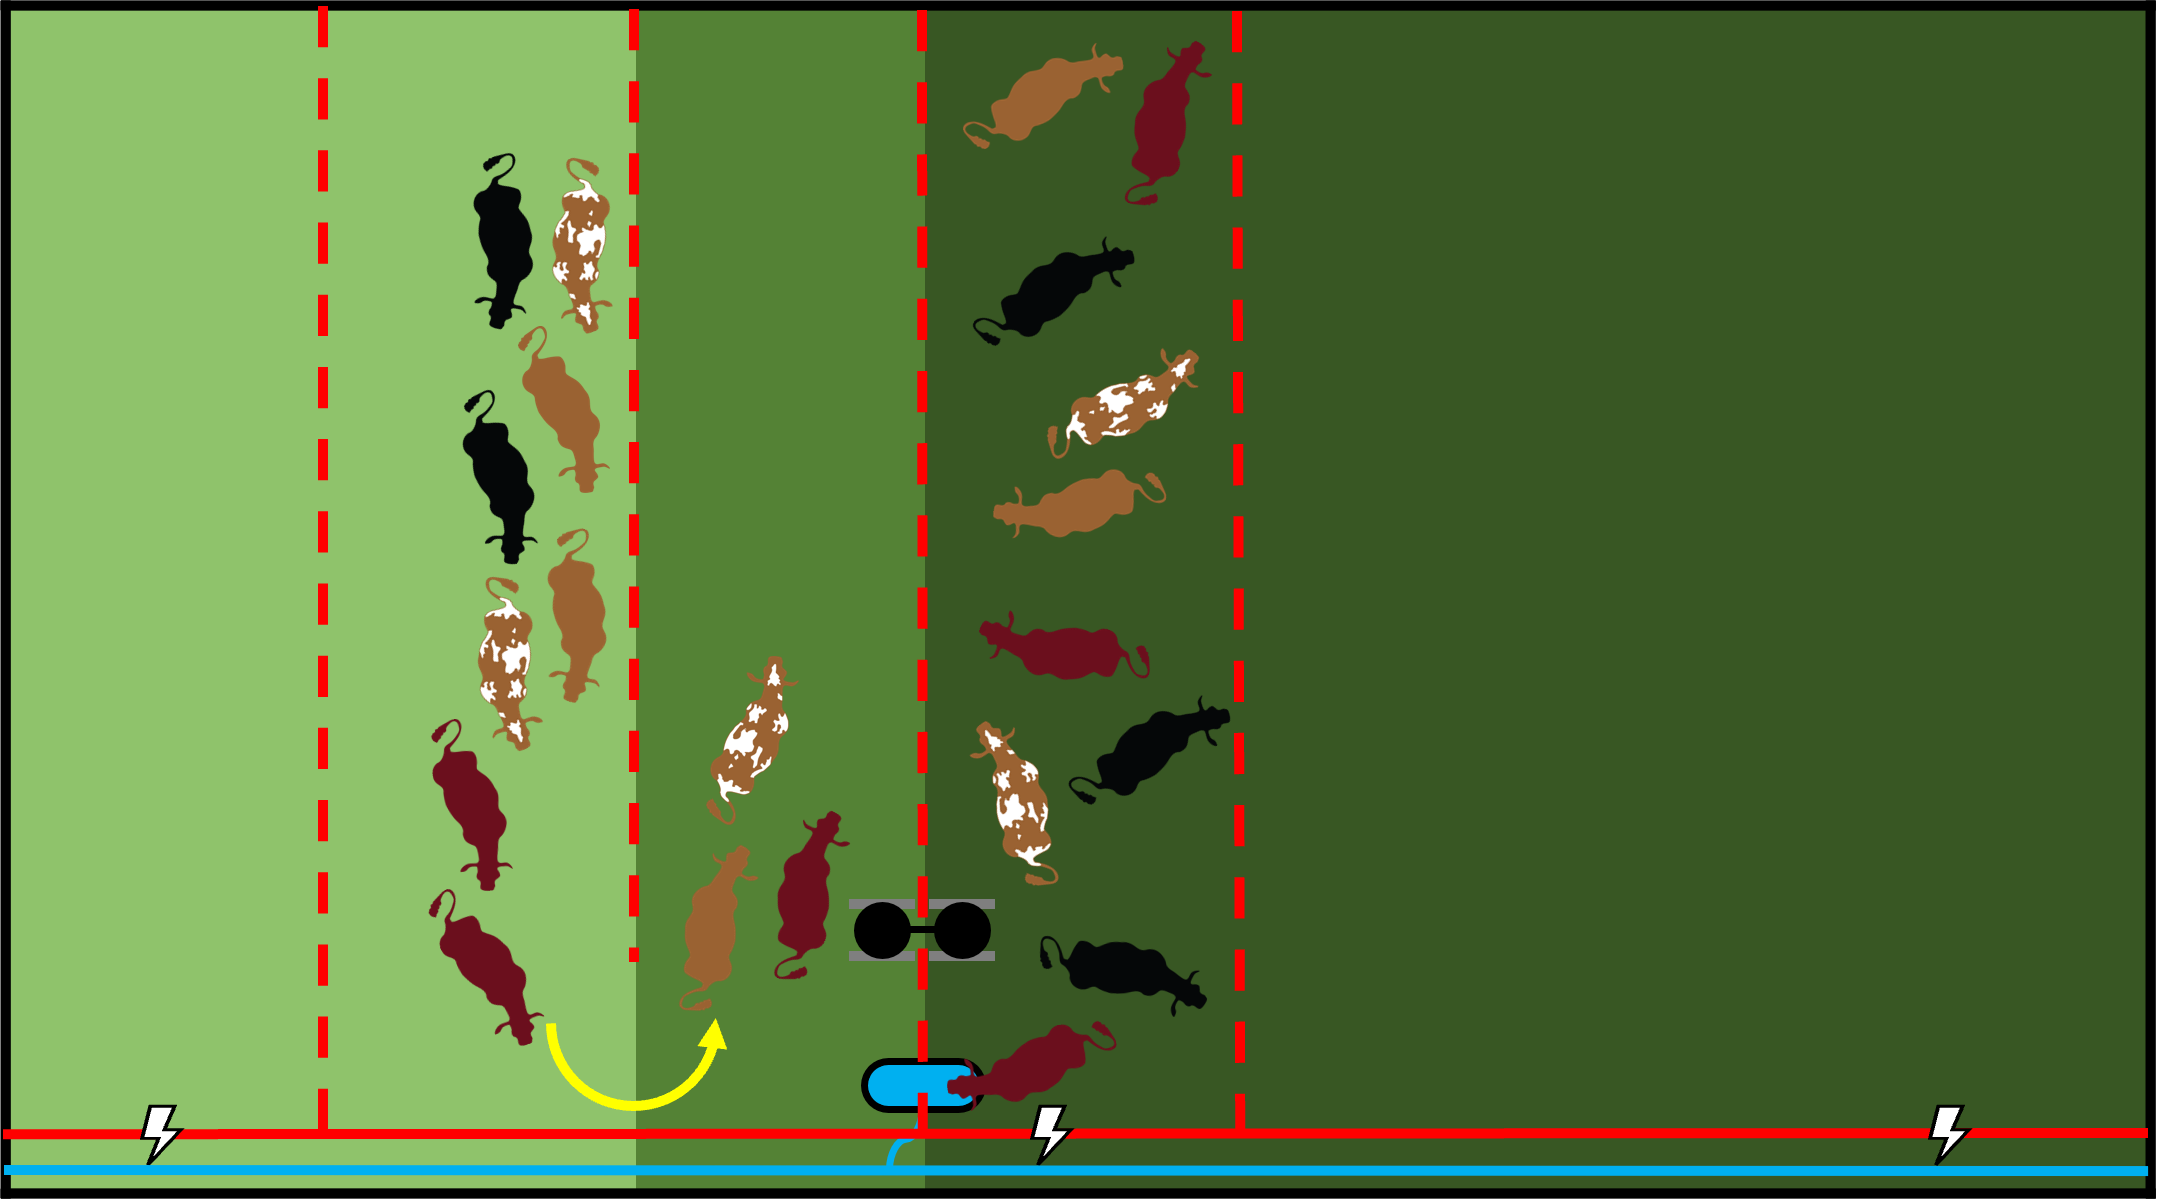
Figure 21:
Once the follower group is in the next paddock, the polywire fence is re-connected (step 1). The back fence is rolled up (step 2), moved beyond the currently grazed paddock (step 3), and unrolled to create a new paddock (step 4).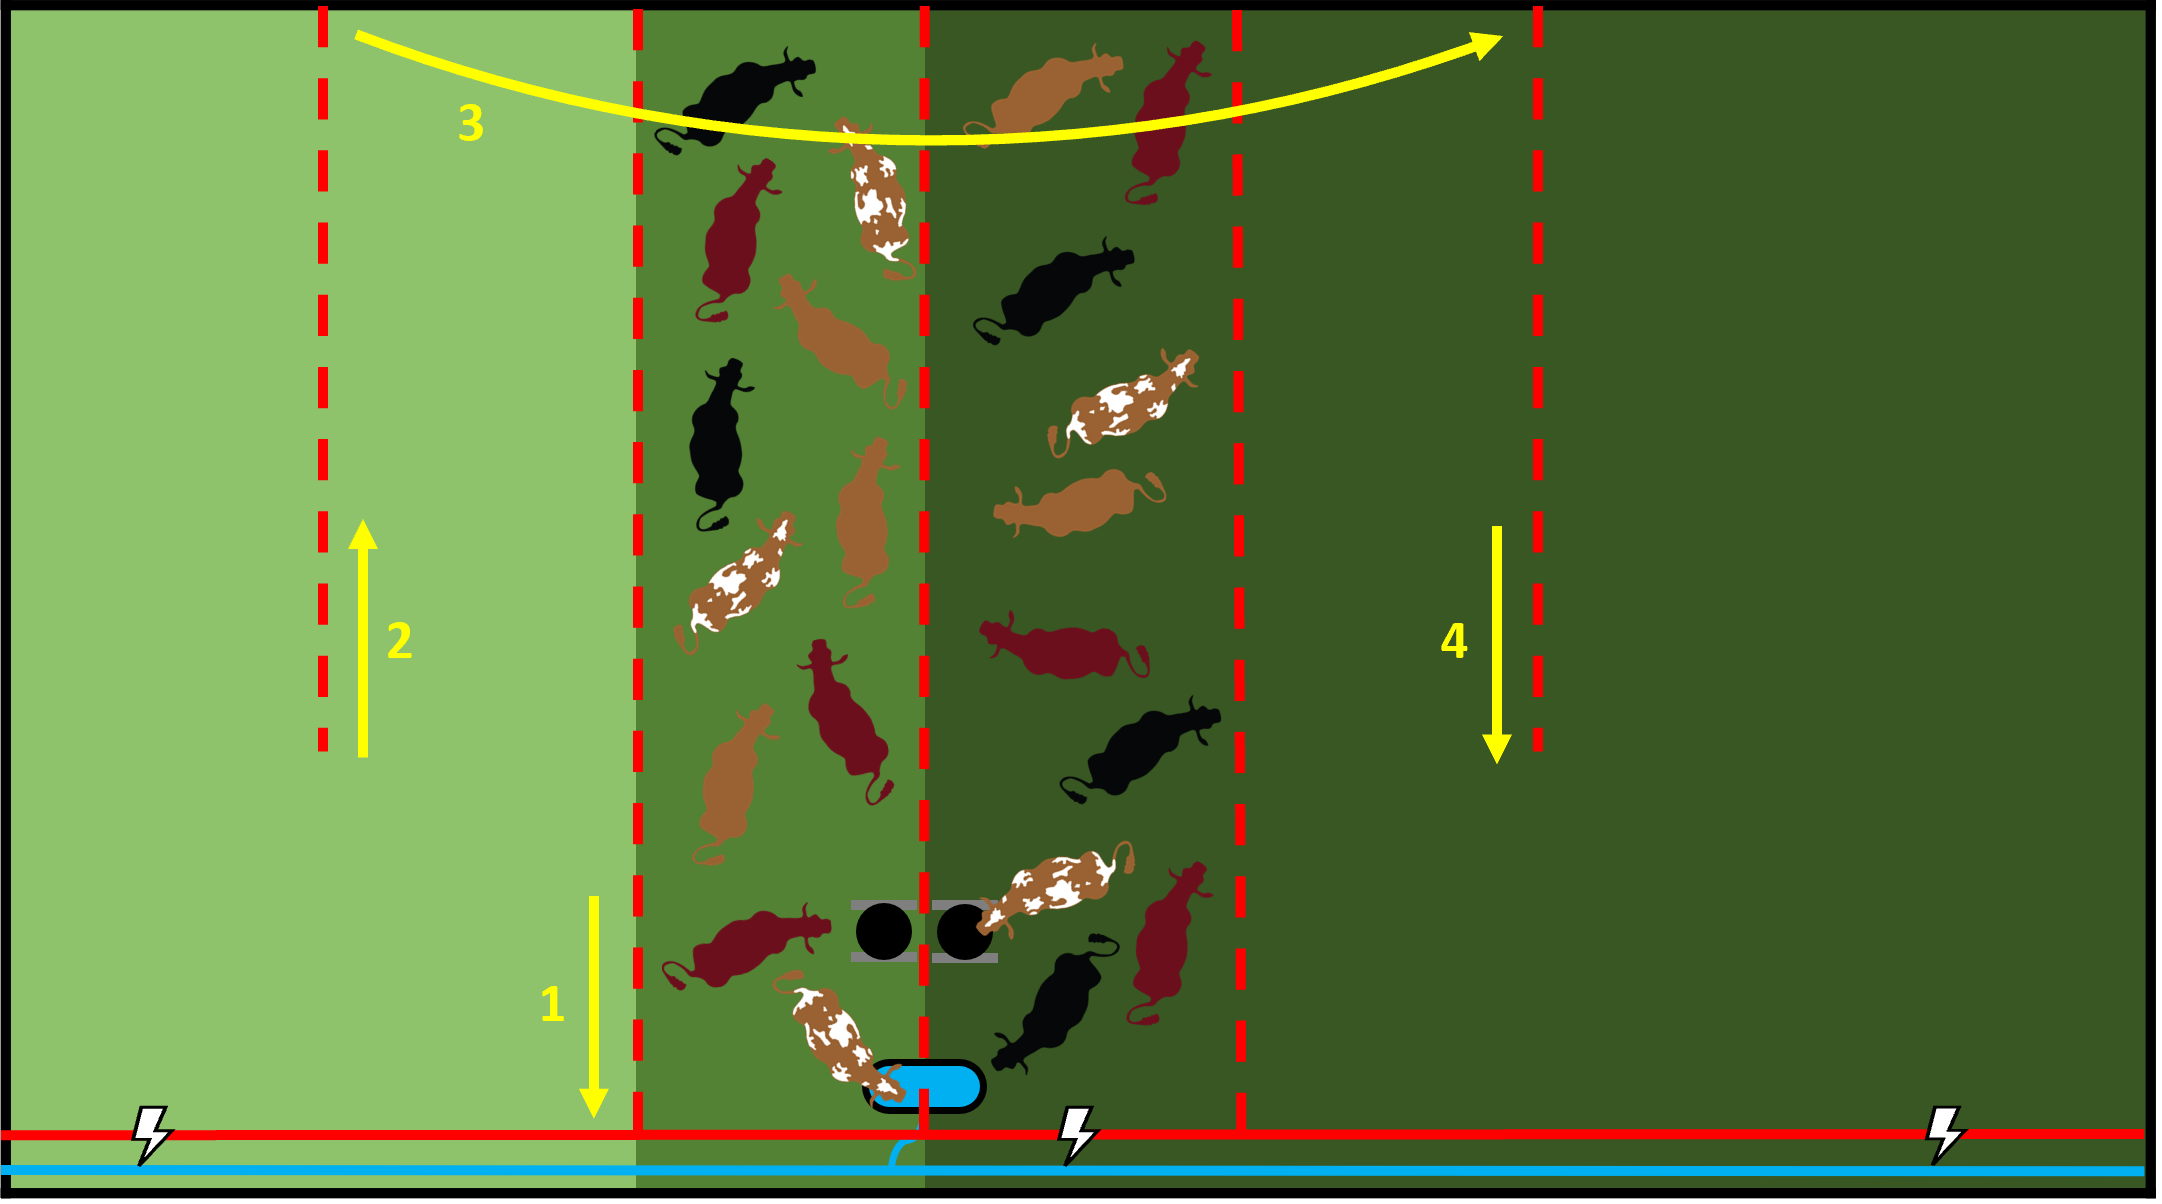
Wheel Line Advanced One Riser at a Time
Figure 22:
Livestock graze in a rectangular paddock that is just ahead of the wheel line. Livestock graze on dry ground and plants are irrigated generally within eight to 12 hours of being grazed. The back fence of the paddock is lined up with the next riser down from where the wheel line is positioned. The water trough and mineral feeder tub are located on the line between two paddocks, so they only need to be moved every other paddock move. A short hose with quick-connect couplings transfers water from an irrigation riser to a portable water trough. Polywire fencing is directed around the water trough and mineral feeder tub so that they are moved every other paddock move.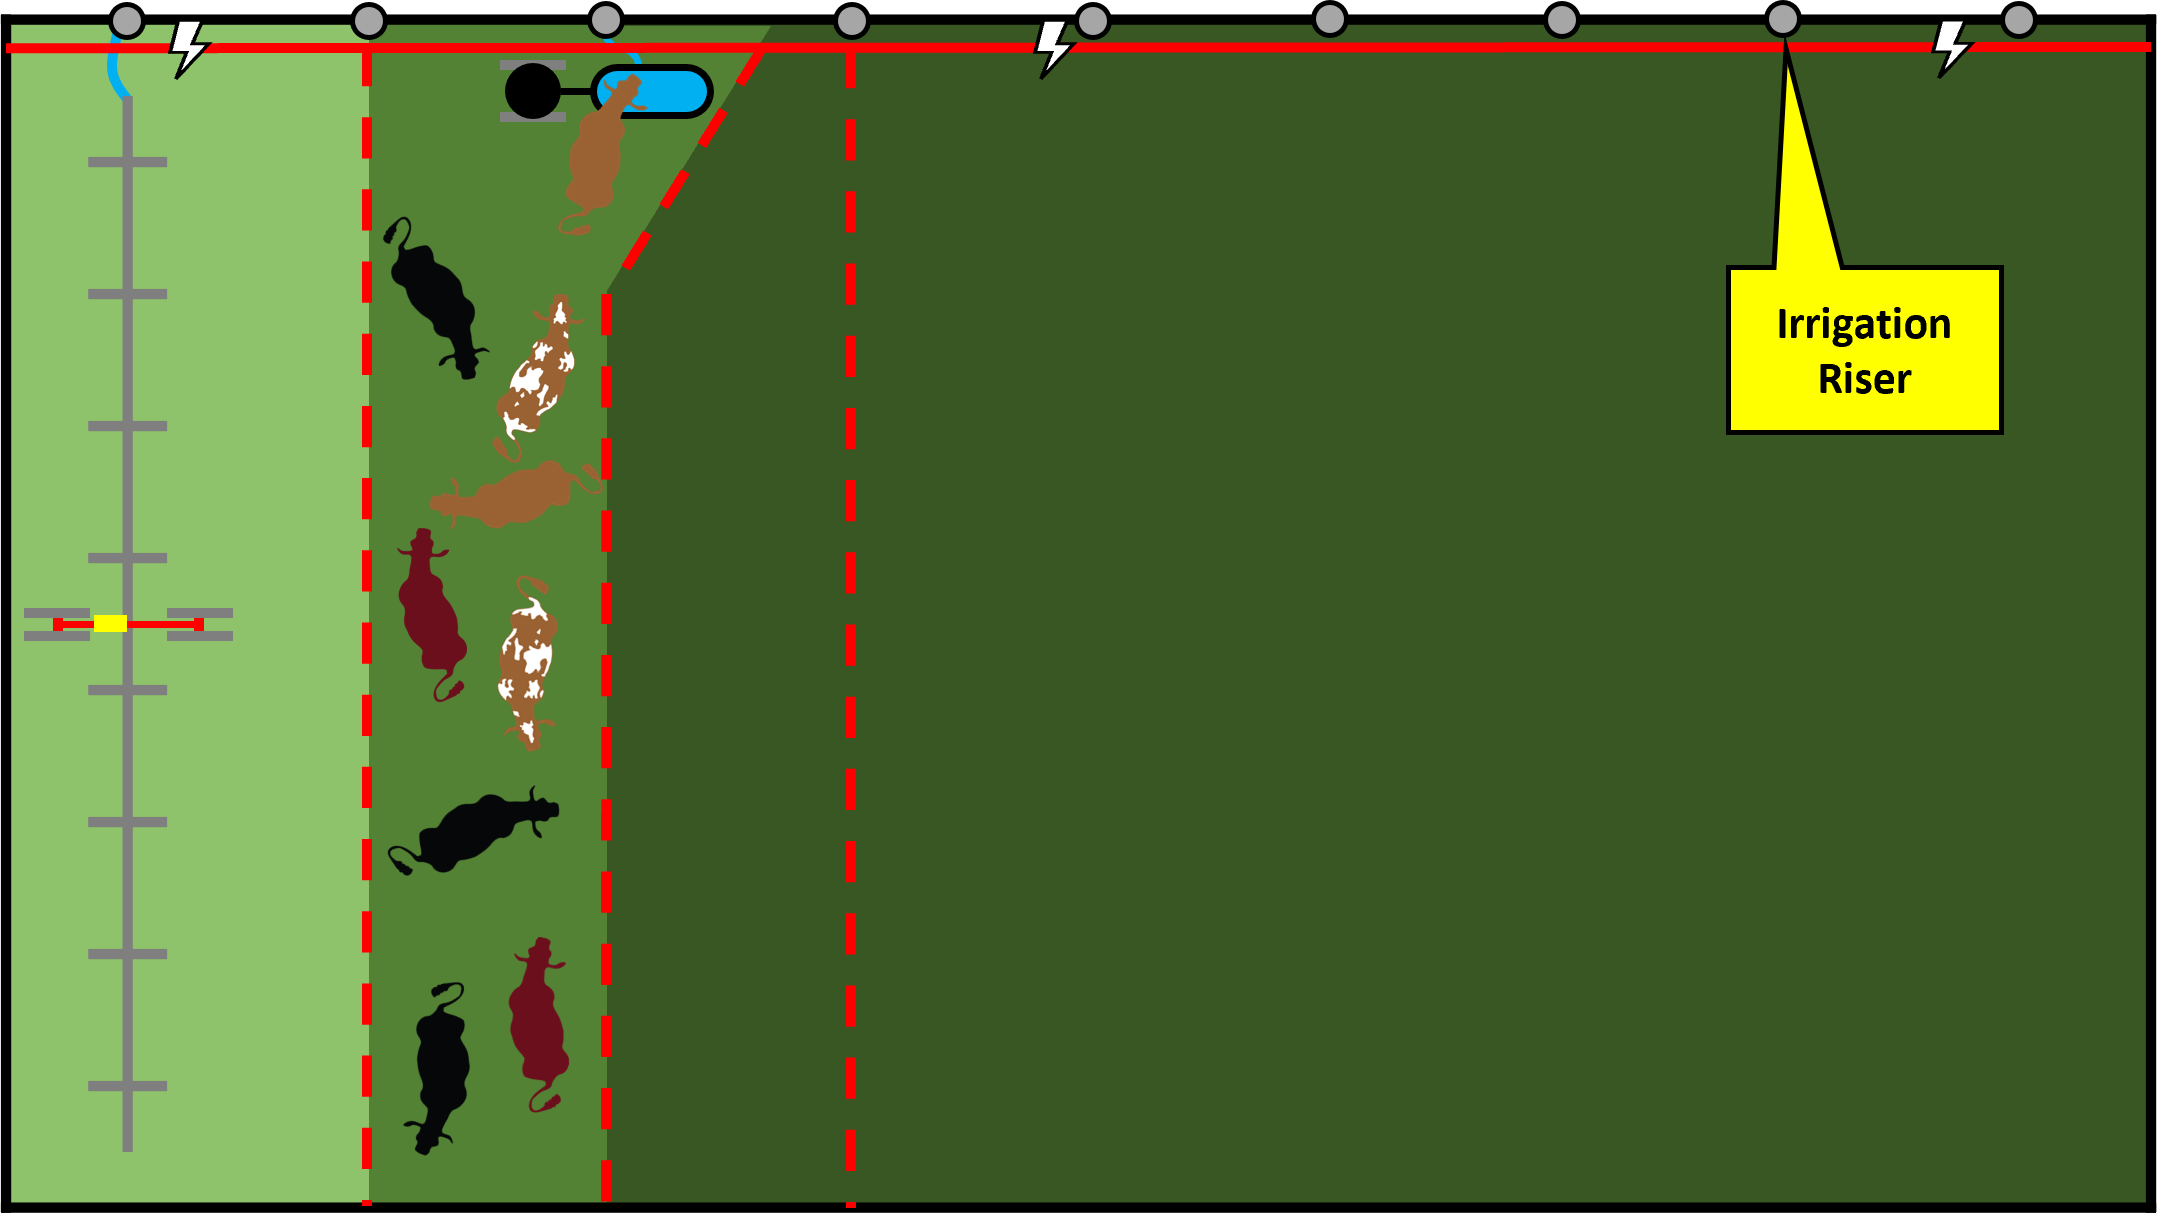
Figure 23:
After the wheel line is shut off and allowed to drain, the middle polywire fence is rolled up 10 to 20 feet, so livestock can enter the next paddock on the end. Alternatively, the polywire fence can be rolled up all the way to allow for higher intake and less trampling.
Figure 24:
After livestock are in the next paddock, the polywire fence is re-connected onto the other side of the water trough and mineral feeder tub (step 1). The back fence is rolled up (step 2), moved beyond the currently grazed paddock (step 3), and unrolled to create a new paddock (step 4).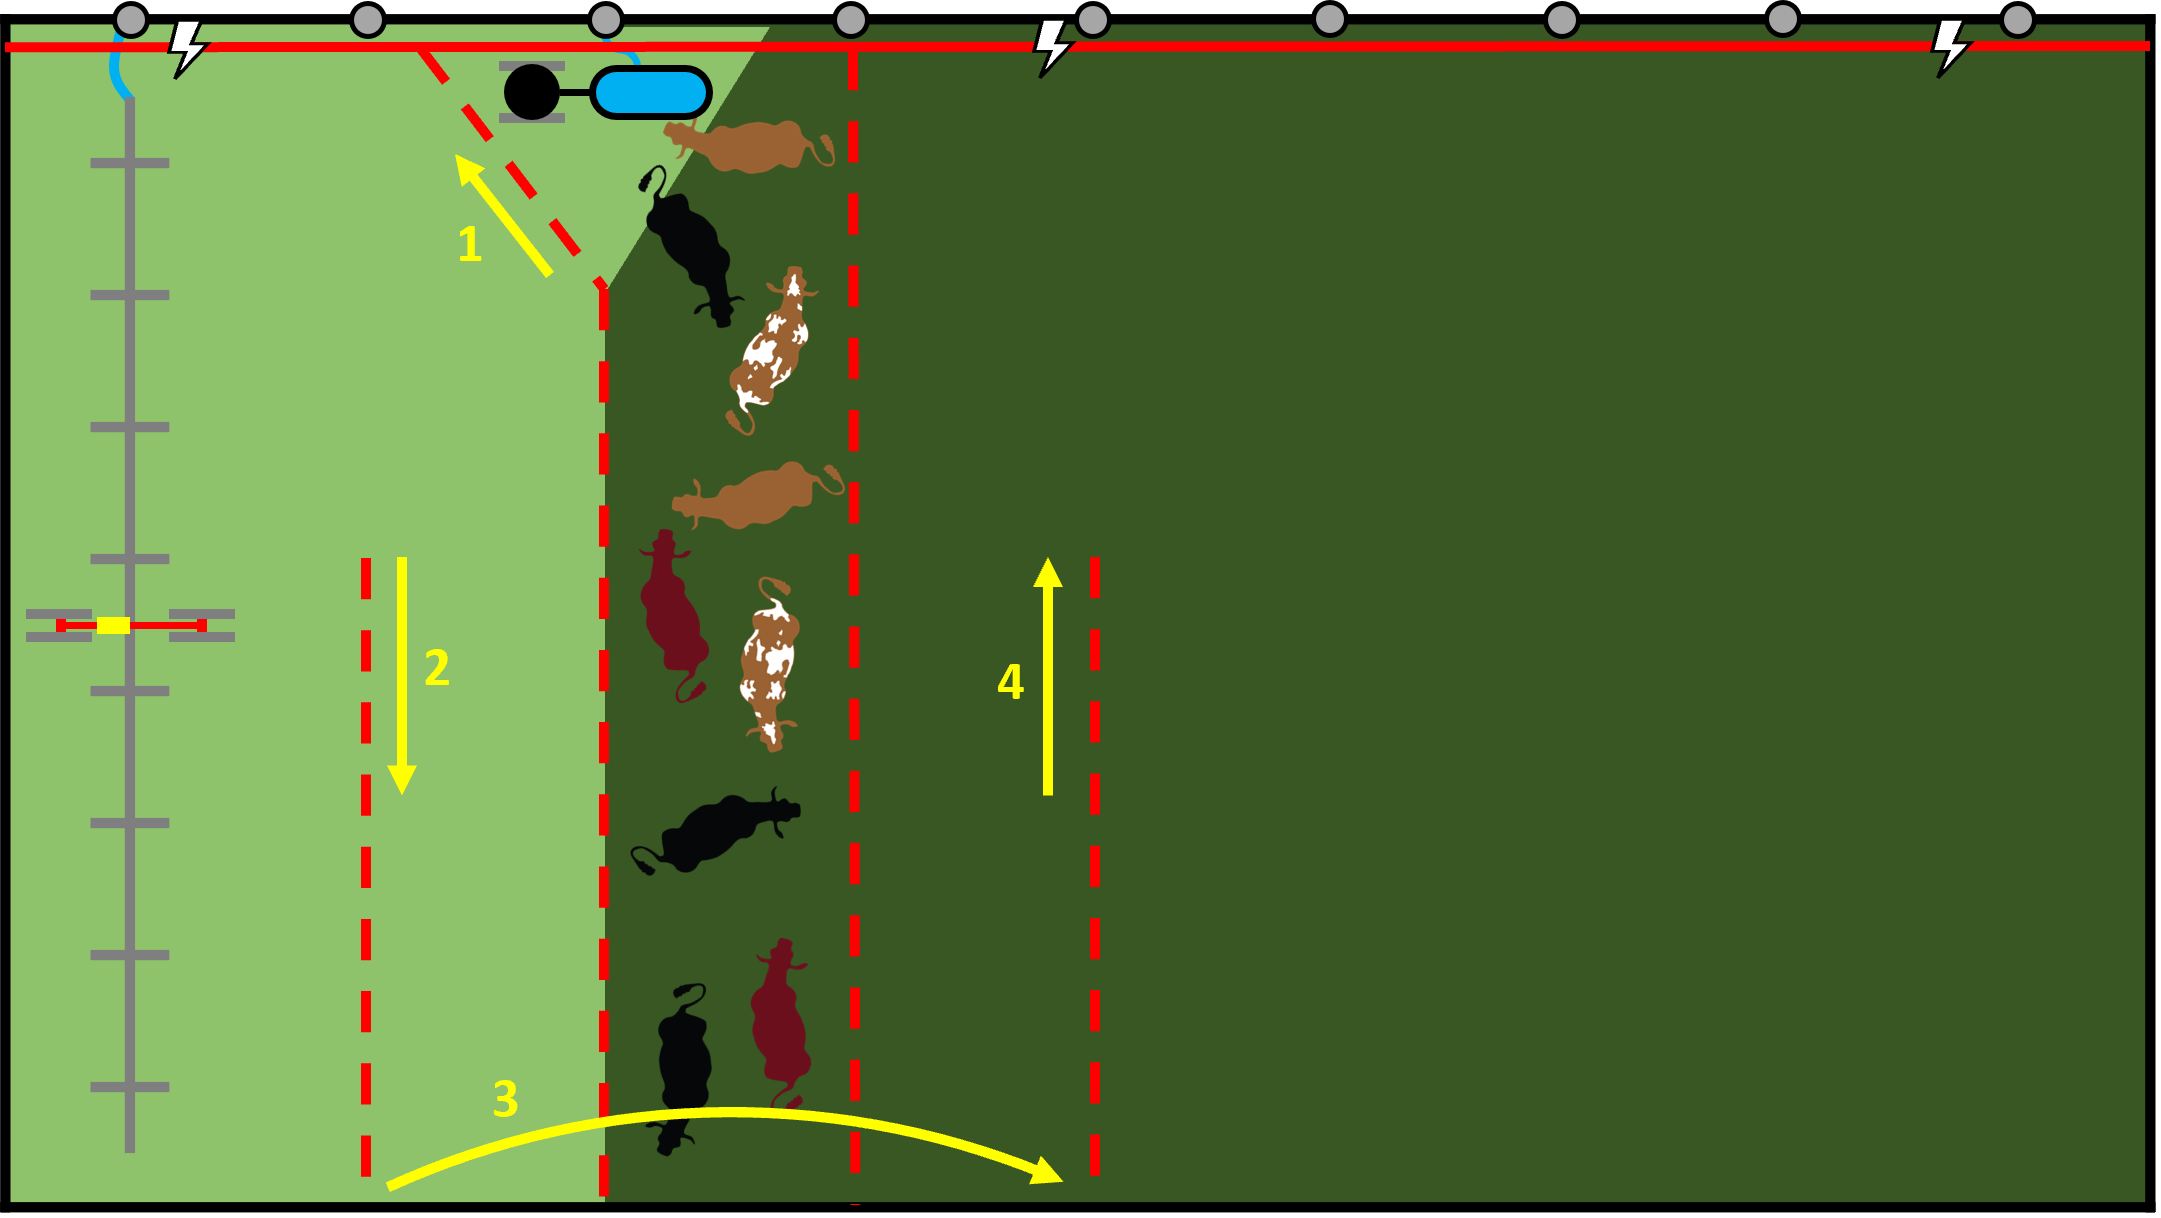
Figure 25:
The wheel line moves ahead to the next riser and irrigation resumes.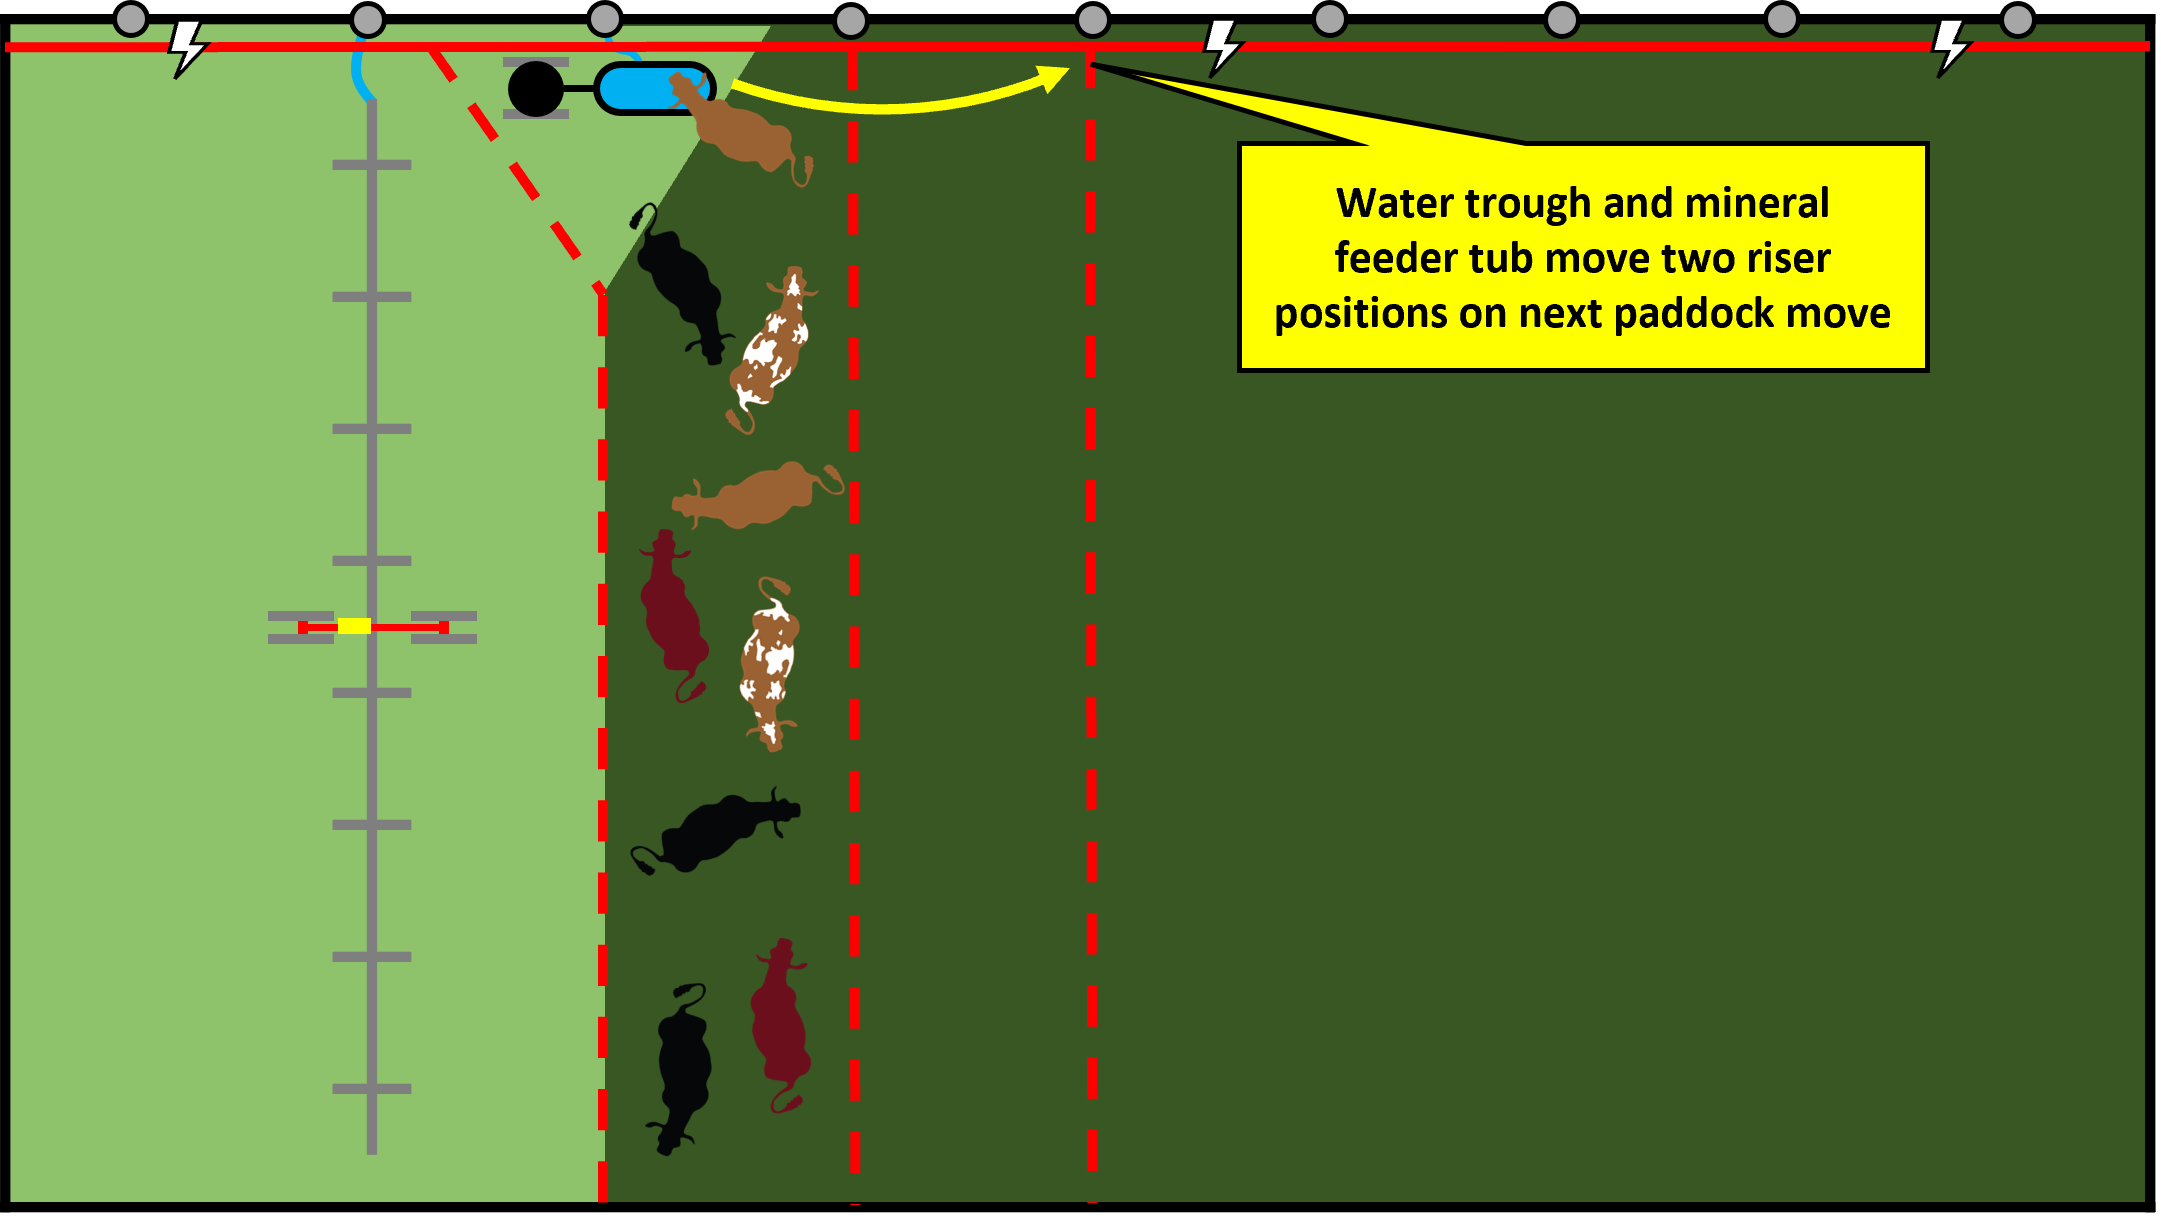
Wheel Line Advanced Every Other Riser
Figure 26:
Livestock graze in a rectangular paddock that is two riser positions ahead of the wheel line. Livestock graze on dry ground, and plants are irrigated generally within eight to 12 hours of being grazed. The back fence of the paddock is lined up between two riser positions. The water trough and mineral feeder tub are located within a single paddock. A short hose with quick-connect couplings transfers water from the irrigation riser to the portable water trough.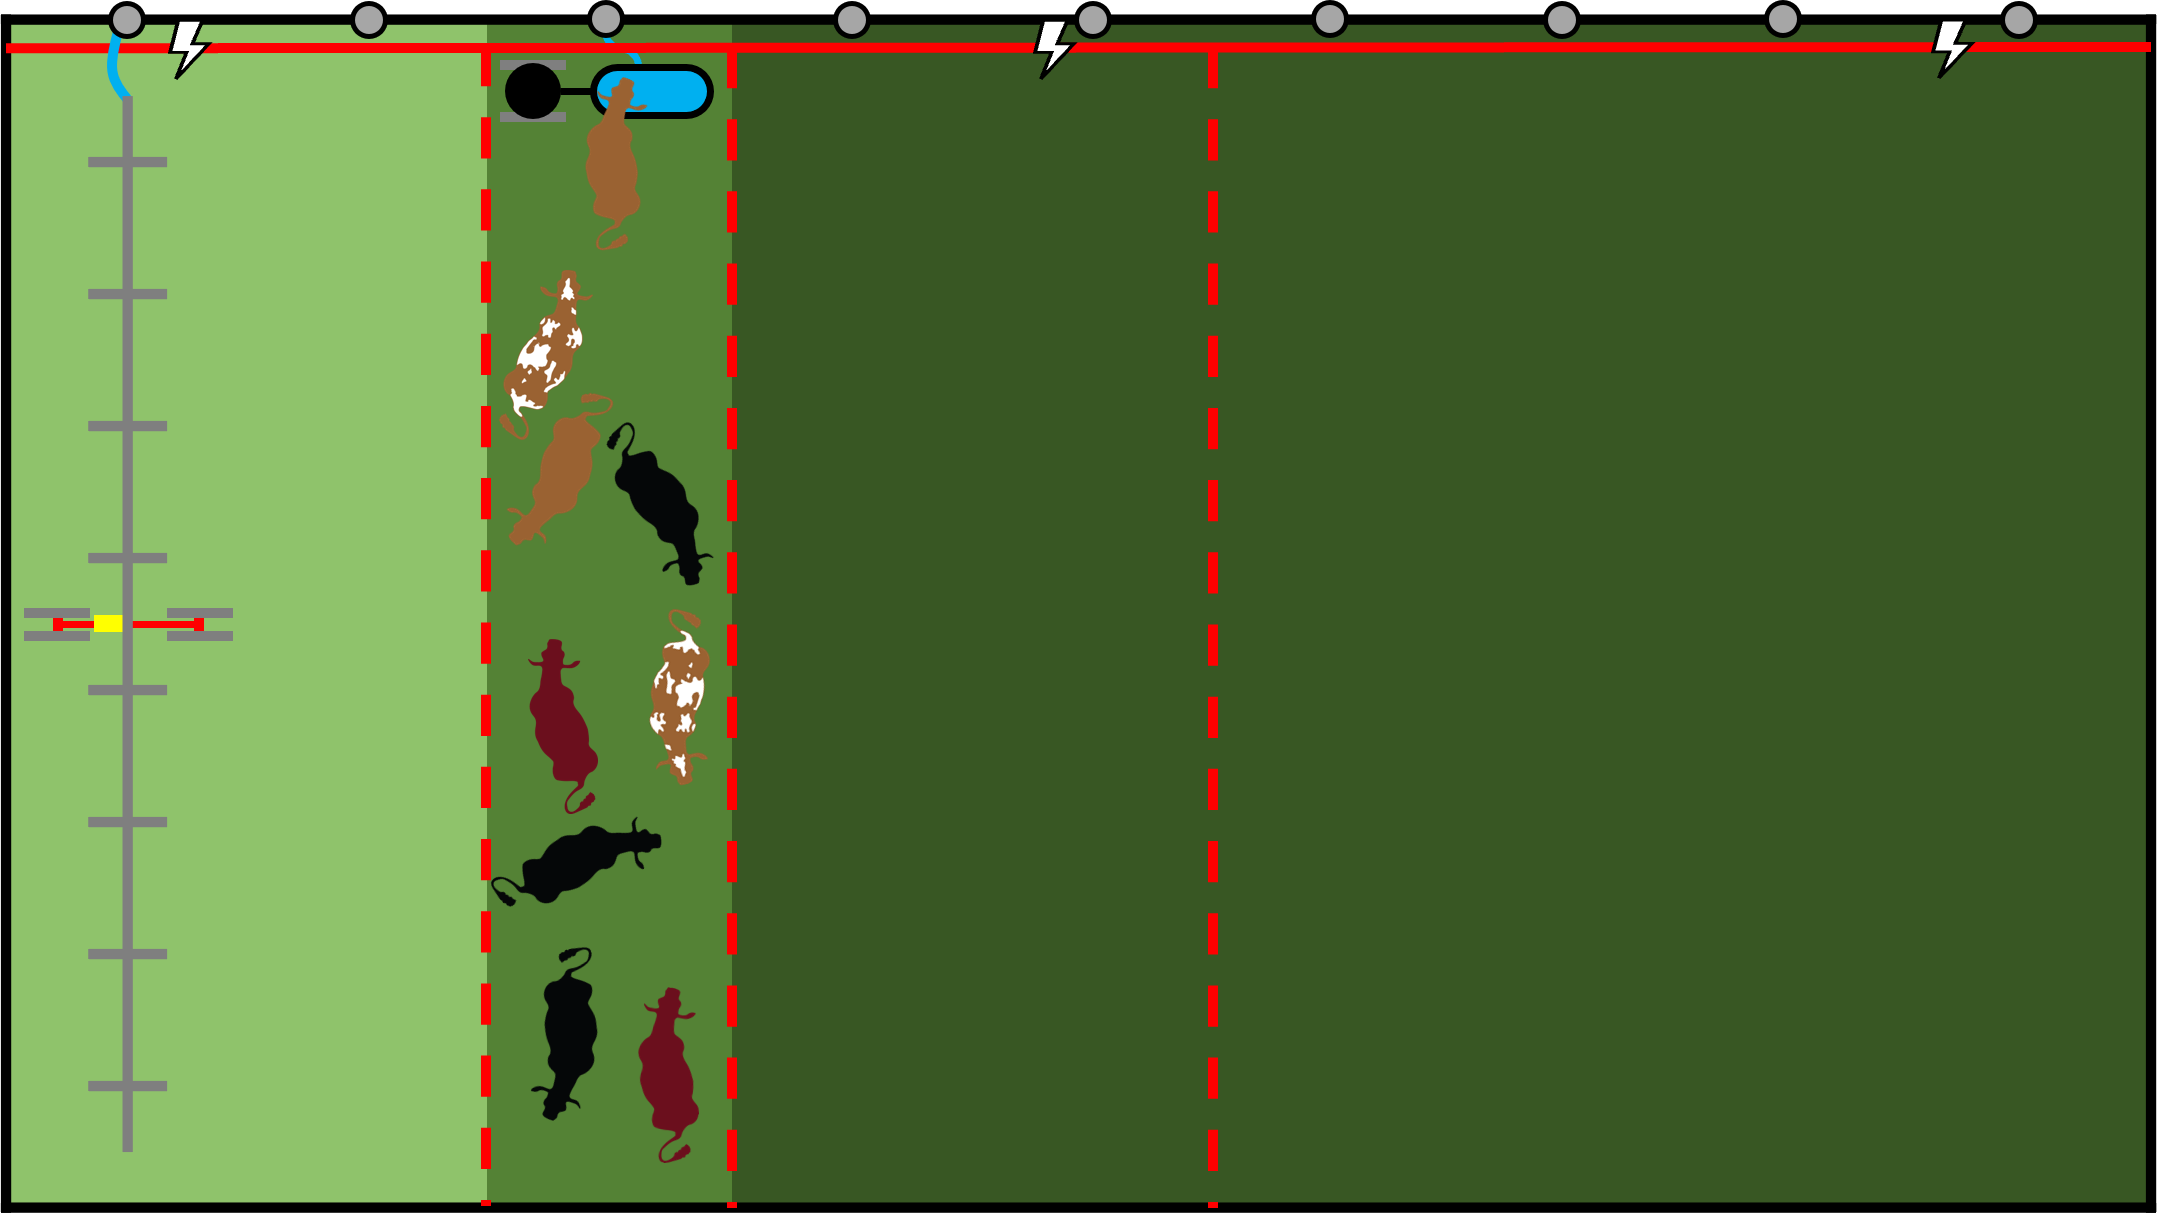
Figure 27:
The wheel line is shut off and allowed to drain. The polywire fence is rolled up and livestock walk forward to the recovered pasture.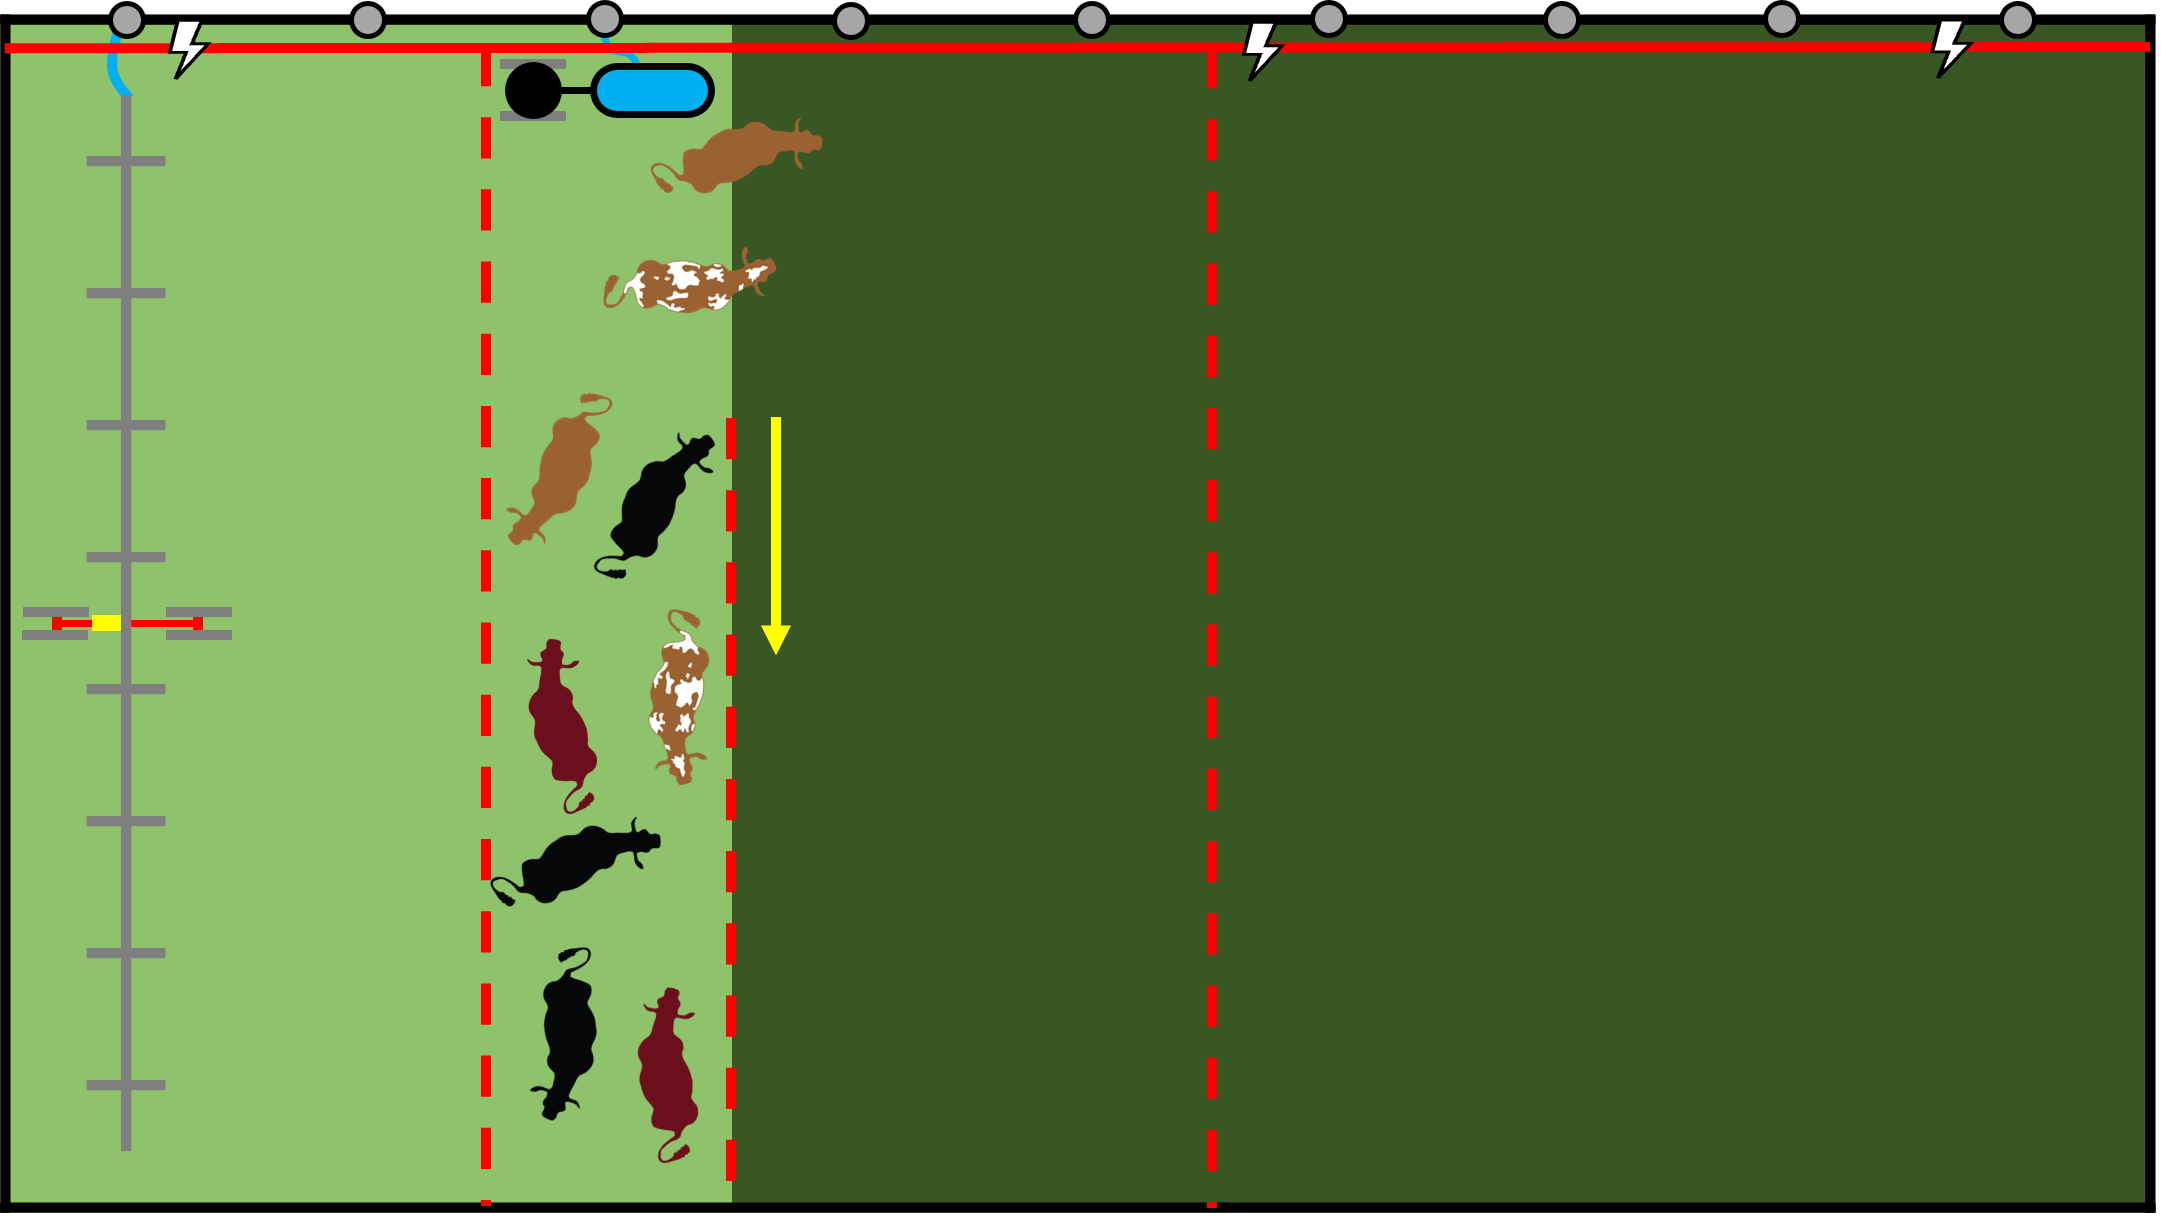
Figure 28:
Polywire fence that was rolled up is disconnected and moved forward a riser's distance to create a new back fence and paddock. As the polywire fence is unrolled while walking back up to where the fence reel will be hung and connected to power, tension is maintained while walking behind livestock, to encourage them to walk forward far enough to allow a straight back fence and proper paddock size.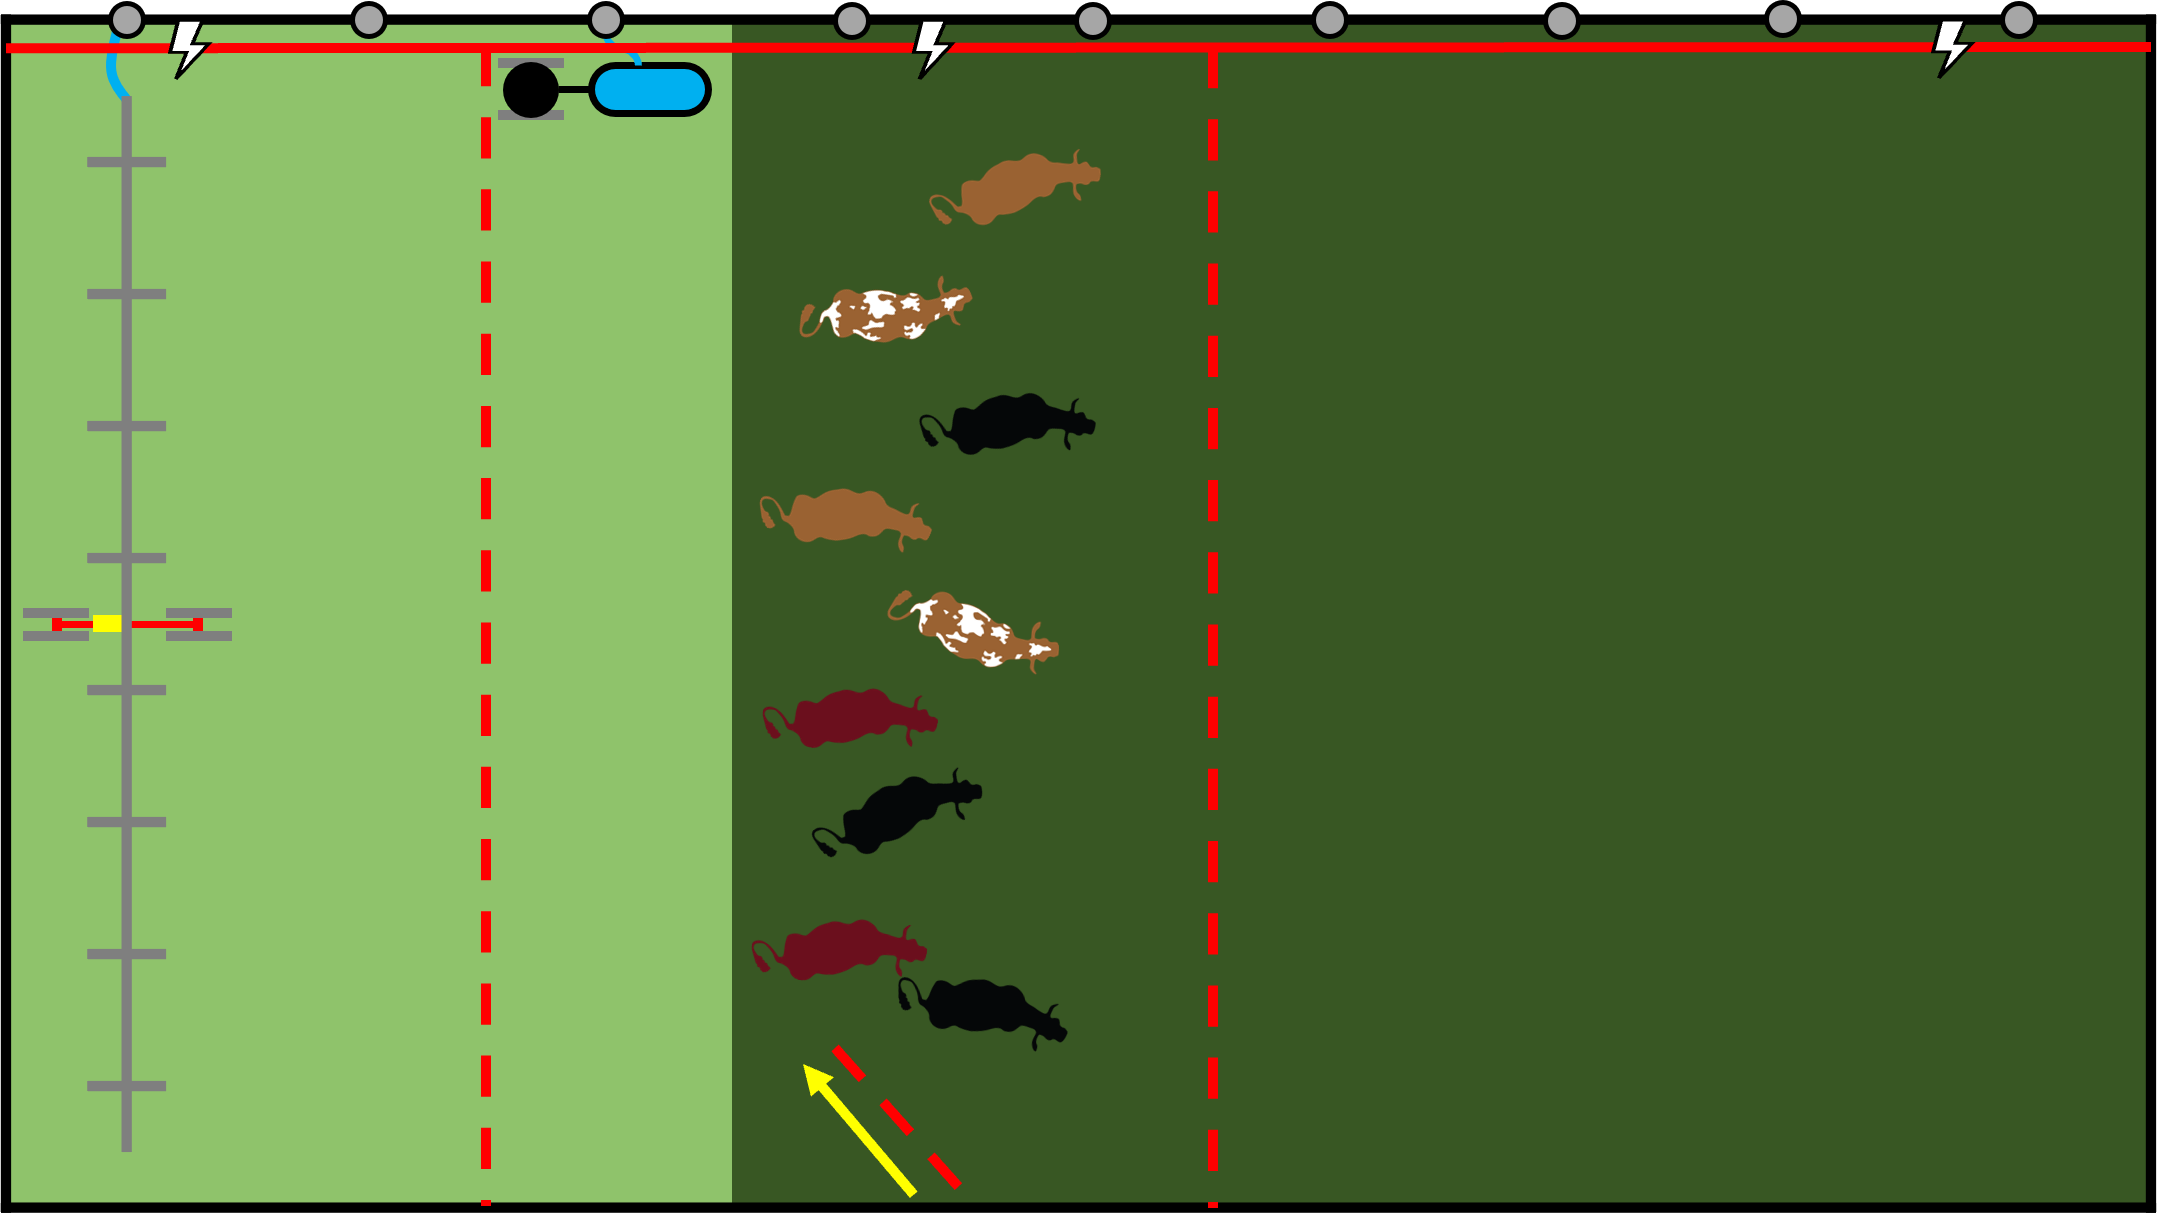
Figure 29:
Once the polywire fence is within 10 to 20 feet of reconnecting with the high-tensile electric fence, the water trough and mineral feeder tub are moved two risers further (step 1) and polywire fence is reconnected to high-tensile electric fence (step 2). Back fence is rolled up (step 3), moved beyond the currently grazed paddock (step 4), and unrolled to create a new paddock (step 5).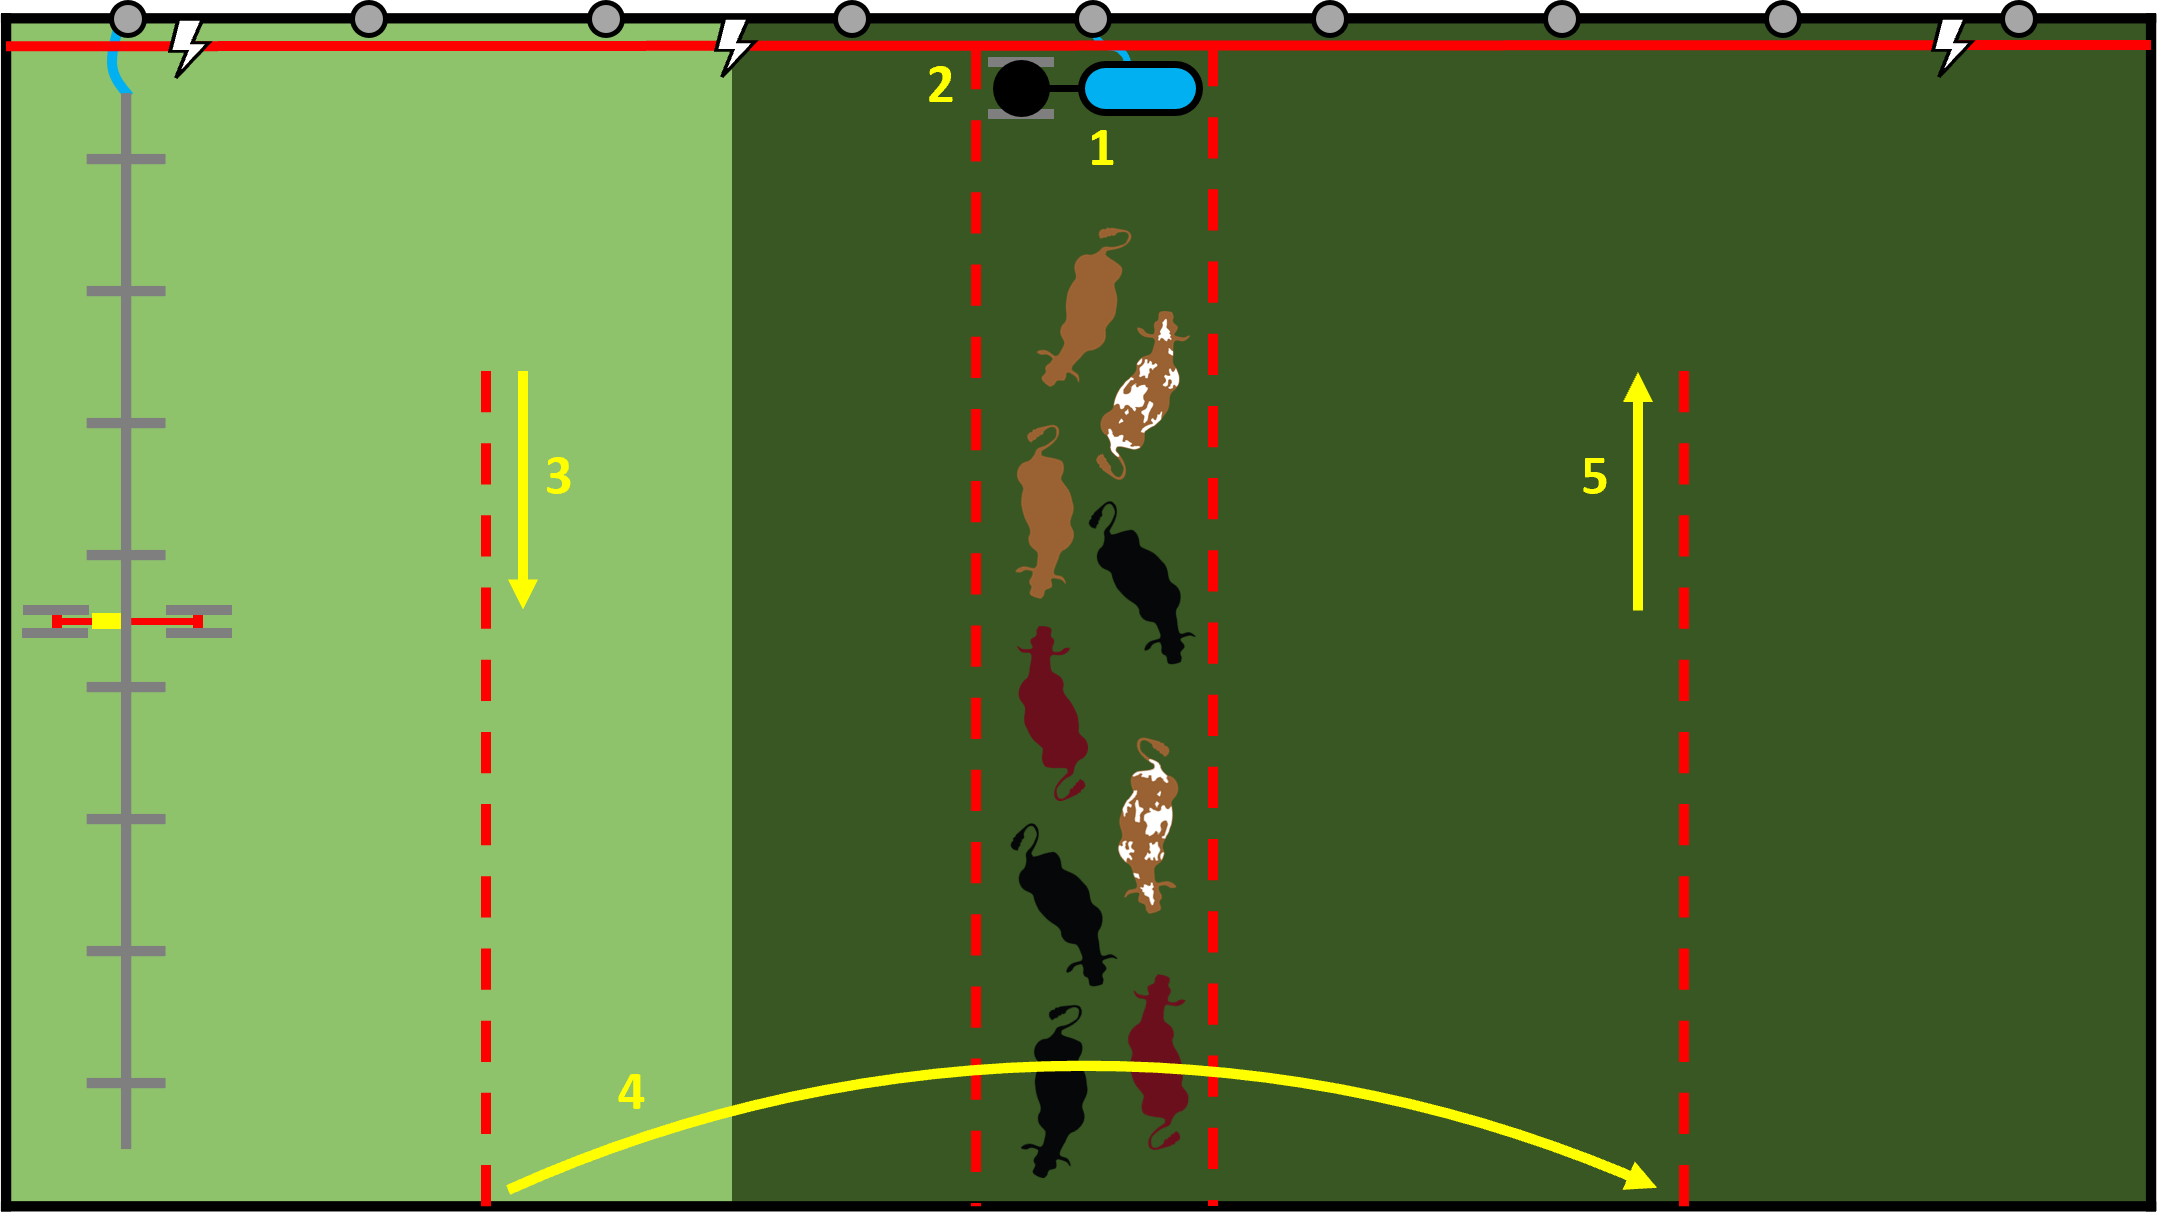
Figure 30:
The wheel line moves ahead two riser positions and irrigation resumes.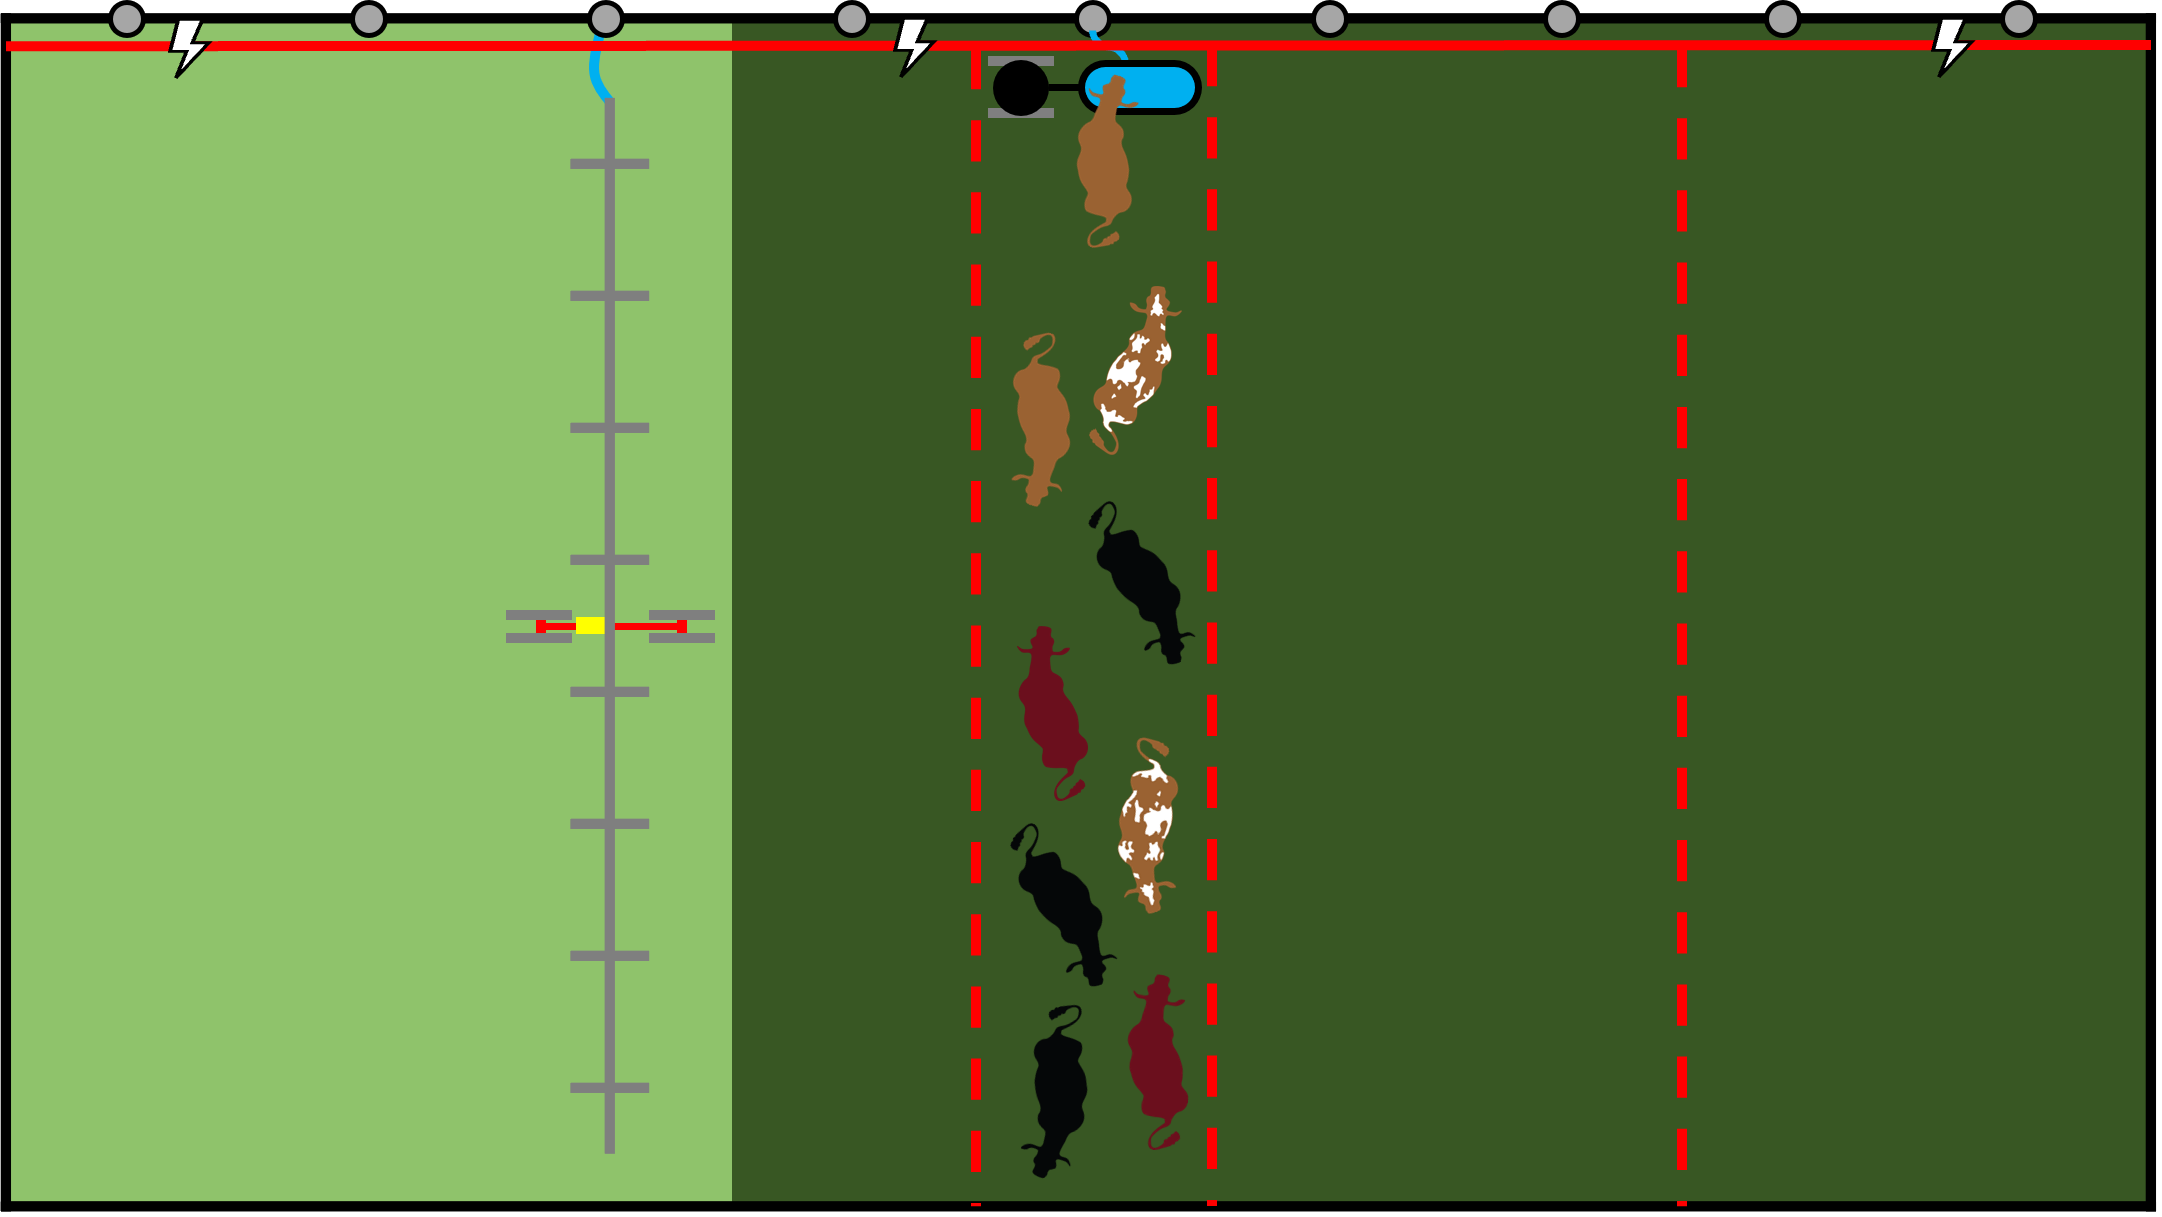
Center Pivot with Water Blocks
Figure 31:
A semi-permanent, one-wire, high-tensile electric fence (solid red line) is positioned halfway between the pivot center and outer edge. Pivot towers straddle the semi-permanent fence. A series of permanent water troughs (water blocks) are positioned at equal spacings along the semi-permanent fence. The pivot rotates in the opposite direction from the livestock to keep livestock on drier soil longer. The pivot is not shut down when crossing over the top of the paddock containing livestock. Polywire fence is offset, so the pivot can cross one tire at a time.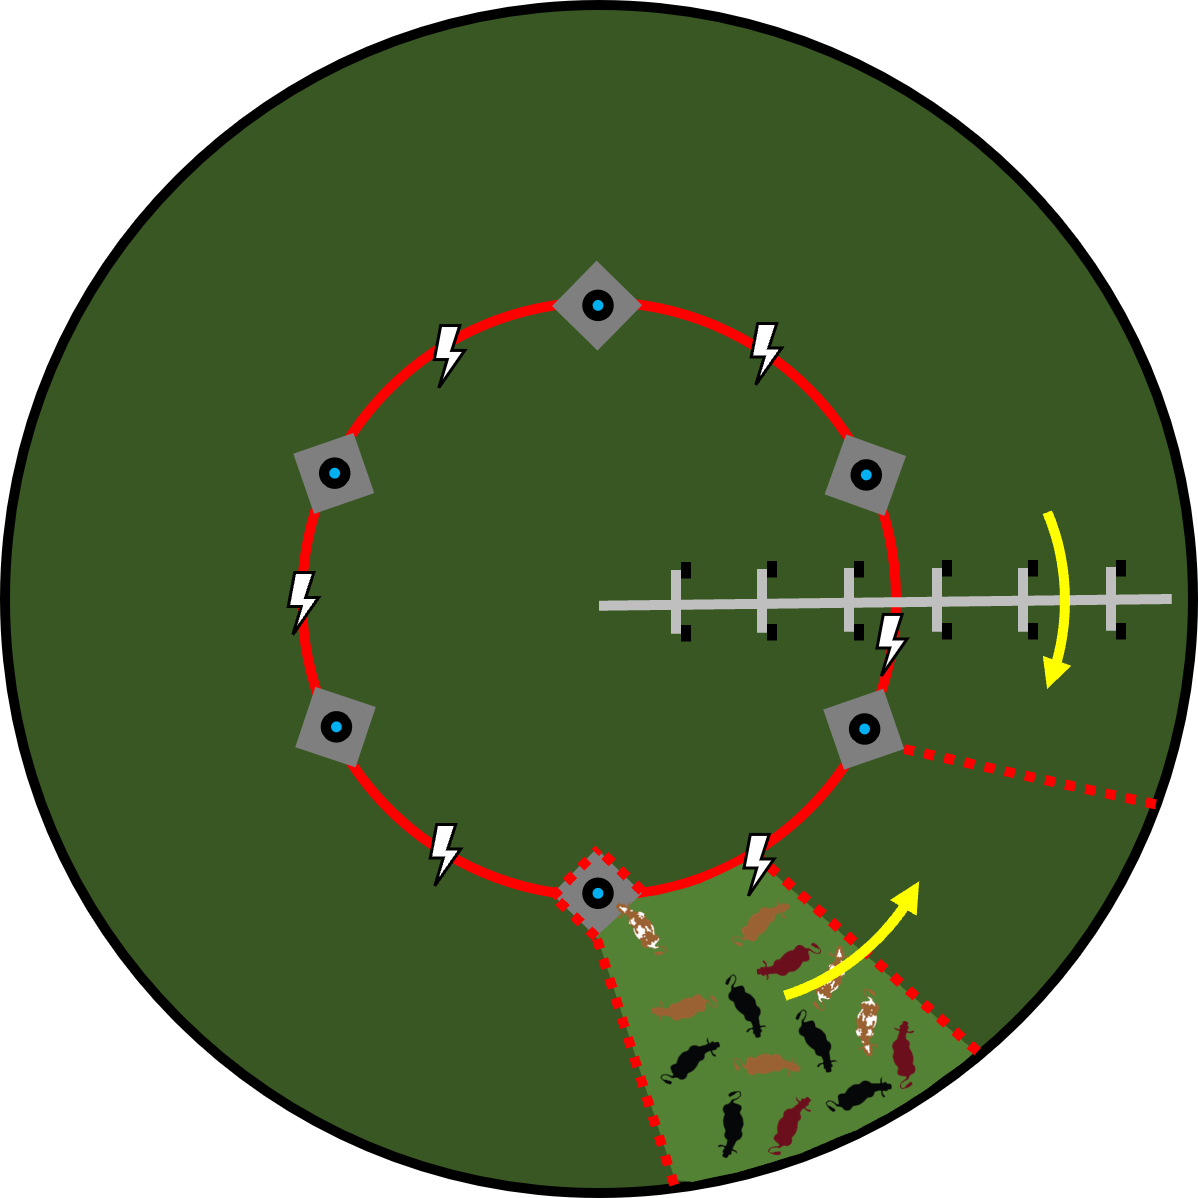
Figure 32:
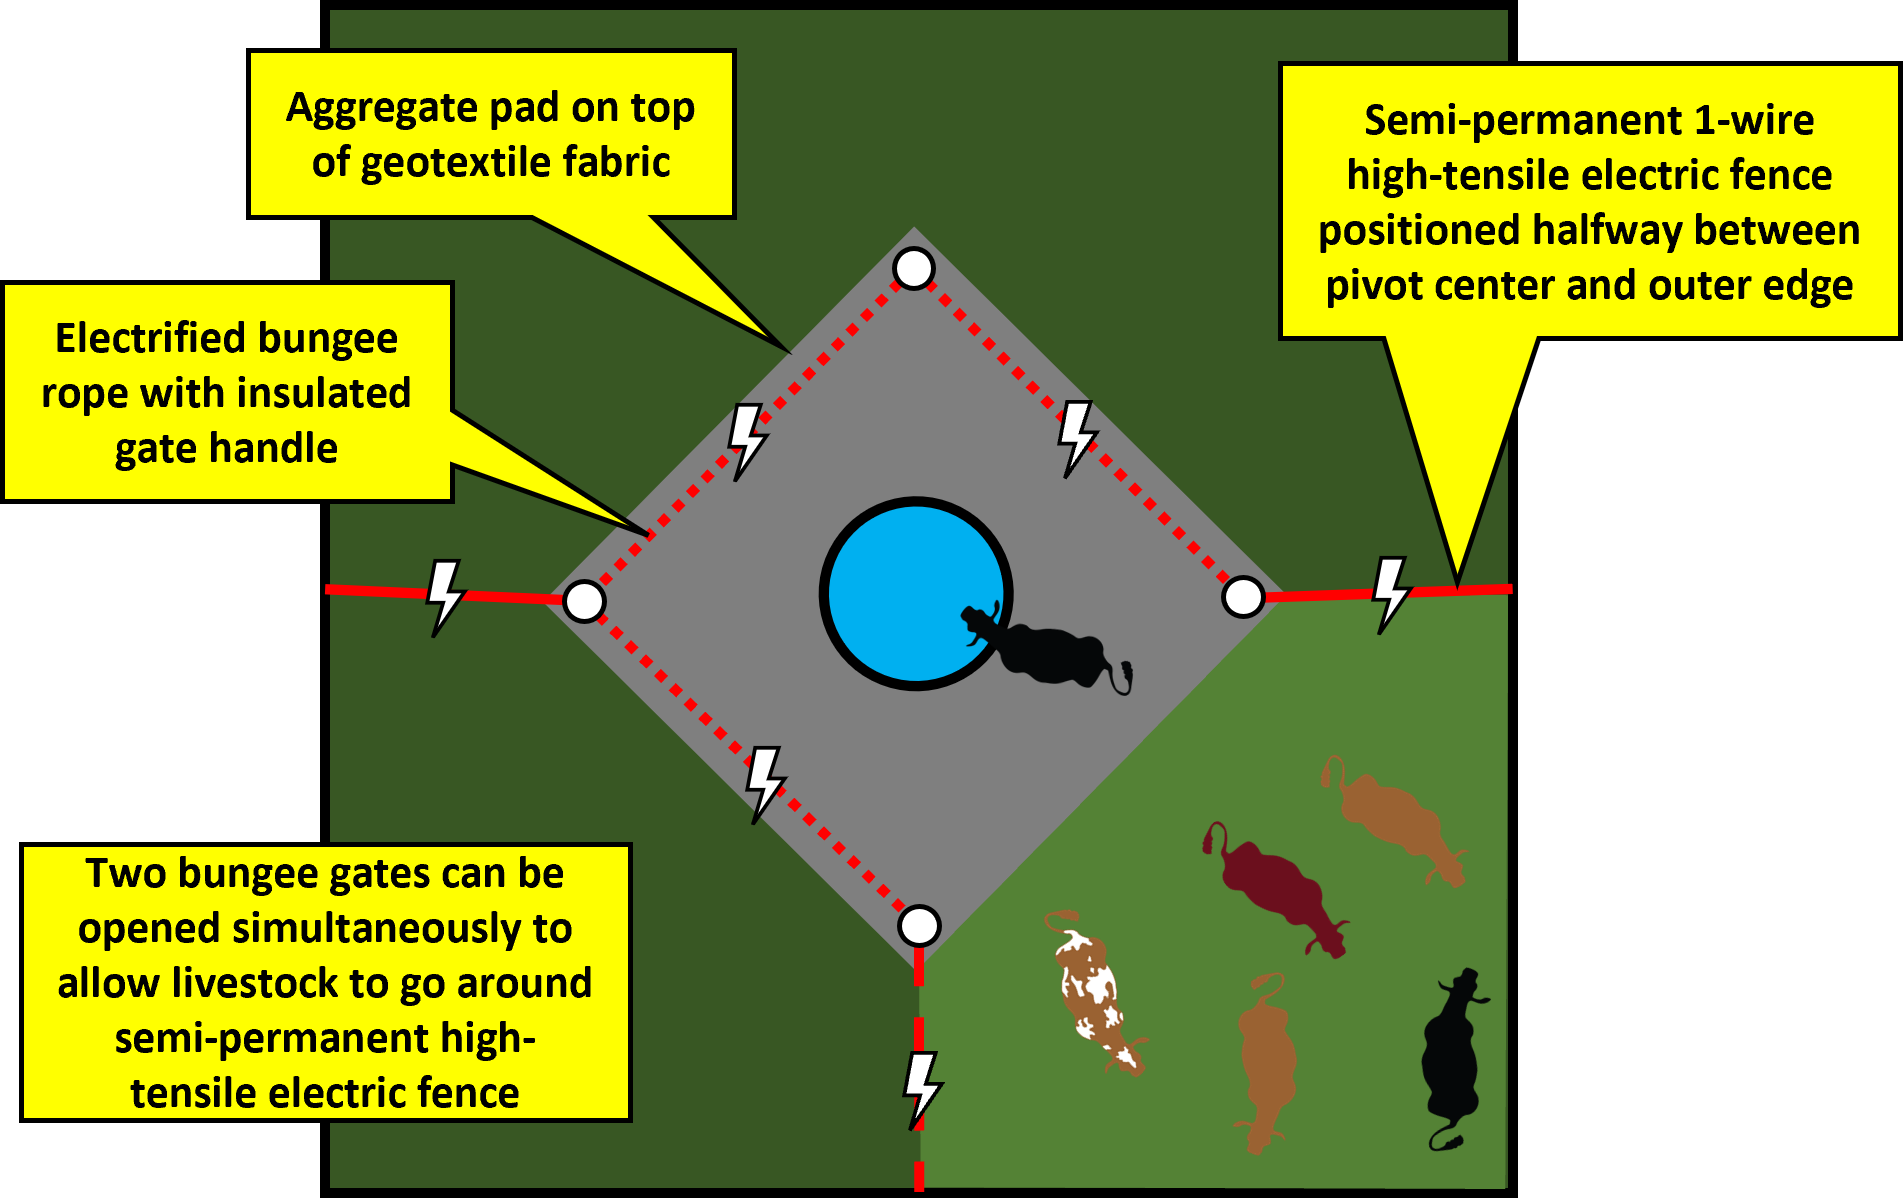
Figure 33:
A water block is open on one of four sides, using electrified bungee rope. A back fence prevents re-grazing of actively growing plants.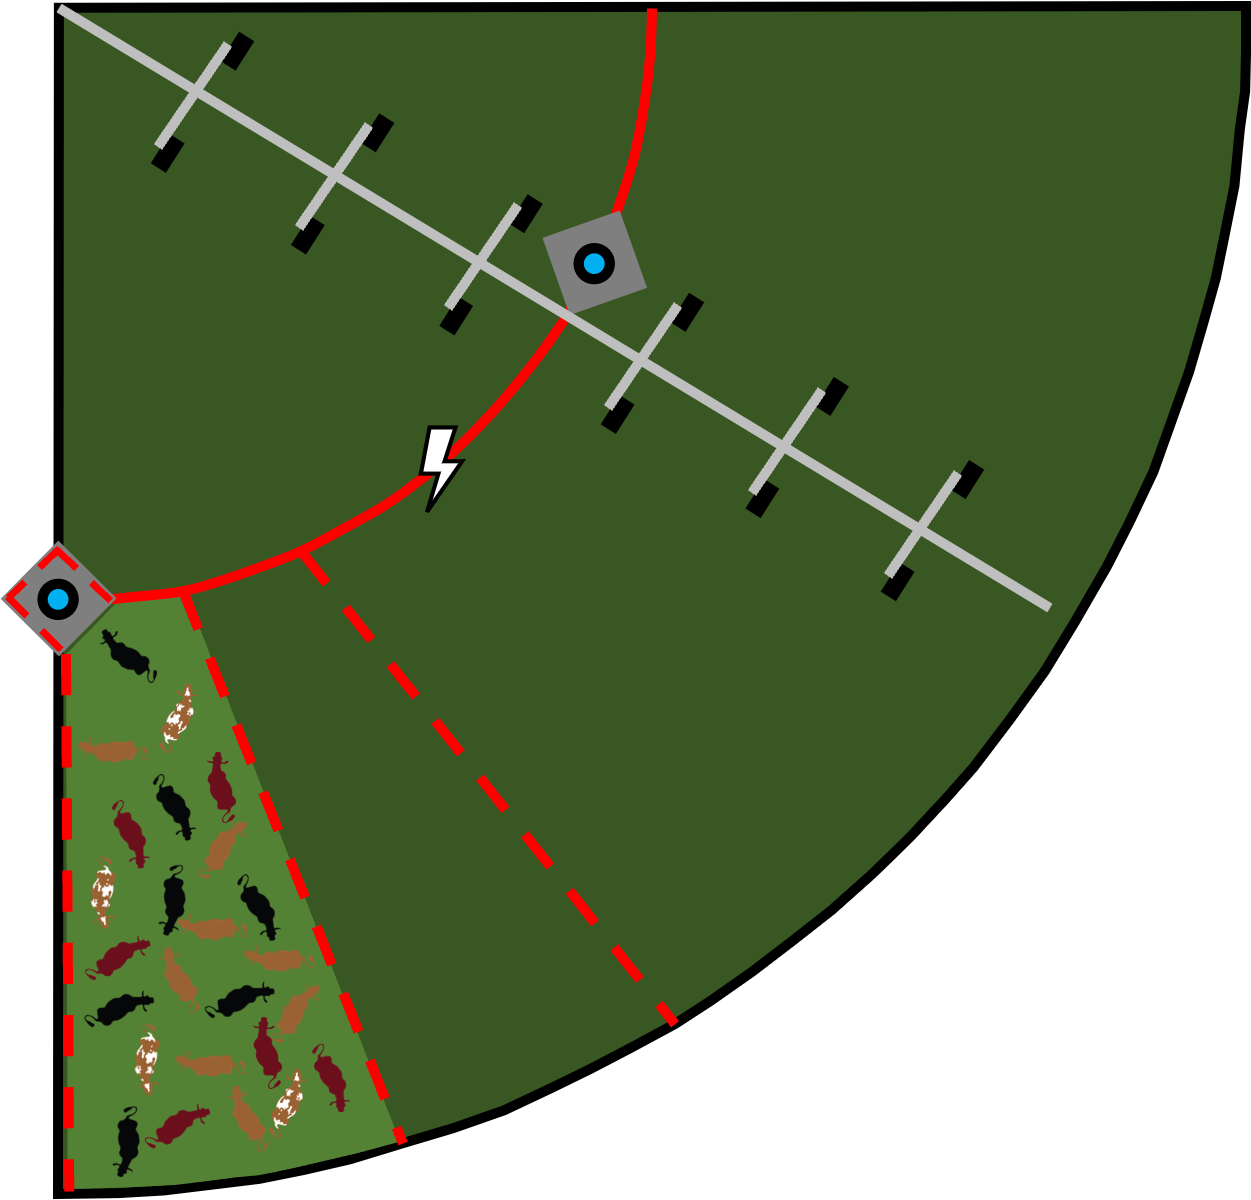
Figure 34:
Polywire fence is rolled up 10 to 20 feet so livestock can enter next paddock at the end.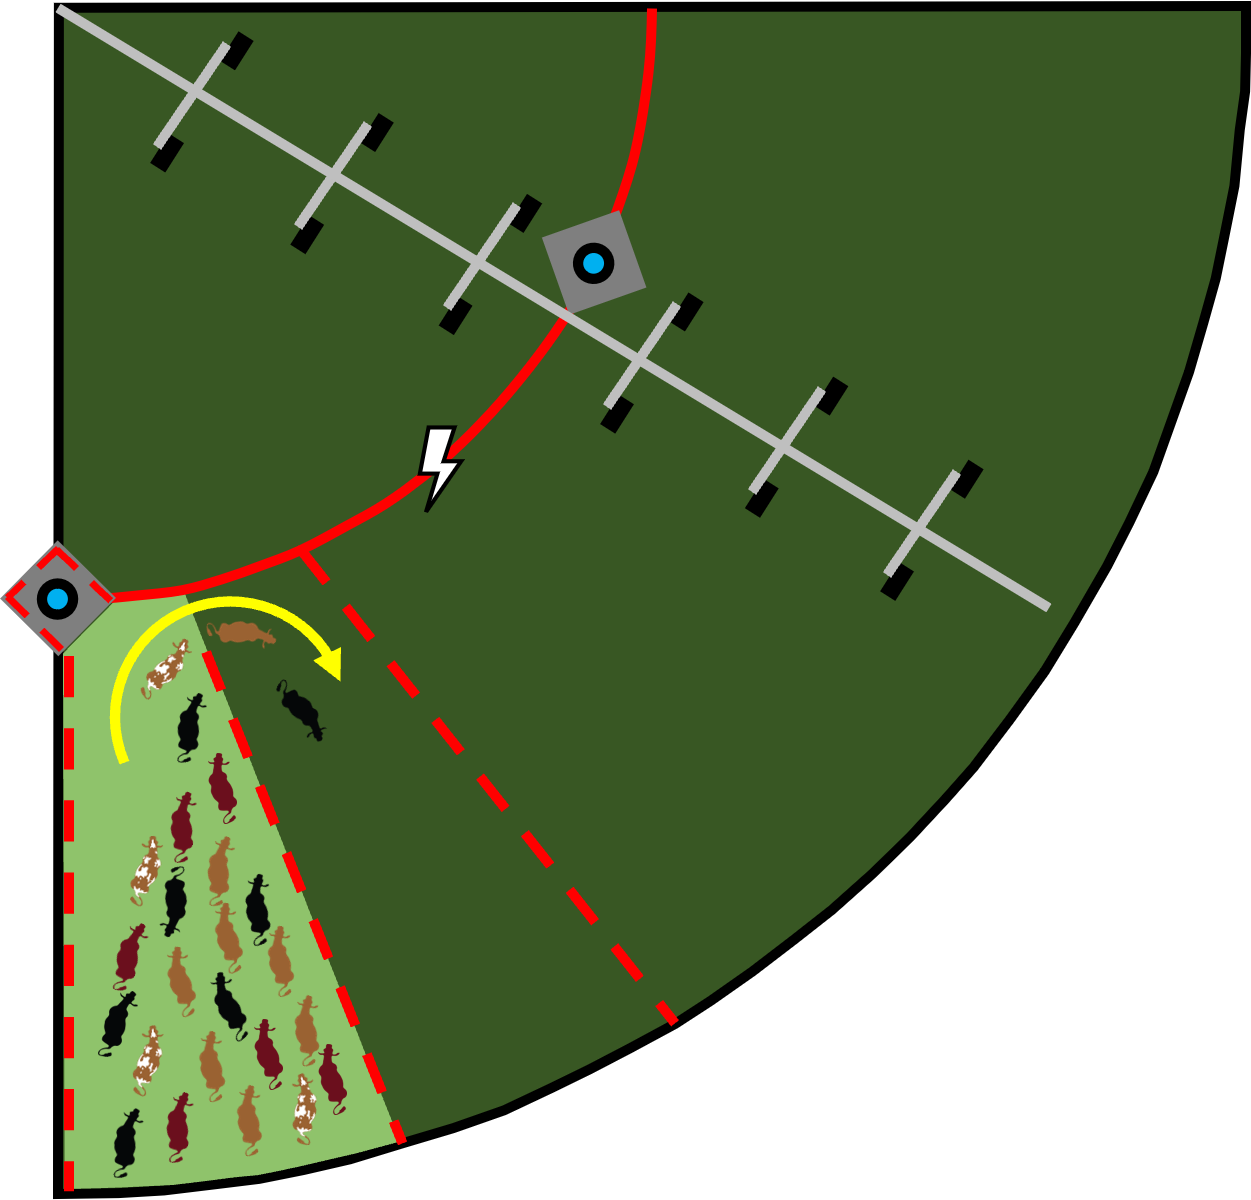
Figure 35:
Once livestock are in the next paddock, an alleyway is created back to the water block with the polywire fence (step 1). The back fence is rolled up (step 2), moved beyond the currently grazed paddock (step 3), and unrolled to create a new paddock (step 4).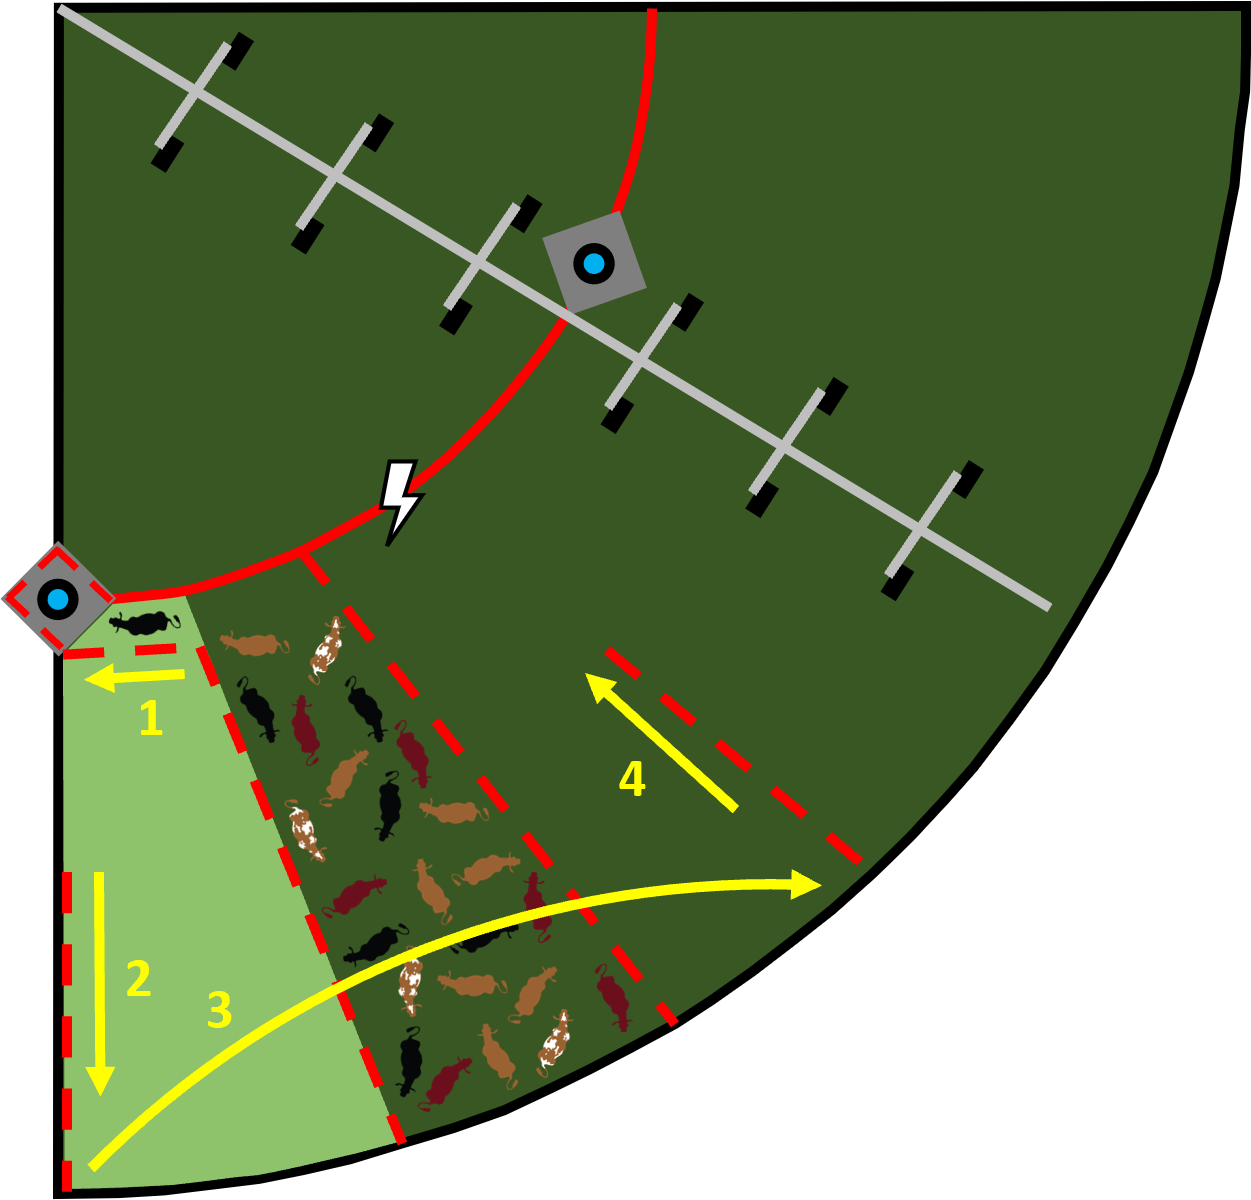
Center Pivot with Portable Water Trough
Figure 36:
Above or below-ground pipeline (blue line) with quick-connect couplings is installed directly underneath the one-wire, semi-permanent high-tensile electric fence, positioned halfway between pivot center and outer edge. A portable water trough and mineral feeder tub are positioned on the line between two paddocks and are moved every other paddock move. Plastic pipe is attached underneath each tower to prevent polywire fence from snagging or grounding out.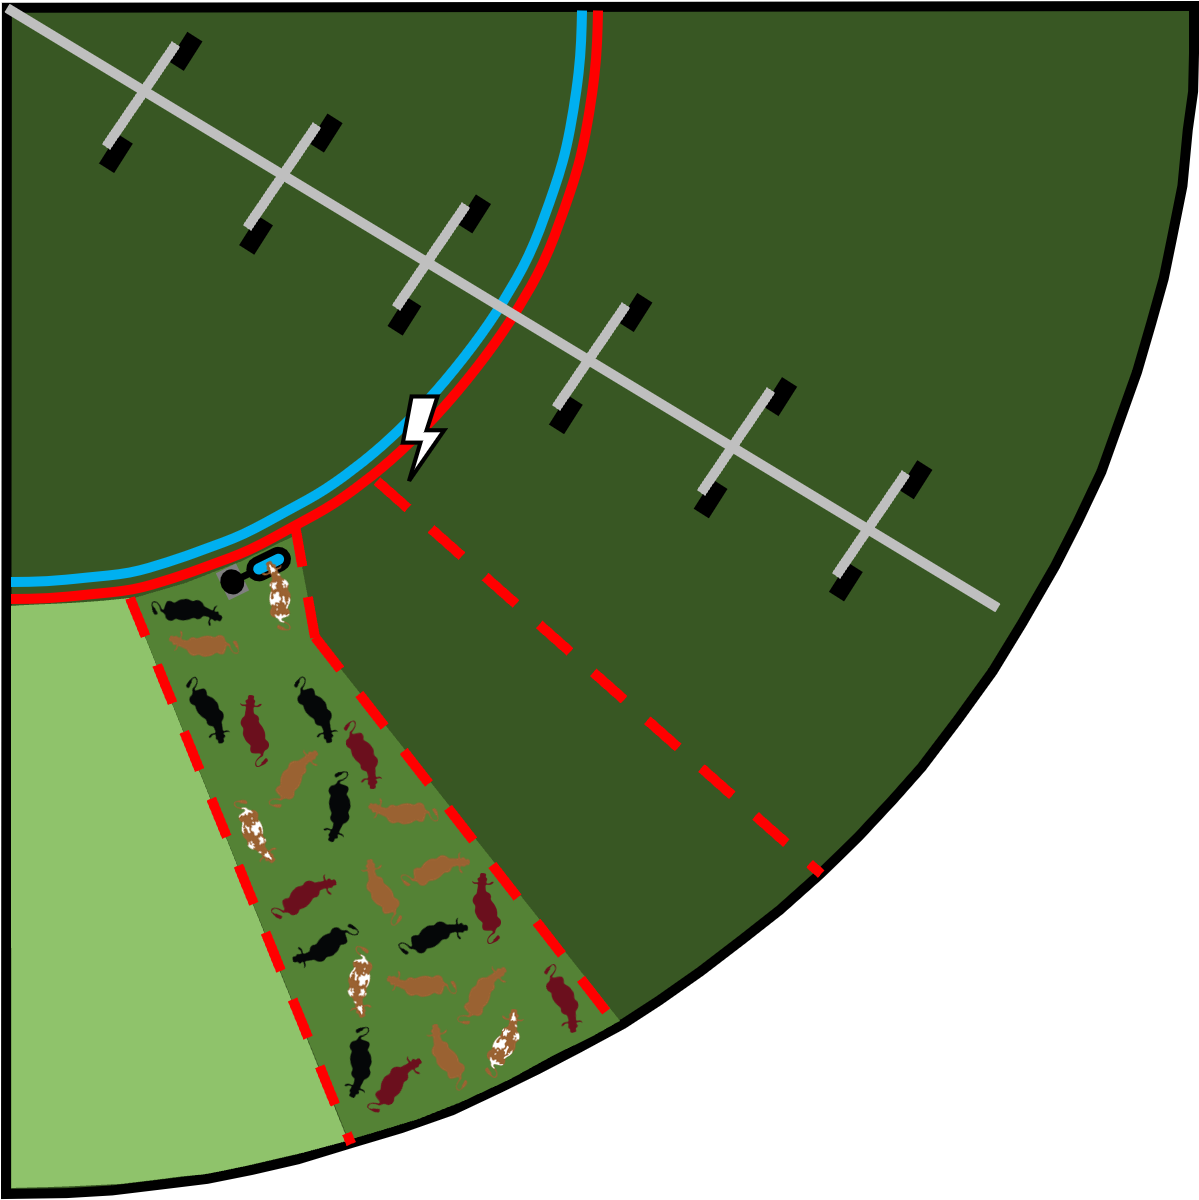
Figure 37:
Polywire fence is rolled up 10 to 20 feet so livestock can enter next paddock at the end. Tension is maintained on the fence so livestock must walk to the end of the paddock to get into the next paddock.
Figure 38:
After livestock are in the next paddock, the polywire fence is re-connected onto the other side of the water trough and mineral feeder tub (step 1). The back fence is rolled up (step 2), moved beyond the currently grazed paddock (step 3), and unrolled to create a new paddock (step 4).
Paddock Design, Fencing, Water Systems, and Livestock Movement Strategies for Multi-Paddock Grazing
By Lee Rinehart, NCAT Agriculture Specialist, and Justin Morris, NCAT Regenerative Grazing Specialist
Published June 2022
IP152
This publication is produced by the National Center for Appropriate Technology through the ATTRA Sustainable Agriculture program, under a cooperative agreement with USDA Rural Development. ATTRA.NCAT.ORG
Related Publications
- Adaptive Grazing with Allen Williams video series
- Adaptive Grazing – You Can Do It
- Building Healthy Pasture Soils
- Grazier’s One-Stop Resource Packet
- Intensive Grazing: One Farm’s Set Up video series
- Irrigated Pastures: Setting Up an Intensive Grazing System That Works
- Multispecies Grazing: A Primer on Diversity
- Nutrient Cycling in Pastures
- Pasture, Rangeland, and Adaptive Grazing
- Ruminant Nutrition for Graziers
- Solar-Powered Livestock Watering Systems
- Why Intensive Grazing on Irrigated Pastures?