
Improving Seed Viability and Germination
 Print This Post
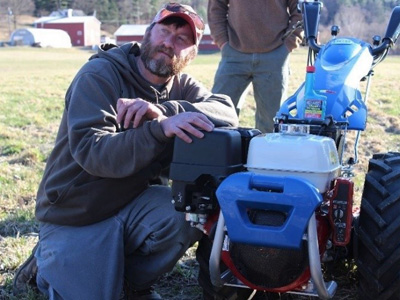
By Andy Pressman, NCAT Northeast Regional Director
The Northeast is often known for the autumn season, a time when the landscape explodes in bright colors from the changing leaves. Leaf peepers travel from afar to witness this magical time of the year. For Northerners, early spring is another magical time of the year. What many refer to as the mud season, this is the time when the maple sugarhouses are boiling any remaining sap from late-season runs. Snow shoes are being hung up as thermal layers are being shed from bodies like a reptile shedding its skin. And while the pastures are still several weeks away from turning green, vegetable growers are hustling to start seeds in order to have transplants ready to go in to the ground once the soil has warmed up and dried out. Here at our farm in Southern New Hampshire, transplants are critical to our mixed vegetable operation and in having crops ready to harvest as early as possible.
Determining Seed Viability
Seed viability and good germination play critical roles in planning for a bountiful harvest. Many seed packets offer information on germination rates for the current year; however, seed viability decreases over time. Germination rates indicate how many seeds should be started in order to meet your targeted harvest yields, and they can save you time and money in having to replant if fewer seeds germinate than what you have expected.
Several factors can determine how long seeds are viable for, including how they stored from one season to the next. Temperature and humidity are critical components in storing seeds. At our farm in New Hampshire, we store our seeds in airtight containers in an unheated cellar. As a good rule of thumb, the temperature and humidity, when added together, should not be greater than 100. For example, with a temperature of 60°F, the humidity should be no more than 40%.
You can determine whether seeds are viable to plant with a simple test. Place 10 seeds on a damp paper towel and seal in a zip-lock plastic bag. The bag should be placed in a warm location, around 70 to 75°F. Check the seeds daily for germination. Most vegetable seeds sprout within three to seven days, with some exceptions, like the Umbelliferae family (carrots, parsley, parsnips, and others), which take longer. If there is even, or not sporadic, germination of 70% or higher, then the seeds are most likely good to use. I may plant a bit heavier if the rate is closer to 70%. Having five or fewer seeds germinate is a sign that the seeds are not very viable and you should not plant them. If six seeds germinate, well, it’s your call whether to plant, based on how much risk you are willing to take. The price of seed can be a factor in deciding whether or not to plant, and how much. As mentioned above, we look for even germination — germination around the same timeframe and not spread out. This year, we decided to build a low-tech, low-cost germination chamber. The goal is to increase germination rates by creating a space that provides uniform temperature and humidity for even seed germination. Commercial units can be very costly, so we set out to build one that was appropriate to our farm needs and our budget. We discovered several great DIY plans, including on the Broadfork Farm (Canada) website and in an article in the February 2020 issue of Growing for Market. Considering these design plans and others, we were able to utilize resources we had on the farm or that we could easily purchase (locally) while meeting our budget.
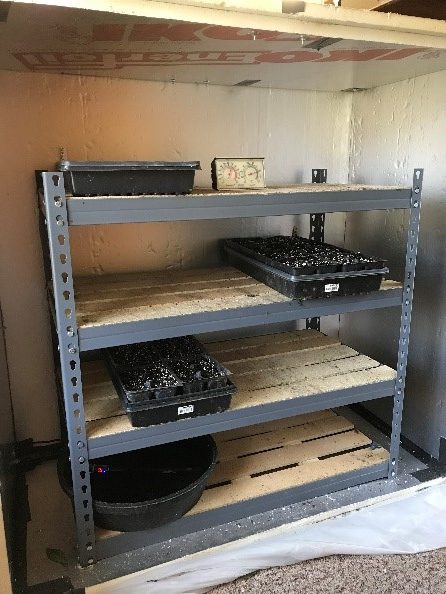 Inside the germination chamber. Notice the heater and water bucket on the bottom shelf. |
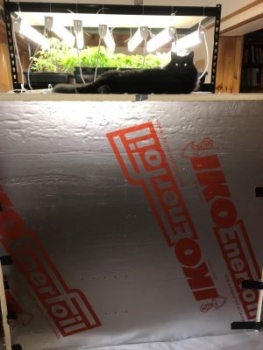 Germination chamber with the front cover in place. Felix the cat keeps guard from up top. |
Constructing a DIY Germination Chamber
The germination chamber is 48”W x 48”H x24”D and is constructed from 1” rigid foam insulation with reflective mylar film. The chamber was designed around the shelving unit and this size also makes for easy cutting of the insulation that come in 4’x8’ sheets. I doubled the top to 2” in order to make the chamber sturdier (and to handle the weight of our cat who likes to sleep on top). Only having 1” insulation on hand, I glued and bolted two 1” pieces together. The entire chamber is held together with heavy-duty construction tape.
Heat is supplied by an aquarium heater that we purchased, and we matched it to meet the size of the chamber. It sits in a rubber feed bucket that we top off with water daily. The heater has an external temperature setting, which is convenient as the box does not have to be opened in order to adjust the temperature. With this setup, we’ve been able to maintain an average temperature of around 73°F and 80% humidity.
The shelving unit has space for 11 seed trays with the heating unit taking up the space of one tray. We are able to stack trays three high, giving us the ability to have 33 trays in the chamber at one time. The shelves are made of particleboard, which I ripped into strips to allow for the heat to rise. This does require adding some type of support to the strips; I used scrap 1”x2” firing strips. The seed trays stay in the chamber until we see the first signs of germination. We do check the seed trays at least three times per day for germination. Because the seeds are started in complete darkness in the chamber, they can get leggy if the trays are not pulled out of the chamber immediately. Then the trays are placed under grow lights or in the greenhouse.

Once the first signs of germination are observed, the seed trays are taken out of the germination chamber and placed under lights or in the greenhouse.
Germination Chamber Results
We are pleased so far with the results of the germination chamber, especially with our plantings of greens. In addition to providing more uniform temperature and humidity, we are using less energy than the alternative use of heat mats, which also dry out the trays much quicker. We’ve observed that peppers are a bit slower to germinate in the chamber, as they tend to prefer slightly warmer temperatures than what we can provide with our setup. While we plan to further use the germination chamber, we may revert back to heat mats for peppers. Building a germination chamber makes economic sense, and costs can be reduced by using materials you already have.
Andy Pressman is an NCAT Agriculture Specialist and Director of NCAT’s Northeast Regional Office, located in Keene, NH. He and his family also operate Foggy Hill Farm, a small diversified farm and CSA. He can be reached at (479)587-3475 or andyp@ncat.org.
Estimated Budget
Rigid foam insulation (three 4’x8’ sheets) = $60
Heavy-duty construction tape = $9.00 roll
Shelving unit = $50
300-watt aquarium heater = $25
Related ATTRA Resources:
Potting Mixes for Certified Organic Production – Publication
Potting Mix – Video
Starting Seeds – Video
This blog is produced by the National Center for Appropriate Technology through the ATTRA Sustainable Agriculture program, under a cooperative agreement with USDA Rural Development. ATTRA.NCAT.ORG.
Photos: Andy Pressman, NCAT


