

Purchasing and Siting a High Tunnel to Extend the Growing Season
 Print This Post
By Chris Lent, NCAT Agriculture Specialist
When I began using high tunnels to protect some crops on my farm, it changed everything, from my planting schedule to how I approached my markets. This blog is the first in a series on high tunnel season extension. Each will have a different focus, such as crop selection, planting schedules, disease and pest management, and soil fertility. This blog starts at the beginning — purchasing and siting a high tunnel to start extending the growing season on your farm.
Purchasing
If you’ve decided to add or expand high tunnel production in your operation, there are many options available, and the choices can be confusing. Choose a supplier who will talk to you and answer your questions. This implies good customer service, which you will need throughout the process of buying and installing your tunnel. Choosing a supplier that is local to your farm or at least within your region may lower shipping costs, and they are more likely to offer tunnels appropriate to your location. For instance, suppliers in the northern part of the country offer kits with extra wind and snow-load bracing. If your farm sees snow accumulation, a tunnel with a peaked roof (called a gothic shape) helps to shed snow off the tunnel.
I recommend buying as big a tunnel as your budget allows, but also use your markets and farm’s labor capacity to inform your decision. Remember, too, that you can plan to add additional tunnel space down the road. Often, the actual width and length of the tunnel will be determined by the size of the already established growing beds you want to cover. Just know there are a variety of widths for free-standing tunnels, from 12 feet up to 34 feet, available on the market and you can make them as long as needed in increments of 4 feet. The size of the tunnel will affect the cost but, generally, the longer the tunnel, the lower the price per square foot of coverage space.
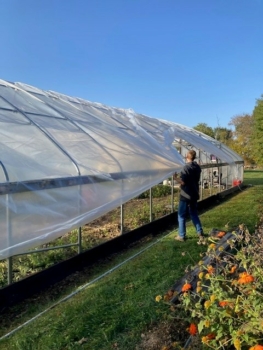
The plastic should be greenhouse grade and should have anti-condensate (AC) and Infrared (IR) treatments. Photo: Chris Lent, NCAT
With recent price increases, you can now expect a cost range of $3 to $6 per square foot of covered space for a basic tunnel kit. That includes the metal frame, plastic cover, and usually wiggle wire channel (to attach the plastic to the tunnel). Kits with roll-up sides and extra wind bracing often have higher costs. As a rule of thumb, you can add an additional estimated 25% to the cost of those kits that don’t include base boards and end-wall framing. The Natural Resources Conservation Service (NRCS) offers cost-share contracts to cover the cost of a high tunnel through the Environmental Quality Incentives Program (EQIP).
Season extension can be accomplished in a tunnel with a single layer of plastic, especially if you cover the inside growing beds with row cover or plastic or if your farm is in a warmer area of the country. If your plan is to grow all winter in the northern part of the country, I would advise two layers of plastic with a layer of air maintained between them using a small blower or plastic spacers. Also, when choosing your greenhouse plastic, be sure it is treated with an anti-condensate (AC) which prevents condensation that forms on the inside of the plastic from raining down on you and your crops. This will be an important part of controlling foliar diseases in winter crops. Almost more important for winter growing is infrared (IR) treated plastic, which helps hold heat inside the tunnel when temperatures drop at night.
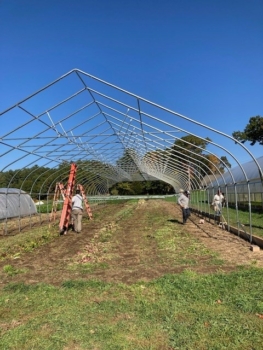
It’s helpful to organize some help for the tunnel installation. Photo: Chris Lent, NCAT
The steps in purchasing and installing a tunnel take time. Many season-extension crops require a late summer planting date, so the tunnel and beds inside it should be ready to plant by August 1 in the northern part of the country. If you want to take advantage of NRCS’s cost-share, you will need time to enter into a conservation contract with them and apply for cost-share dollars. That takes time, and it can take several weeks to a month after you do order a tunnel for it to be delivered. High tunnels are usually considered impermanent structures, but if your farm is in an urban or peri-urban setting, you will need time to check with your local zoning authority to see if a permit will be required. Installation is also time-consuming and requires a plan.
Tunnel manufacturers are getting better at supplying installation instructions and some offer guides and how-to videos on their websites. Some manufacturers will also offer installation services. Hiring out the installation can be worth the cost when time and farm labor savings are considered, and you can learn from observing the installation for when you install a second tunnel. However, most farmers have access to the tools, labor, and skills needed to install a high tunnel and most decide to tackle the installation themselves.
Siting
The installation site should have good-quality, well-drained soils so the first crop can be planted without a lot of soil alteration. The site should also be as level as possible. If there is too much slope to the tunnel end to end and especially side to side, the strength of the tunnel can be compromised. Follow manufacturer recommendations for maximum slope.
To make it easier to give high tunnel crops the attention they need, tunnel placement should be in a central and accessible location on your farm. High tunnel crops rely entirely on irrigation for their water needs so access to a quality water source is crucial. Access to electricity is not crucial but can give the option of fan ventilation and automation of the ventilation system for more accurate temperature and humidity control inside the tunnel.
In a 1-inch rainfall event, a 30’x90’ high tunnel can shed almost 2,000 gallons of water. In high rainfall regions, be sure that water runs out and away from your tunnel and not onto the beds inside the tunnel. To accomplish this, some growers dig a small trench along the full length of the tunnel sidewalls to capture and divert rainwater. A perforated pipe and gravel can be installed in the trench to help move water away more quickly.
In the northern United States, the length of your high tunnel should run as close to east west orientation as possible for winter growing. This way, it can capture the most winter sun possible to heat the air and soil inside the tunnel. While growers located south of 40° latitude should consider a north-to-south orientation to limit heat gain in the summer, there will still be plenty of sun in the winter months to heat the tunnel for cold-weather crops.
Depending on the market and sales goals that you have set for your farm, investing in a high tunnel will give you the ability to expand markets and increase sales without increasing the production area. I hope that this post helps clarify some of the considerations surrounding buying and installing a tunnel on your farm. Look for future blogs for ideas on managing high tunnel crops to make the most of this valuable tool.
Related ATTRA Resources:
Sustainable Season Extension: Considerations for Design
Other Resources:
USDA NRCS High Tunnel Initiative
This blog is produced by the National Center for Appropriate Technology through the ATTRA Sustainable Agriculture program, under a cooperative agreement with USDA Rural Development. ATTRA.NCAT.ORG.


