Energy Saving Tips for Irrigators
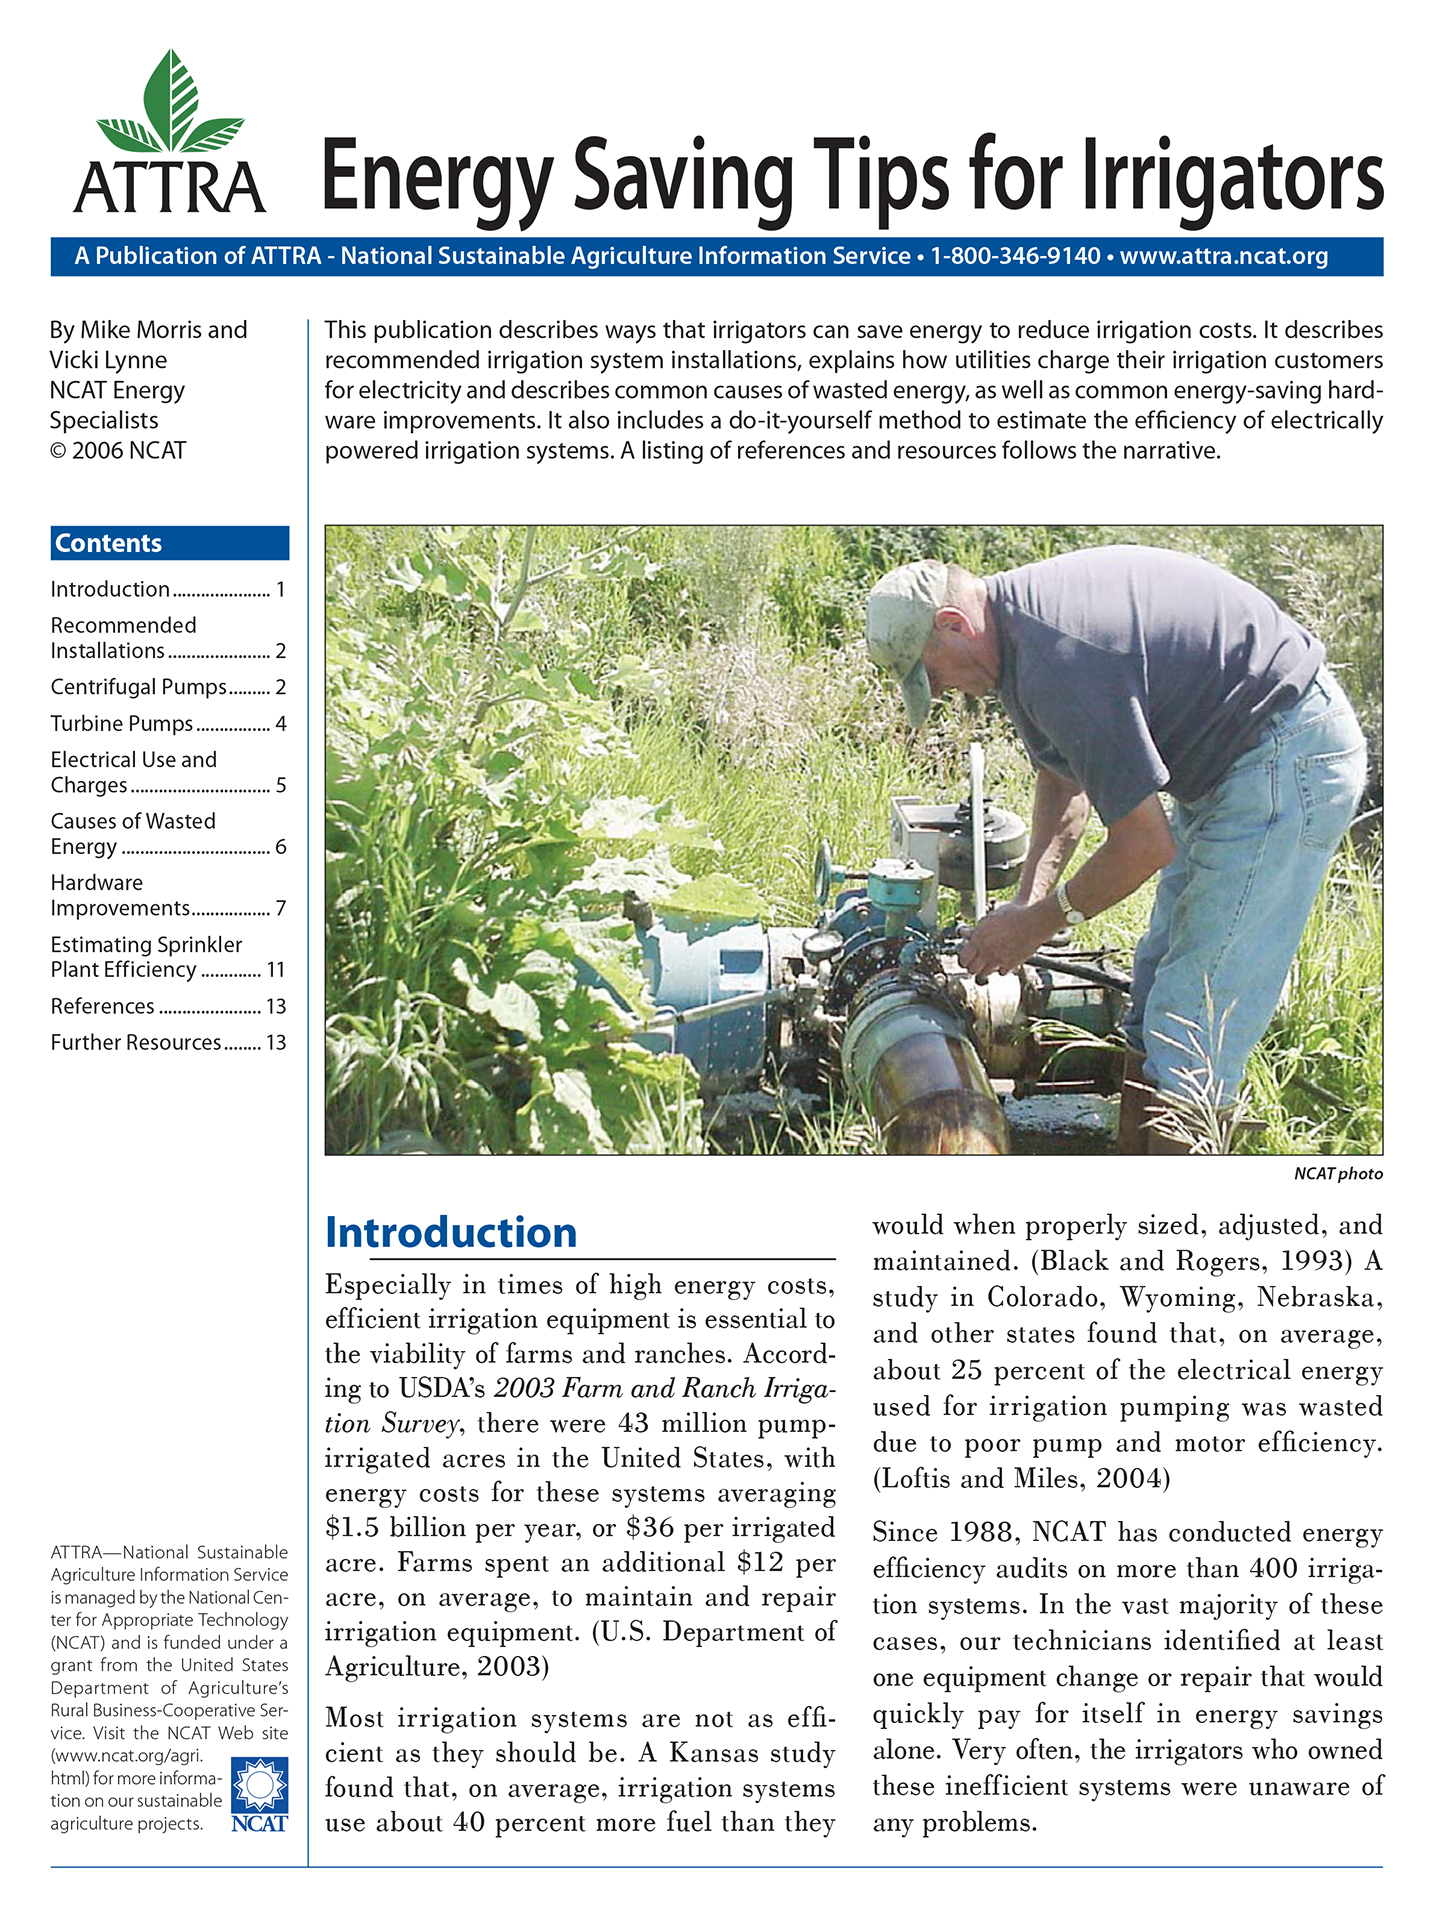
Photo: NCAT
By Mike Morris and Vicki Lynne, NCAT Agriculture Specialists
Abstract
This publication describes ways that irrigators can save energy to reduce irrigation costs. It describes recommended irrigation system installations, explains how utilities charge their irrigation customers for electricity and describes common causes of wasted energy, as well as common energy saving hardware improvements. It also includes a do-it-yourself method to estimate the efficiency of electrically powered irrigation systems. A listing of references and resources follows the narrative.
Introduction
Especially in times of high energy costs, efficient irrigation equipment is essential to the viability of farms and ranches. According to USDA’s 2003 Farm and Ranch Irrigation Survey, there were 43 million pump-irrigated acres in the United States, with energy costs for these systems averaging $1.5 billion per year, or $36 per irrigated acre. Farms spent an additional $12 per acre, on average, to maintain and repair irrigation equipment. (U.S. Department of Agriculture, 2003)
Most irrigation systems are not as efficient as they should be. A Kansas study found that, on average, irrigation systems use about 40 percent more fuel than they would when properly sized, adjusted, and maintained. (Black and Rogers, 1993) A study in Colorado, Wyoming, Nebraska, and other states found that, on average, about 25 percent of the electrical energy used for irrigation pumping was wasted due to poor pump and motor efficiency. (Loftis and Miles, 2004)
Photo: NCAT
Since 1988, NCAT has conducted energy efficiency audits on more than 400 irrigation systems. In the vast majority of these cases, our technicians identified at least one equipment change or repair that would quickly pay for itself in energy savings alone. Very often, the irrigators who owned these inefficient systems were unaware of any problems.
This publication describes ways to save energy and reduce irrigation energy costs. There are basically four ways to do this:
• Make mechanical improvements, so the irrigation system uses less energy during each hour it runs.
• Make management changes, so the system runs fewer hours.
• Reduce cost per unit of energy by, for example, negotiating a better rate with the utility, switching fuels, or finding a lower price for diesel fuel.
• Make your own energy by installing a wind turbine to generate electricity or by making your own biodiesel fuel, for example.
This publication focuses on mechanical improvements. Of course, good management is also critically important for saving energy. The most obvious energy-saving management strategy is to eliminate unnecessary watering, meeting only the water needs of your crops. But you might also consider less obvious options such as changing to less water-intensive crops, timing plantings to take better advantage of natural precipitation, reducing irrigated acreage, using mulches and cover cropping to increase soil organic matter and build the water-holding capacity of your soils, or taking steps (such as planting wind breaks) to reduce evaporation in your fields.
Equipment problems and management problems tend to go hand in hand. Equipment that is badly designed, inefficient, or poorly maintained reduces the irrigator’s degree of control over the way water is applied. Problems like patchy water distribution and inadequate pressure make it impossible to maintain correct soil moisture levels, leading to crop stress, reduced yields, wasted water, runoff, soil erosion, and many other problems.
On the other hand, mechanical improvements do not necessarily result in energy savings, unless the irrigator makes management changes that reduce hours of operation (see Hanson, 2002). This is a key point that is frequently misunderstood. Mechanical improvements like the ones described in this article generally improve irrigation system performance, resulting in higher pressure and increased volumes of applied water. These improvements in turn should make it possible to meet crop water needs with fewer hours of irrigation. But if the irrigator continues to run the system for the same number of hours, energy consumption often stays the same or even increases.
This publication focuses on direct energy consumption—using electricity and fuel to run irrigation pumps and motors. Indirect energy costs are at least as important for many farm operations. Natural gas, electricity, fuel oil, and other fossil fuels are all used in making commercial fertilizers and pesticides. In 2002, commercial fertilizers (nitrogen, phosphate, and potash) accounted for 29 percent of all energy consumed in U.S. farm production. (Miranowski, 2004) The cost of these inputs has skyrocketed in recent years. One of the best things farmers can do to reduce energy consumption and energy-related costs is to reduce their use of commercial fertilizers and pesticides. Many ATTRA publications are available on this topic. See, for example, the ATTRA publications Overview of Cover Crops and Green Manures, Alternative Soil Amendments, Managing Soils for Water: How Five Principles of Soil Health Support Water Infiltration and Storage, and Tipsheet: Assessing the Soil Resource for Beginning Organic Farmers.
Recommended Installations
Centrifugal Pumping Plant Installation with Electric Motor
Especially if you have an older system, your pumping plant might look like Poor in Figure 1, on the discharge side. (The term pumping plant means the pump and motor considered together.) It’s a false economy to save money by installing undersized valves and fittings. You’ll only achieve greater friction loss and higher pumping costs. The next time you rebuild your pump, replace the fittings so that your pumping plant looks like Ideal in Figure 1.
Figure 1. Ideal and Poor Installations
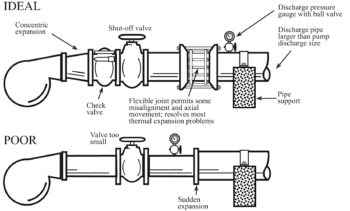
Adapted from: Energy Efficient Pumping Standards, Utah Power & Light Company
An ideal installation should also have:
- A discharge concentric expansion, instead of an abrupt change in pipe diameter, to minimize head loss, turbulence, and air pockets.
- A discharge valve the same diameter as the mainline.
Figure 2 shows what a plant should look like when pumping from a surface source such as a river or canal. The pumping plant should also have the following features:
On the Suction Side of Pump
- A well-designed and screened sump that keeps trash out.
- Suction line joints that are airtight under a vacuum.
- No high spots where air can collect.
- A suction line water velocity of five feet per second (fps) or less. Two to three fps is best.
- A suction entrance at least two pipebell diameters from sump inlet.
- A suction lift (vertical distance from water surface to pump impeller) less than 15 to 20 feet.
- An eccentric reducer to keep air from becoming trapped in the reducer fitting.
- A vacuum gauge to indicate whether the primer is pulling a vacuum or just moving air through the pump.
On the Discharge Side of Pump
- A valve that is the same diameter as the mainline.
- A non-slam check valve to prevent back spin of the pump when shutting it off.
- An air relief device when a buried mainline is used.
- A discharge line water velocity of less than seven fps. Five fps is best.
- An energy efficient 1,800 rpm motor with a 15 percent safety factor.
- A simple shade over the motor.
Figure 2. Recommended Pump Installations, Top and Side Views
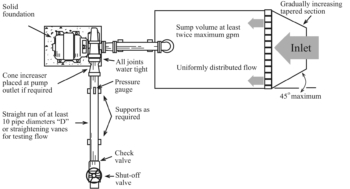
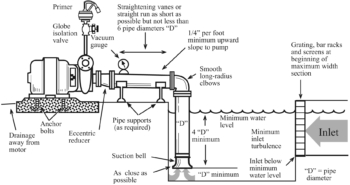
Illustrations adapted from: Energy Efficient Pumping Standards, Utah Power & Light Company
Photo: NCAT
About Pressure GaugesA good quality oil- or glycerin-filled pressure gauge on the discharge side of the pump tells a lot about a system’s condition. If operational pressure remains close to the original design pressure, the pump is probably in good working order. Pressure changes can indicate clogged suction screens, leaks, pump wear, worn nozzles, and other problems. Use the gauge when filling the mainline to reduce electrical demand and water hammer. Extend the life of the gauge by installing a ball valve on the riser. Keep the valve closed except when referring to the gauge. With a ball valve in place, the operator can remove the gauge during the winter. |
Turbine Pump Installation
Refer to the left half of Figure 3 for proper installation of a turbine pump in a well. Many of these same principles apply to turbine pumps in sumps. The properly constructed well should also:
- Be at least six inches in diameter larger than the outside diameter of the well casing when a gravel pack is required.
- Have horizontal well screen slots that continue below the pumping water level. The openings should hold back at least 85 percent of the surrounding material.
The poorly constructed well in the lower right half of Figure 3 shows a well casing not centered in the well. Vertical slotted pipe perforations are above the minimum water level, creating cascading water.
Figure 3. Deep Well Turbine Pump
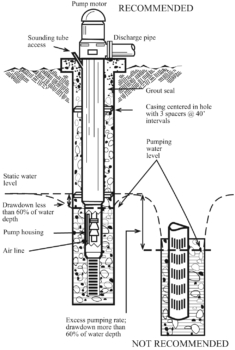
Adapted from: Energy Efficient Pumping Standards, Utah Power & Light Company
Control Panel for Electric Motors
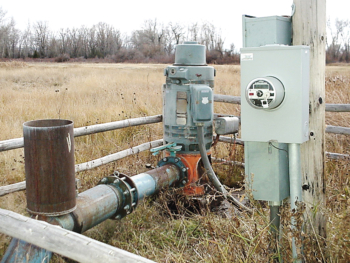
Photo: NCAT
The importance of a properly installed control panel cannot be overemphasized, both for personal safety and to protect your investment in the pump and motor. Your control panel should:
- Have a shade over it to cool thermal breakers.
- Be mounted on secure poles or foundation.
- Have any missing knockout plugs and other holes in the starting switch box replaced and screened or puttied against rodents, insects, and dirt.
- Have a small hole (about 3/16-inch diameter) in the bottom of the panel to allow moisture to drain.
Your control panel should include the following controls, at a minimum:
- Circuit breakers for overload currents
- Lightning arrester
- Surge protector
- Phase failure relay, to protect the motor from phase reversal or failure and from low voltage
- A pressure switch to shut off the motor if pumping pressure drops to undesirable levels.
Electrical Use and Power Bill Charges
Electricity is measured in watts or kilowatts (equal to 1,000 watts). The number of watts is the product of operating voltage times the current (or amps) flowing to the load. A kilowatt-hour (kWh) is an amount of energy equivalent to using one kilowatt (kW) over a one-hour period. To visualize one kilowatt-hour, it may be helpful to imagine ten 100-watt light bulbs burning for one hour. Although billing procedures vary among electric providers and in different regions of the country, irrigation bills typically include three basic charges for electricity.
- The Base Rate or Meter Charge. This is either a monthly or seasonal charge. Some utilities roll this charge into the electric consumption or energy rate. This may remind you of the ante in a poker game—a fee to get into the energy consuming game.
- Electric Consumption or Energy Charge. This charge is based on the amount of electricity used over time as recorded on a kilowatthour meter, with a rate charged for each kWh consumed.
- Electric Demand Charge. Many utilities charge larger customers an amount over and above the electric consumption charge. The basic rationale for these demand charges is that the utility incurs costs to maintain enough capacity to serve the needs of its large customers. Electric providers generally calculate the demand charge in one of two ways. Each method gives an approximation of the customer’s size or power requirements.
a. The demand charge may be based on connected load or horsepower, with a fixed rate charged per horsepower during each billing period. This charge is usually based on “nameplate” horsepower. For example, if the demand charge is $10 per horsepower, the demand charge for a 40- horsepower system would be $400.
b. The demand charge may be based on maximum wattage during the billing period. In this method, a special demand meter measures wattage for each 15-minute interval (or some other interval) during the billing period. The demand charge would be based on the 15-minute interval with highest wattage during the billing period.
For example, suppose the demand charge is $10 per kilowatt, and your demand meter records use of 29 kilowatts for some 15-minute intervals in the billing period, 30 kilowatts for other 15-minute intervals, and 31 kilowatts for other intervals. You would be billed $310. A key point is that demand charges are based on the size of your system—not on how many hours you operate the system. A demand charge is incurred even if you operate your irrigation system for just one 15-minute interval during the entire monthly billing period. Customers with small motors may not have a demand charge.
Every kWh CountsSome irrigators mistakenly assume that since they are charged for demand, they won’t save money by turning off their pumps and reducing hours of operation. It’s true that the demand charge is often a substantial percentage (as much as half or more) of a total electric bill. But all electric providers bill for every single kWh consumed. You will always save energy and money by reducing your hours of operation. Talk to a customer service representative at your utility for an explanation of the rate structure. Know when your meter reading date is each month, since this can influence management decisions. If your power bill includes a demand charge, remember that this charge will be about the same whether you operate your system for one day or 31 days during a billing period. Time-of-Use Rate SchedulesIn some parts of the country, irrigators can sign up for a time-of-use billing schedule. Under time-of-use billing, rates are higher at peak times (when demand is greatest) and lower at “off peak” times. Time-of-use billing allows some irrigators to adjust work schedules so they can irrigate when rates are low. Call your utility to find out if time-of-use billing is available in your area, and to see whether a time-of-use rate schedule may work for you. |
Common Causes of Wasted Energy
- Lack of system maintenance
Impellers that are out of adjustment, plugged screens, worn nozzles, engine drive units that need a tune-up, worn shaft sleeves, leaking gaskets and drains, and dried-out bearings and pump packing are only a few of the problems that are avoided with regular maintenance. - The wrong pump for the system
A pump that is oversized, undersized, or just not right for your system, will never operate efficiently. While it may be possible to trim the pump impeller, re-nozzle the sprinklers, or redesign the layout of the mainline and laterals, a new pump with different characteristics is most likely necessary.
Net Positive Suction Head (NPSH) and CavitationMany people are surprised to learn that centrifugal pumps don’t pull water through a suction pipe; they can only pump water that is delivered to them. When air is removed from the suction pipe by a primer pump, the weight of the earth’s atmosphere forces water to rise into the pipe, delivering water to the pump. Even in the best of circumstances (including a near-perfect vacuum) the maximum water column that can be forced by atmospheric pressure never exceeds about 33 feet in height. As elevation, water temperature, and pipe friction increase, the height of the water column that can be forced drops. The maximum column of water that can be created in a pipe under a given set of conditions is known as Net Positive Suction Head or NPSH. Insufficient NPSH often occurs at startup. Since the pump is working against low pressure, it pumps a larger volume than in normal operation. This larger volume creates friction losses in the suction line, reducing NPSH. Too little available NPSH can result in vaporization of water in the eye of the impeller, causing cavitation, a noisy condition where vapor bubbles collapse violently in the pump. To stop cavitation while occurring, close the discharge valve. If cavitation is allowed to continue, the impeller and pump casing can become pitted and damaged, reducing pump capacity. To eliminate cavitation as well as water hammer, and to prevent high amperage draw on demand meters, each time you start up the pump open the discharge valve slowly to fill the mainline. Caution: Don’t let the pump run more than two minutes with the discharge valve closed. |
- Pump wear from cavitation or abrasion
Cavitation damages impellers, reducing efficiency. If your pump is cavitating, determine whether you have sufficient net positive suction head (NPSH). You should also have a valve on the discharge side of the pump, allowing you to fill the mainline slowly and avoid cavitation. If your water source contains a high amount of sediment, re-engineer the intake structure to allow sediment to settle out of the water before entering the suction line. - Improperly sized or designed fittings
Every minute that irrigation water passes through undersized valves or other fittings at a high velocity, profits drain away. Replace undersized fittings with ones of the correct size. - Water source changes
If you’re using a well for irrigation and the water table has dropped, you may have to reset the pump to a lower level. To compensate for the increased head, you may have to add more stages to turbine or submersible pumps. If you’re using surface water and the level has dropped, centrifugal pumps may need to be relocated closer to the water source in order to create sufficient NPSH.
If turbine or submersible pump capacities do not fit the well characteristics, you may need to replace the bowls with new ones suited to the well capacity.
Hardware Improvements
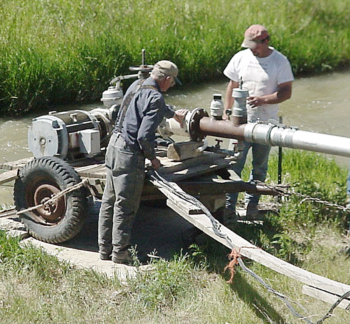
Photo: NCAT
Some common energy efficiency improvements are listed below. No matter what kind of system you are operating, you’ll probably find at least one cost-effective idea below to improve the efficiency of your irrigation system.
Electric Motors
- Rebuild older motors and gain several percentage points in motor efficiency. This procedure typically involves replacing the bearings, rewinding, and “dipping and baking,” and is done by qualified motor repair shops.
- Consider a premium-efficiency motor instead of a standard efficiency motor when installing a new system, when replacing over or undersized motors, and when the cost of rewinding exceeds 65 percent of the price of a new motor. Premium-efficiency motors are two to four percent more efficient than standard-efficiency motors. Besides saving energy, premium-efficiency motors usually have higher service factors, longer insulation and bearing life, and less vibration than standard-efficiency motors. Caution: Some premium-efficiency motors draw a higher startup current. Make sure your system can handle it.
- If you put in a new system, be aware that an 1,800 rpm motor is more efficient than a 3,600 rpm motor. For example, an open drip-proof 3,600 rpm, 40-horsepower motor is 91.7 percent efficient whereas an 1,800 rpm, 40-horsepower motor is 93 percent efficient. Since 1,800 rpm motors make half the revolutions of 3,600 rpm motors, maintenance needs are lower and motor life is longer.
- Consider a variable speed drive (also sometimes called a variable frequency drive) if you need to produce a wide range of flows and pressures to meet varying system needs. For example, a pump serving three pivots and equipped with a variable speed drive could run at slow speed with one pivot turned on, at a higher speed with two pivots turned on, and at full speed with all three pivots turned on. Steep terrain and the use of corner “swing arms” on pivots also cause changing flow and pressure requirements and sometimes justify the cost of a variable speed drive. In 2005, the typical cost of variable speed drives was between $90 and $200 per horsepower. (Idaho Power, 2005) Whether this investment is cost effective for your situation depends on operating hours, pump size, and crop value, among other factors.
- Constant-pressure valves or flow-control nozzles may be a lower-cost alternative to a variable speed drive, although they are less energy efficient. Contact your equipment supplier for more information.
Engines
-
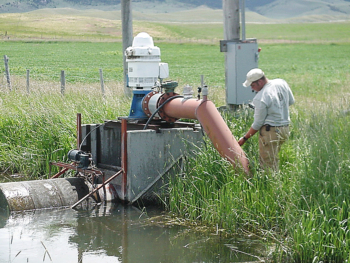
Photo: NCAT
If your radiator-cooled engine uses a cooling fan, five to eight percent of the fuel going into the engine is used to run the fan. You can install equipment that uses irrigation water to cool the engine, eliminating the need for a fan. Check with an engine equipment dealer for more information.
- Think about using the variable speed ability of engines to your advantage. By varying the rpm of the engine you can vary the flow rate, total dynamic head, and brake horsepower requirements of the pump to save fuel and meet varying system needs. Consult an engine equipment or irrigation equipment dealer for advice.
Centrifugal Pumps
- Rebuilding an older pump to increase its efficiency can be a cost-effective alternative to purchasing a new pump. Rebuilding usually involves replacing shaft sleeves, packing, and wear rings, and re-machining or replacing the impeller.
- For optimum efficiency, the pump must match the requirements of the water source, water delivery system, and irrigation equipment. If your pump is under- or oversized and does not match the system needs, pump replacement is the best option. Running an oversized pump with a mainline valve half-closed is like driving a car with your foot on the brake and the accelerator at the same time.
Turbine Pumps
- Vertical shaft turbine pumps lose efficiency when not regularly adjusted. Only qualified pump service personnel should adjust deep well turbine pumps.
- Rebuilding an older turbine pump to increase its efficiency is usually a cost-effective alternative to purchasing a new pump. Rebuilding usually involves replacing shaft sleeves, packing bearings, and re-machining or replacing the bowls.
Mainlines
- Mainlines too small for the volume of water pumped through them contribute to high head requirements and lowered system efficiency. Water velocity through a mainline should never exceed seven feet per second (fps). Velocities below five fps are best and are achievable through good design. Your local irrigation equipment dealer or Natural Resources Conservation Service (NRCS) office can help determine whether a system’s mainline is the right size.
Sprinkler Systems
- If you have a high-pressure pivot with impact sprinklers, you can realize significant energy and demand savings by converting to low pressure (20 to 35 pounds per square inch or psi) or very low pressure (10 psi) and installing drop tubes. Reduce your pump size or have the impellers trimmed to reduce horsepower. In addition to saving energy and money, you’ll increase water application uniformity because wind drift will be reduced and the water discharge point will be closer to the ground. Be aware that a low-pressure pivot could exceed your soil’s infiltration rate, causing runoff.
- Sprinkler options have come a long way in the past decade, and this is especially true for pivot and linear move systems. Spinners produce large droplets that are more rain-like and reduce wind drift. Dual spray heads allow for different spray options for crop germination or irrigating later in the season. Spray plates can also be replaced to allow for different spray patterns. Check out sprinkler packages at your local irrigation equipment dealer to find one suitable for your operation.
- Eliminate your pump completely or reduce your horsepower requirements and pump size by taking advantage of gravity, if you have sufficient elevation drop. Many irrigators underestimate the energy savings and pressure available to them. An elevation drop of just 2.3 feet is equivalent to one pound per square inch of pressure. Your local irrigation equipment dealer or NRCS office may be able to help determine whether your system can be converted to a full or partial gravity system.
- You can also convert a pivot or linear move system to Low Energy Precision Application (called LEPA) by installing hoses or drag socks on the drop tubes. The water is applied directly at the soil surface, virtually eliminating wind drift. These systems also eliminate deep wheel tracks because the ground is wet behind the wheels instead of in front of them. A Colorado study calculated average LEPA conversion cost for pivots at around $15,000, with energy savings of up to 40 percent and paybacks of only three to four years. (Jenkins, 2001) LEPA systems do not work for all crops (for example, tall ones like field corn) or situations. Producers raising orchard and vegetable crops can sometimes dramatically reduce energy costs by converting from hand-move laterals or other high-pressure sprinklers to drip or micro sprinklers. Micro-irrigation systems operate at very low pressure and allow precise application of water to a limited area of soil adjacent to the plant.
Sprinkler Nozzle Wear

Photo: NCAT
To check nozzle wear, remove the nozzle and clean out the interior. Then get either a numbered drill index, with bits measured in thousandths, or a new high-speed drill bit of the size printed on the nozzle. If a drill bit is used, get a new nozzle to compare alongside the worn nozzle. Insert the index into the nozzle opening and compare the size to that printed on the nozzle. Or insert the shank (smooth end) of the drill bit into the nozzle opening. The fit should be snug. If you can wobble the bit sideways even slightly, the nozzle is worn.
How Leaks Cost You MoneyMany producers aren’t very concerned about leaks because the water “ends up on the field anyway.” What they don’t realize is that leaks reduce system pressure, causing a poor sprinkler distribution pattern. Reduced pressure also moves the pump operating point out of the range where the pump is most efficient, increasing demand costs. An NCAT study found that each worn sprinkler nozzle costs its owner up to $4.00 per year in unnecessary energy costs, depending on the degree of wear and the prevailing cost of electricity. Significant leaks can also cause motor overloading and shorten motor life. |
Surface Irrigation
 Many surface irrigators can save water and energy by replacing open ditches with gated pipe. Gated pipe allows water to flow out through evenly-spaced “gates” or openings along the length of the pipe, giving irrigators increased control over the way water is applied.
If you’re already using gated pipe, you may be able to save additional energy by installing a surge valve. Surge valves automatically alternate the water from one set of furrows or border strips to another. This method causes the water stream to advance much faster. Deep percolation at the upper end of the field is reduced and water penetration at the lower end is increased, resulting in more even water distribution.
A Simple Method to Estimate the Pumping Plant Efficiency of an Electrically Powered Sprinkler Irrigation System
Pumping plant efficiency, sometimes called “wire to water” efficiency, is the overall energy efficiency of the pump and motor considered together, and is defined as the ratio of water horsepower (“power out”) to electric horsepower (“power in”). Energy is lost by every pump and motor, and efficiencies in the mid-70 percent range are about the best any pumping plant can achieve. A 70-percent pumping plant efficiency would mean that 70 percent of the horsepower delivered to the motor is transmitted to the water leaving the pump.
Pumping plant efficiency should be evaluated every several years or whenever there is cause for concern (such as a noticeable decrease in performance or an increase in demand charges on your power bill). The do-it-yourself pumping plant evaluation described below reveals whether you can save energy and money by adjusting, rebuilding, or replacing the existing pump or power unit.
To conduct this test, you’ll need the following:
- A good quality pressure gauge (preferably oil-filled) mounted on the discharge side of the pump.
- A five-gallon bucket and a length of garden hose that will fit over a sprinkler head OR a working flow meter mounted at least five pipe diameters downstream of the pump or other bends, valves, or changes in pipe. Mark with a permanent marker the five-gallon line on the inside of the bucket.
- A stopwatch (or a watch with a second hand) and a calculator.
When the system is operating under normal, stable conditions, follow these six steps:
Any system whose pumping plant efficiency is less than 65 percent has some room for improvement. A result in the 50 percent range or lower indicates a significant problem requiring attention. Contact your irrigation equipment dealer or your local NRCS office to discuss your options.
Other flow measuring methods for pivots
The flow from impact sprinklers mounted on the top of the pipe can be measured with a bucket test, using a longer garden hose that fits over the nozzle. In the case of pivots equipped with “wobbler” or “spinner” sprinkler heads, the following method may work. Cut the end of a finger off an old rubber glove, insert a short piece of metal pipe, and attach a hose clamp. Attach a length of garden hose to the other end of the metal pipe with a hose clamp. Place the glove over a pivot nozzle of almost any type and the flow rate can be measured with a bucket test.
Energy Saving Tips for Irrigators
Mike Morris and Vicki Lynne, NCAT Agriculture Specialists
© NCAT 2006
IP278
This publication is produced by the National Center for Appropriate Technology through the ATTRA Sustainable Agriculture program, under a cooperative agreement with USDA Rural Development. ATTRA.NCAT.ORG