Soil Moisture Monitoring: Low-Cost Tools and Methods
By Mike Morris, Katherine Favor, and Omar Rodriguez, NCAT Agriculture Specialists
Abstract
Monitoring soil moisture levels in the field is a fundamental skill that helps producers optimize crop yields, conserve water and energy, and avoid soil erosion and water pollution. This publication surveys low- to moderate-cost soil moisture monitoring tools and methods, including a new generation of sophisticated and user-friendly electronic devices.
Contents
Introduction
How Soils Hold Water: A Quick Review
Soil Health Matters—A Lot
Ways of Measuring Water in Soil
What Method Is Right for You?
Where to Place Moisture Sensors
What about Measuring Infiltration?
High-Precision Techniques
Summing It All Up
References
Further Resources
Introduction
Knowing how to check your soil moisture level is a basic skill for all producers and essential for irrigators—even more so in times of water scarcity or drought. There are many straightforward ways of doing it, yet this basic skill is often described in ways that only a mathematician or electrical engineer could love. We’ve aimed this publication at irrigators, not scientific researchers. We focus on simple, practical, and direct ways that you can measure soil moisture in the field, at low or moderate cost and without complicated mathematical calculations. We also touch briefly on more expensive, complex, and high-tech options. Price estimates and ranges for the tools described here were checked for accuracy in 2022.
Of course, there’s more to good irrigation management than just tracking your soil moisture. You should also:
-
-
- Know and follow general irrigation guidelines for the crops you’re growing
- Keep your irrigation equipment in good working order
- Know how much irrigation water you’re applying
- Track crop water use (evapotranspiration) as the season goes by
-
These topics are outside the scope of this publication but are discussed in the ATTRA publications The Irrigator’s Pocket Guide, California Microirrigation Pocket Guide, Measuring and Conserving Irrigation Water, and Maintaining Irrigation Pumps, Motors, and Engines.
Overwatering can:
- Drown crop root systems, depleting air and encouraging disease
- Leach nutrients—especially nitrogen—below the root zone
- Send nutrients into groundwater, polluting water sources downstream
- Reduce root growth by cooling the soil
- Cause waterlogging and, in some cases, salt buildup in the root zone
- Reduce crop quality and yield
- Waste energy and money
How Soils Hold Water: A Quick Review
Soil holds water in small cavities or pores, just like a sponge. In living, healthy soil, many of these pores are created by small soil organisms: digging, tunneling, digesting, excreting, dying, and secreting various glues (such as glomalin) that make soil particles stick together in small clumps called aggregates.
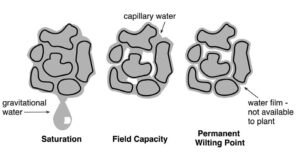
Figure 1. Saturation, Field Capacity, and Permanent Wilting Point
During a heavy rain or irrigation event, the pore spaces fill with water. After the pores are saturated, water continues to move downward due to gravity, taking as little as a few hours to drain from sandy soils, or as much as days or weeks in clay soils. Meanwhile, evaporation at the soil surface pulls water upward through capillary forces, like water climbing up a paper towel. Capillary forces also hold water in films around the soil particles. When a balance is achieved between gravitational and capillary forces, water stops moving and soil reaches an equilibrium known as field capacity. At this point the “soil sponge” is full and no longer dripping or draining.
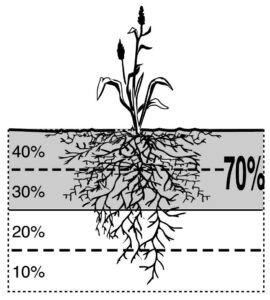
Figure 2. Effective Root Zone
Plants get most of their water from the upper portion of the root zone. The term effective root zone refers to approximately the upper half of the root zone depth, where 70% of the plant’s water is taken up.
The water held in soil at field capacity is the water that matters most to growing crops, but only a fraction of this water—often less than half—is plant available (Armstrong et al., 2001). When the films of water around soil particles get thin enough, they are bound so tightly that plants can no longer overcome these binding forces, and the plants begin to wilt. The water-holding force of soil, known as soil water tension or soil water potential, is strongly affected by soil texture. For example, clay soils have small pores and hold water much more tightly than silt soils, with their larger pores.
The infiltration rate and water-holding capacity of a soil depend on its soil type, organic matter content, and past management practices, among other things. All irrigators should know their soil’s texture class, soil type, and soil series. You can look these up in a soil survey, available from your local Natural Resources Conservation Service (NRCS) or Extension office, or through the online USDA-NRCS Web Soil Survey.
| Table 1. Typical plant-available water holding capacities of various textured soil. | |
| Plant-Available Water Holding Capacity (inches of water per foot of soil) |
|
| Very coarse sands | 0.4 – 0.75 |
| Coarse sands, fine sands, loamy sands | 0.75 – 1.25 |
| Sandy loams, fine sandy loams | 1.25 – 1.75 |
| Very fine sandy loams, loams, silt loams | 1.50 – 2.30 |
| Clay loams, silty clay loams, sandy clay loams | 1.75 – 2.50 |
| Sandy clays, silty clays, clays | 1.60 – 2.50 |
| Adapted from: Schwankl, L.J. and T. Prichard. 2009. University of California Drought Management Web Site. http://UCManageDrought.ucdavis.edu. | |
Soil Health Matters—A Lot
Although you can’t change your soil’s texture class (its ratio of sand, silt, and clay), you may very well be able to increase its infiltration rate and water-holding capacity by improving your soil’s health, using cover crops, reduced tillage, and related methods. As soils get healthier, more numerous and diverse organisms create water-holding channels, pores, and aggregates. In some cases, the changes can be dramatic. For example, over a 15-year period, North Dakota farmer Gabe Brown increased his infiltration rates from around one-half inch per hour to about eight inches per hour (Brown, 2018).
A soil’s water-holding capacity and infiltration rate are indicators of its overall health. There are many other indicators you can check, such as a soil’s aggregate stability, bulk density, organic matter level, and respiration rate (indicating the activity of soil organisms). See the ATTRA publication Soil Health Indicators and Tests for more information.
At the heart of sustainable agriculture is the idea of looking at the biological aspect of soil, not just its physical and chemical aspects. This biological perspective is lacking in most irrigation manuals and guidebooks but should be a high priority for all irrigators. For tips on improving your soil’s health and water-holding capacity, see the ATTRA publication Managing Soils for Water.
Ways of Measuring Water in Soil
There are three ways of measuring water in soil, based on the water’s volume, mass, or soil water tension.
The volumetric water content of soil is defined as the volume of water per unit volume of soil. You may see this expressed as:
-
-
- A ratio like cubic meters of water per cubic meters of soil (m3/m3)
- A number like inches of water per inch or foot of soil depth
- A percentage: [volume of water /volume of soil] × 100
-
The mass of water per unit mass of soil is known as the gravimetric water content of soil.
Soil water tension is the amount of energy holding water in soil, or (putting it differently) the amount of energy needed to pull water out of soil. You’ll also see soil water tension called soil water potential, matric potential, and various other names. It’s a measure of how tightly water is bound to soil surfaces or how hard the plant roots need to work to extract water.
Soil water tension is usually measured in centibars (cb), where a centibar is 1/100th of a bar and a bar is equivalent to about one atmosphere of pressure. However, you may also see it measured in kilopascals (kPa). Moreover, soil water tension numbers are usually shown as negative but are sometimes given as positive numbers. So, just make sure you know how the scale works and whether a high or low number means dry soil.
All three ways of measuring water in soil (volume, mass, and soil water tension) have their advantages.
Knowing the volume of water in soil allows simple management decisions. For example, if your soil is holding one-half inch per foot of soil depth, and its field capacity is one inch per foot, you can bring it to field capacity by adding another half-inch.
Measuring water by its mass is highly accurate and often used to calibrate other tools, even though it’s too time-consuming for normal day-to-day decision-making. The method (easily found on the Internet) involves weighing soil samples, drying them in an oven, weighing them again, and using the difference in weight to calculate the amount of water that has been cooked out of the soil.
Finally, many irrigators prefer to measure soil moisture tension (instead of water volume) because it relates directly to plant well-being, “comfort,” and stress. When you measure soil water tension, you’re measuring the various forces at work in soil that make it hard or easy for plant roots to extract water. As an analogy, think about the work it takes to drink a thick milkshake through a straw. Water always moves from higher to lower water tension (or potential), so soil water tension measurements allow predictions of water movement.
All tools commonly available to irrigators either give volumetric readings or measure soil water tension. Unfortunately, there’s no simple formula for converting one measurement to the other. Some soils hold large volumes of water that plants can’t access, while other soils hold smaller volumes of water that plants can access easily. Depending on soil texture, field capacity may be anywhere from about 10 to 33 cb. Many clays and silty soils still retain more than 50% of available water at 80 cb, whereas coarse soils (such as sands and sandy clay loams) often release 50% of their available water by the time soils have dried out to 40 to 50 cb.
What Method Is Right for You?
Here are a few general suggestions:
-
-
- Consider the limitations of your irrigation system. As a rule, the greater your control, the more precise the information you can use. If you’re running a drip irrigation system, it may make sense to invest in a sophisticated soil moisture measurement method because you can fine-tune your water applications. On the other hand, if you’re flood irrigating hay meadows five or six times each summer, a simple method will give you all the information you can use.
- Consider your soil and crops. Some devices work better in coarse soils than in fine soils, some work better with annual crops than with perennial crops, and some hardly work at all in saline soils. High-value crops may justify a more expensive monitoring system. Deep-rooted crops are more “forgiving” than shallow-rooted crops, taking longer to reach the permanent wilting point and requiring less exact and intensive monitoring.
- Unless you’re a scientific researcher or growing a crop with extremely specific requirements, don’t get too hung up on precision. Methods and devices will give slightly different readings, and all will give distorted readings under certain conditions, but most devices from reputable companies will track moisture trends similarly and give perfectly adequate information for practical farming purposes. Choose a method that works for you, take the exact readings with a grain of salt, and pay more attention to the trends and changes you’re seeing over time and how they’re affecting your crop. No soil moisture measuring device substitutes for the judgment, observation, and local knowledge that good farmers acquire over time.
- Consider what’s convenient for you. Do you want a portable device that you can carry around and push into the ground wherever you like? A permanent installation with buried blocks hard-wired in place? A system that takes regular readings automatically? A wireless system that sends data to your phone? Do you need to avoid burying cables that will interfere with tillage?
- Be realistic in your expectations. Soil moisture measurement, even with the advent of ever-more-accurate devices, is still an art as much as a science. Even the most expensive and sophisticated sensor only tells you about a small point (or very small volume of soil) in your field. This is definitely useful as a reference point but possibly quite different from nearby areas with different soils or slopes. Other potential errors creep in during installation, when your sensor may end up near a small air pocket or pebble. There’s going to be a margin of error no matter what type of sensor you use and how much money you spend. Your sensor may be a Ferrari, but you’re driving it down an extremely rough road.
-
The methods below are arranged roughly in order of cost. All work just fine if they are used properly and diligently.
Direct Soil Inspection
The least expensive methods rely on digging up soil samples in the field and then inspecting, feeling, or weighing and drying them.
Feel and Appearance Method
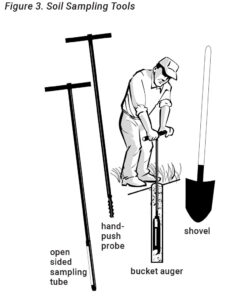
Take walnut-sized soil samples from various locations and depths in the field, appropriate to your crop’s root zone. Then use Table 2 below to estimate the soil water content of your samples. With practice and diligence, the feel and appearance method can be accurate enough for most irrigation management decisions, and many people say they can reliably come within 10% of actual moisture levels. A soil probe, auger, or core sampler is better than a shovel, especially for retrieving deep soil samples.
| Table 2. Determining Soil Water Content by Feel and Appearance | ||||
| Coarse (0.5 to 1.0 mm) |
Moderately Coarse (0.25 to 0.5 mm) |
Medium (0.25 to 0.5 mm) |
Moderately Fine and Fine (<0.01 to 0.05 mm) |
% of Available Water Capacity (AWC) |
| Free water appears when soil is bounced in hand. | Free water is released with kneading. | Free water can be squeezed out. | Puddles and free water forms on surface. | Exceeds field capacity – runoff & deep percolation. |
| Upon squeezing, no free water appears on soil, but wet outline of ball is left on hand. | 100% – At field capacity | |||
| Tends to stick together, forms a weak crumbly ball under pressure. | Forms weak ball that breaks easily; does not stick. | Forms a ball and is very pliable; sticks readily if relatively high in clay. | Ribbons out between thumb and finger; has a slick feeling. | 70 – 80% of AWC |
| Tends to stick together. May form a very weak ball under pressure. | Tends to ball under pressure, but seldom holds together. | Forms a ball, some what plastic; sticks slightly under pressure. | Forms a ball; ribbons out between thumb and finger. | 50 – 70% of AWC |
| For most crops, irrigation should begin at 40 to 60% of AWC. Crop-specific guidelines are available from NRCS or Extension. | ||||
| Ap pears to be dry; does not form a ball under pressure. | Appears to be dry; does not form a ball under pressure. | Somewhat crumbly but holds together under pressure. | Somewhat pliable; balls up under pressure. | 25 – 50% of AWC |
| Dry, loose, single-grained flow through fingers. | Dry, loose, flows through fingers. | Powdery dry, sometimes slightly crusted but easily breaks down into powder. | Hard, baked, cracked; sometimes has loose crumbs on surface. | 0 – 25% of AWC |
| Adapted from NRCS Irrigation Guide, USDA Natural Resources Conservation Service, 1997. | ||||
Hand-push Probe
A hand-push probe is one of the best $30 to $70 investments you’ll ever make, giving you a quick and easy way to check moisture anywhere in your fields. Many irrigators find that a hand-push probe is all they need.
To determine the depth of wetted soil, push the probe vigorously into the soil by putting your weight on the handle without turning. The probe will stop abruptly when it reaches dry soil. (Rocks and gravel will also stop the probe, but these are easily detected by a metallic click.) Check the mark on the probe shaft to determine the depth of the wetted soil. Most hand-push probes have some type of auger on them, allowing you to retrieve a soil sample by twisting the probe and pulling it up out of the soil.
Water Budget Calculations
Although it’s not discussed in this publication, we highly recommend learning how to do water budget calculations using reference evapotranspiration (ETo) rates. These rates are published by various organizations relying on publicly available weather stations, such as those in the AgriMet system or California-based CIMIS system. The OpenET website provides satellite-based estimates of ET for the western United States, for areas as small as a quarter of an acre. You can also set up your own weather station for as little as $1,000.
If you know reference ET values, crop coefficients (Kc) for the crops you’re growing, and a few other variables such as field size, irrigation system type, irrigation efficiency, crop root depth, and crop spacing, you can maintain a water budget: tracking how much remains in your soil and forecasting when you’ll need to irrigate. (This is sometimes also called the checkbook method because of the similarity to making withdrawals and deposits to a checking account.)
Detailed explanations are available from the ATTRA Irrigator’s Pocket Guide and numerous Internet sources and books. You can also find helpful tools to make these calculations easier, such as the Wateright online calculation tool from Fresno State University, which relies on CIMIS data.
Tensiometers
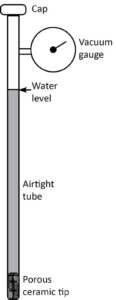
Figure 4. Tensiometer
One step up in sophistication from a hand-push probe, a tensiometer is an airtight, water-filled tube with a porous ceramic tip and a vacuum gauge near the top. As the name implies, a tensiometer measures soil water tension. When you push the device into the ground, water flows into or out of the tube through the ceramic tip, increasing or decreasing vacuum pressure inside the tube. When water stops moving and reaches equilibrium with its surrounding soil, the vacuum pressure equals soil tension and can be read from the gauge.
Tensiometers are easy to use, last for years with good care, are not affected by soil temperature or salinity, and don’t need batteries unless you connect them to data loggers or other remote sensing devices. While not as accurate as some electronic devices, they’re inexpensive and plenty accurate for many practical farming situations. You need to service them regularly by filling them with water, and the main complaint about them is that if the soil gets too dry, tensiometers can lose soil contact, requiring re-installation. They cost $80 to $150 apiece, although instructions are available on the Internet for making your own for less than $55. (See Cahn and Chambers, 2019.)
Once installed, tensiometers are typically left in the field for weeks at a time or through the entire growing season. Because they’re easy to install and remove, tensiometers are well-suited to cultivated fields, annual crops, and other situations where buried blocks or cable would be awkward. They’re often used in orchards. They work best in the range of 0 to 80 cb, making them better suited to coarse soils. (As noted earlier, a fine soil such as clay might still contain more than half of its available water capacity at 80 cb.)
| Table 3. Irrigation Guidelines Based on Centibar Readings | |
| Reading | Interpretation |
| 0-10 cb | Saturated soil |
| 10-20 cb | Most soils are at field capacity |
| 30-40 cb | Typical range of irrigation in many coarse soils |
| 40-60 cb | Typical range of irrigation in many medium soils |
| 70-90 cb | Typical range of irrigation in heavy clay soils |
| > 100 cb | Crop water stress in most soils |
| Adapted from Watermark Soil Moisture Sensors, The Irrometer Company, Riverside, CA. | |
Electronic Meters and Sensors
There’s a vast and slightly bewildering variety of electronic meters and sensors on the market. Some are portable tools carried around the field and pushed directly into the soil. Others rely on buried sensors that are either hard-wired to a fixed meter or else have attached wires (electrodes) that are left above-ground and hooked to a portable hand-held meter or data logger.
All these tools consist of one or more sensors inserted or buried in the soil and a meter that runs an electric current through the sensor. Most common and affordable tools for irrigators measure one of two things: electrical resistance (opposition to the flow of an electric current) or capacitance (the electrical charge-storing ability of soil).
Electrical Resistance Sensors
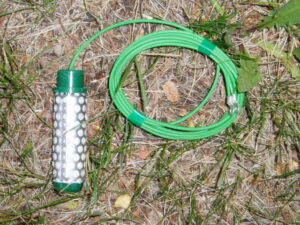
Granular matrix sensor. Photo: Mike Morris, NCAT
Gypsum blocks. Photo: Mike Morris, NCAT
Electrical resistance sensors take advantage of the familiar idea that wet soil conducts electricity better than dry soil and has lower electrical resistance. These sensors are normally blocks made of some type of porous material that absorbs water from the surrounding soil. A meter runs an electric current through two electrodes implanted in the block, measuring electrical resistance. Once the block stops soaking up water and achieves equilibrium with its surrounding soil, these resistance measurements give a good indication of soil moisture tension.
The two most common types of electrical resistance sensors are gypsum blocks (with a short life of as little as one year but a low cost of $12 to $25 apiece) and granular matrix sensors (lasting three to seven years or more and costing $45 to $60 apiece.) We’ve tried both types and think almost all farmers will find it worth spending the extra money on granular matrix sensors. Not only will granular matrix sensors last much longer than gypsum blocks, but freezing will usually not hurt them, whereas it can cause cracking and premature aging in gypsum blocks.
One of the main drawbacks to electrical resistance blocks is that they are strongly affected by salinity—more so than tensiometers. To give accurate readings, electrical resistance blocks also need to be buried carefully, with snug soil contact and no air pockets–something that may be difficult to achieve in coarse or gravelly soils. Over the years, NCAT staff members have installed hundreds of granular matrix sensors and we’ve found the number one problem to be poor soil-to-sensor contact, usually in coarse or gravelly soils.
| Table 4. Choosing a Water Potential Sensor According to Soil and Crop Type | |||
| Soil and crop type | Tensiometer | Granular matrix |
Gypsum block |
| Soil Type | |||
| Coarse sand | Yes | No | No |
| Sandy loam, loam, loamy clay | Yes | Yes | Yes |
| Heavy clay | Yes | Yes | Yes |
| Crop Type | |||
| Vegetables and strawberries | Yes | No | No |
| Perennial fruit and table grapes | Yes | Yes | No |
| Pastures | Yes | Yes | Yes |
| Wine grapes | No | No | Yes |
| Maintenance required | Moderate | Low or none | Low or none |
| From the Government of Western Australia’s Agriculture and Food website. | |||
Dielectric Sensors
As soil gets wet, it not only conducts electricity better but also stores an electrical charge better. Dielectric sensors measure the charge-storing capacity of soil: its tendency to become electrically polarized when exposed to an electric field, acting like a capacitor. Dielectric sensors can be extremely accurate and are generally preferred by scientific researchers to electrical resistance sensors. The charge-storing capacity of soil is closely and reliably related to its water content. So, unlike tensiometers or electrical resistance blocks, dielectric sensors allow volumetric measurements: the volume of water per volume of soil.
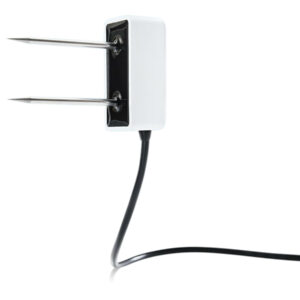
Capacitance Sensor. Photo: Meter Group
There are two main types of dielectric sensors: capacitance sensors—also known as frequency domain reflectometry (FDR) sensors—and time domain reflectometry (TDR) sensors.
FDR devices measure the charge-storing capacity of soils by pulsing electromagnetic waves into the soil and measuring the difference in frequency between output and return waves. By contrast, TDR devices measure the travel time of a reflected wave of electrical energy sent along two parallel rods or stiff wires. For practical purposes, irrigators don’t need to understand the electrical engineering that makes these devices work. But, if you’re scientifically minded or simply curious, you can read about the theory of dielectric permittivity in sources on the Internet.
FDR devices are the most widely used dielectric sensors in agriculture. They are readily available and cost anywhere from a few dollars to hundreds of dollars apiece. Among other options, there are multi-depth sensors, 18 to 35 inches long, that allow you to measure moisture at multiple depths from a single buried device.
TDR devices require complicated electronics that do wave-form analysis. Until recently, TDR systems cost way more than FDR systems and were much more difficult to set up. Within the past few years, however, TDR devices have become available that take advantage of mass-produced and simpler electronics and are close in price to high-quality FDR devices. TDR is now an option worth considering for irrigators who need a high degree of accuracy. Although not necessarily more accurate than the best FDR devices in most situations, TDR sensors are less affected by moderate levels of salinity. (It should be noted, however, that TDR devices will stop working completely in highly saline soils.)
Although cheap dielectric sensors are available on the Internet, they’re often described poorly and give wildly inaccurate readings or may not work at all. High-quality dielectric sensors have a lifespan of 10 years or more. We advise spending the money on high-quality sensors made by a reputable company.
The diagram below shows some main ways of measuring soil moisture, indicating the four that are most common, practical, and affordable for agricultural producers.
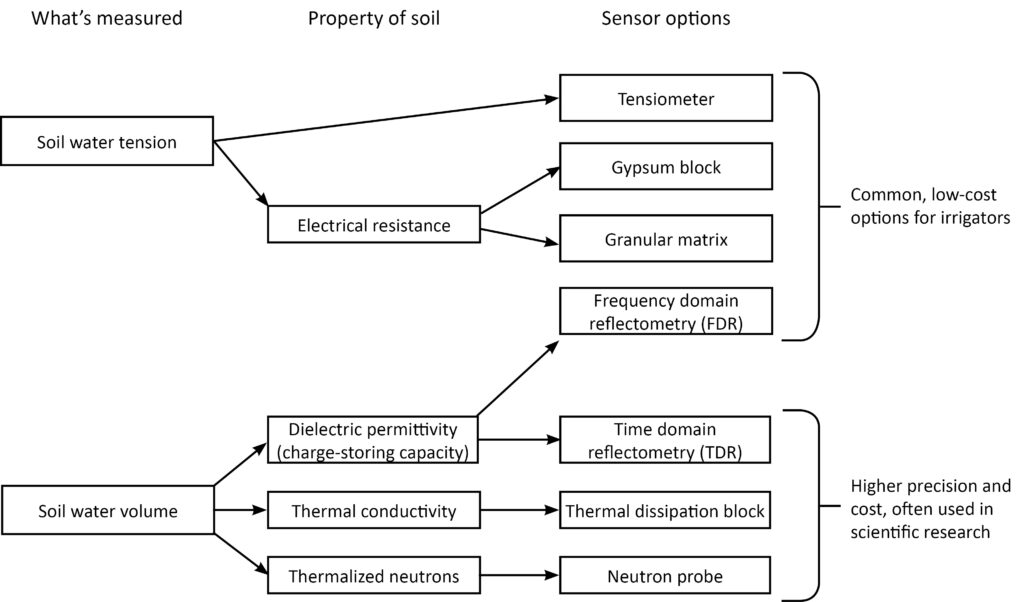
Figure 5. Sensor Options
Data Loggers, Weather-based Controllers, and Phone Apps
A data logger is an electronic device, usually powered by batteries or a solar panel, that records data at regular intervals. Electrical resistance blocks, tensiometers, and dielectric sensors can all be connected to data loggers.
Soil moisture data loggers are typically mounted permanently on a post and connected by a cable to one or more sensors buried nearby—or, in some cases, hundreds of yards away. At regular intervals (ranging from every few minutes to every few hours), the data logger sends a weak electric current to the sensors and retrieves measurements, which are converted into soil moisture estimates and stored in memory. In many cases, data loggers double as weather-based controllers that automatically modify your irrigation schedule based on soil moisture and weather conditions.
Data loggers are a godsend for farmers. No matter how busy you get, the data logger automatically checks and records your soil moisture, storing months or years of data that can be downloaded at your convenience or sent directly to your phone or laptop. Some data loggers also allow remote-control irrigation and send alerts if soil moisture gets above or below desired levels.
Hand-held meters certainly have their advantages, allowing you to check moisture at an unlimited number of sites. Based on our experience, however, we think most irrigators will find a data logger setup more useful than a hand-held meter. About the only things we don’t like about data loggers are: (1) you need to set them up in a semi-permanent way, with a mounting post and cable that can get in the way of cultivation and other farming operations; and (2) the process of calibrating sensors to the data logger can be time-consuming.
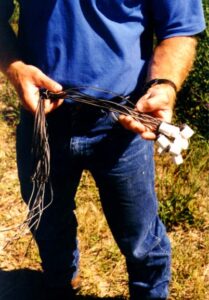
In a recent project, NCAT staff members installed approximately 60 soil moisture data loggers at farms and ranches in Montana. These installations were not particularly difficult, and the headaches mostly related to the cable. We saw dozens of faulty splices, cable chewed by livestock and wildlife, cable damaged by machinery during tillage and hay cutting, cable melted when the owner was burning weeds, cable melted by lightning, and (on one memorable occasion) a cable snagged by a passing car. We ended up using direct-burial cable for all our installations, despite its high cost. The rugged, waterproof design and copper shielding defeated gnawing rodents and put an end to most of our cable problems.
Many data loggers nowadays work with wireless transmission systems that allow you to see real-time moisture levels on your phone or computer. Some apps allow you to control irrigation from your phone, while others regulate your irrigation schedule automatically, based on the weather. Still others recommend irrigation schedules that you can then program into your system. As an example, a free app that’s available for peanut, corn, and cotton growers is the Agricultural Research Service’s Irrigator Pro, which collects data from soil moisture sensors in the field, transmits it to the Irrigator Pro cloud server, and generates customized irrigation recommendations.
As a ballpark figure, you’re going to pay $150 to $600 for either a hand-held meter or a data logger. The total cost of a system will depend on the number of sensors you install, the type of sensors you choose, and whether the system is wireless. As noted earlier, electrical resistance blocks cost only $12 to $60 apiece, whereas good-quality capacitance sensors often cost more than $200 apiece. A wireless system with a single volumetric (dielectric) sensor can be set up for as little as $1,200, including annual fees for a data plan. On the other hand, a system that includes multiple sensors, a weather station, and monitors multiple locations and depths over a large area could easily cost tens of thousands of dollars.
How a Wireless System Works
A wireless soil moisture monitoring system consists of a data logger mounted on a pole and connected by cable to one or more nearby sensors. The battery-powered data logger sends a weak electric signal to the sensors and measures resistance or capacitance. The results are sent wirelessly to a central location (such as a weather station) or relay station and to the Internet cloud, where the data is processed and made available to your phone or computer.
When we first heard about wireless systems, we hoped or imagined that they would eliminate the hassles associated with burying and splicing cables. Unfortunately, “wireless” systems rely on cables just as much as any other data logging system. The only way a data logger can send an electrical current to a sensor is through a cable. (True, there are sensors that contain their own batteries and wireless transmitters, eliminating the need for cables, but these are mainly used in landscaping and home gardening.)

Where to Place Moisture Sensors
Because you’re counting on sensors located at just one or a few places to inform you about soil moisture across a whole field or farm, how and where you place your sensors is extremely important.
-
-
- It cannot be stressed enough that most sensors require snug soil-to-sensor contact to work properly, without air pockets. If you’re not going to install sensors carefully, you might as well not install them at all.
- When burying any soil moisture sensing device, it’s extremely important to minimize soil compaction and disturbance to the surrounding soil and canopy cover. Your goal is to install each sensor in surroundings that are representative of the field.
- It’s rarely practical to monitor every part of the field, so install sensors in average soil and slope areas. Avoid field edges and unusually wet or dry areas.
- Avoid installing sensors in recently tilled soil because tillage brings up deeper soil layers that may behave quite differently from the soil in your crop’s root zone.
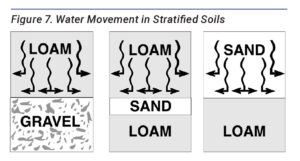
- Fine soil overlying a coarse soil, or vice versa, must get very wet before water moves down through it. Under these conditions, the overlying soil can hold three times as much water as it would in more uniform soils. If you have distinct layers of soil, you may want to place a sensor in each layer.
- For mature trees, place sensors well away from the trunk but inside the drip line (canopy diameter).
- The question of how deep to maintain soil moisture is a management decision, depending on crop and growth stage, soil conditions, and other factors. In general, though, management should focus on the effective root zone, i.e., the upper half, where plants take up most of their water.
- For deep-rooted crops, place sensors at multiple depths or use a multi-depth sensor. In monitoring deep-rooted alfalfa, for example, we’ve found it convenient to place sensors six, 18, and 24 inches deep: the midpoint of the top, middle, and deepest third of the total three-foot root depth.
- For shallow-rooted crops (such as grasses and most vegetables), place one sensor in the root zone and another below the root zone, as a way of detecting deep percolation and overwatering.
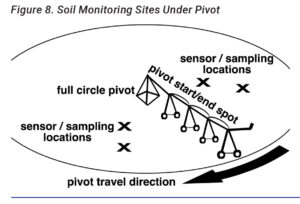
- For center pivots, monitor a few sprinkler diameters from where you normally start the pivot, in the direction of pivot movement. Also monitor a few sprinkler diameters before the spot where you normally stop the pivot. Avoid the inner part of a pivot circle (inside the first tower), which tends to be wetter than the rest of the circle.
-
What about Measuring Infiltration?
Your soil’s infiltration rate is just as important as its ability to hold water, and key to preventing runoff and erosion. Although it’s not needed for day-to-day irrigation management, measuring infiltration rates can show you a lot about differences between soils and locations in your fields and can show you how your soils are changing over time. Infiltration rates are affected by soil health and can often be improved in several years or less.
In any soil, infiltration rates vary depending on soil moisture levels. This complicates the process of getting reliable and repeatable infiltration-rate measurements. Scientific researchers use expensive infiltrometers to measure saturated hydraulic conductivity, but the easiest way to check your infiltration rates is with a simple ring test. To do this, you pound a ring made of metal, PVC, or some other rigid material into the soil, pour a carefully measured amount of water into the ring, and record the time (in minutes or seconds) it takes for all the water to infiltrate the soil. Good videos are available on the Internet to show you the procedure.
Even though they’re highly useful, don’t expect too much precision from ring tests. Be especially careful about comparing tests done on different dates, when all sorts of factors influencing the results (such as soil moisture, temperature, and vegetation) may be different. Here are some refinements to the ring test, to make it more accurate:
-
-
- After the water is completely infiltrated, repeat the test. The second application (in wet soil) will give a more meaningful estimate of your infiltration rate.
- Use distilled water.
- Line the inside of the ring with a sheet of plastic wrap before adding the water. Once you’ve added all the water, carefully pull the plastic wrap out, so infiltration starts exactly when you begin timing.
- Add exactly one inch of water, so you can calculate your infiltration rate in inches per hour. (If you use a 6-inch diameter ring, this amount will be 444 mL.)
- Use a double-ring infiltrometer (costs $200 to $700), whose “ring within a ring” design forces water in the inner ring to infiltrate vertically and reduces error due to the lateral spread of water.
-
High-Precision Techniques
The methods below are more expensive and best suited to high-value crops, large farms, and scientific research. In some cases, though, high-tech features are becoming available at affordable prices.
Pressure chambers, also known as pressure bombs, are airtight chambers that measure plant moisture tension and, therefore, water stress. A leaf or plant stem is placed inside an airtight chamber, with part of the petiole extending outside the pressure chamber through a seal. The pressure of the chamber is increased until water begins to appear at the tip of the petiole that is facing outwards. If the pressure chamber’s reading is high, it means that a lot of pressure was needed to extract water from the plant, which indicates that the plant is experiencing more water stress. If the pressure chamber’s reading is low, it means that less pressure was needed to extract water from the plant, which indicates that the plant is experiencing less water stress.
Like soil water tension, stem water tension is commonly measured in centibars. Although they’re expensive ($1,500 to $7,000), pressure chambers give precise water-stress measurements, avoid some of the challenges of measuring water in soil, and are appropriate when your crop’s quality depends on getting specific amounts of water at specific times of the year. A good example is wine grapes, whose high quality often warrants the use of expensive precision tools. For more information on how to interpret pressure chamber readings from various crops, refer to ATTRA’s California Microirrigation Pocket Guide.
Porometers also measure plant water stress, by measuring the stomatal conductance on plant leaves (i.e., how open or closed stomata are). Stomata are small pores on the surface of plant leaves that let air into the leaf and let water out of the leaf through transpiration. Closed stomata tend to indicate that plants are experiencing water stress. Porometers are handheld, portable, easy to use, and are simply clamped onto leaves to measure the rate of water vapor exiting stomata. Although they provide a good picture of how much water a plant needs, porometers are expensive ($6,000 to $12,000). They can be used on any type of crop and (like pressure chambers) are a good choice for plants like grapevines, whose quality depends on receiving precise amounts of water at certain times of the year.
Infrared satellite imagery is emerging as an important way to track evapotranspiration, soil moisture, and carbon flux levels, and it will undoubtedly become more common in the future. The estimates are based on NASA’s satellite data on leaf temperature, solar radiation, and crop leaf size. Companies like IrriWatch are already providing satellite imaging services to farms for irrigation purposes. Among other advantages, satellite images can show soil moisture conditions over an entire field or farm. Participating farms specify their digital field boundaries, crop type, soil type, and irrigation type, consent to have their field information tracked by satellite, and then begin receiving reports and irrigation recommendations.
Neutron probes are extremely high-tech devices that contain pellets of radioactive material that produce “fast” neutrons that collide with hydrogen atoms in soil water, thus losing their energy and becoming “slow.” By measuring the number of slow neutrons within a volume of soil, an estimate can be made of how many hydrogen atoms, and thus how much water, is in the soil. Neutron probes are generally viewed by scientific researchers as the most accurate way of measuring soil moisture (other than directly measuring gravimetric content by weighing and drying), but they are not recommended for most farms. Besides the obvious safety hazards of working with radioactive material, they require special training and licensing and are labor-intensive and expensive (often upwards of $5,000).
Coming soon: Soil moisture monitoring is moving towards methods (like satellite imagery) that cover large areas and are “noninvasive,” avoiding the need for digging, burying, or close contact with the soil. Many new methods are commercially available or under development, including actively heated fiber optics, microwaves, ground-penetrating radar, radio frequency identification, hydrogels, seismoelectric approaches, cosmic ray sensors, and electromagnetic induction. (See Hardie, 2020.)
Summing It All Up
The table below summarizes the pros and cons of the various methods discussed here, arranged by cost.
| Table 5. Pros and Cons of Various Soil Moisture Measurement Methods | |||||
| Method | What’s measured | Advantages | Disadvantages | Cost | |
| Direct soil inspection (very low cost) |
Feel & appearance | Approximate % of plant-available water-holding capacity | Simple | Accuracy questionable but improves with practice. | Free |
| Hand push probe | Depth of soil moisture | Simple, inexpensive | Qualitative measurement only (“wet or dry”). |
$30-$70 | |
| Gravimetric weight method | Mass water content (percentage of dry vs. wet soil weight) | Accurate; not affected by salinity; suitable to wide range of soils. | Laboratory equipment required; long wait times until results. |
Minimal (except for labor) | |
| Non-electric devices (low cost) |
Tensiometer | Soil water tension (aka soil water potential) | Low cost, easy installation; long-lasting; non-electric; requires no buried blocks or cable. Works best in coarse soils and below 80 cb. | High maintenance; can’t be left in the ground in freezing temperatures; affected by salinity; prone to failure when air enters the system. | $50-$150 apiece |
| Electrical devices (moderate cost) | Gypsum block | Electrical resistance | Easy installation; low cost. | Short life-expectancy; questionable accuracy; strongly affected by salinity or fertilizer; requires careful installation without air gaps. | $12-$25 apiece for sensors + $150-$600 for meter or data logger |
| Granular matrix sensor | Electrical resistance | Low maintenance; easy installation; accurate enough for many practical farming purposes; greater durability and range of operation than gypsum blocks. | Not suitable for very sandy or vertic (swelling) soils; strongly affected by salinity or fertilizer; questionable accuracy; requires careful installation without air gaps. | $30-$50 apiece for sensors + $150-$600 for meter or data logger |
|
| Frequency domain reflectometer | Dielectric constant of soil (its charge-storing capacity) | Extremely accurate; ideal for use in sandy soils ; suitable to a wide range of soils. | Sensitive to salinity and clay activity; needs to be calibrated for each specific soil; requires careful installation without air gaps. | $100-$300 apiece for good quality sensors + $150-$1,000 for meter or data logger | |
| High precision (high cost) |
Time domain reflectometer | Dielectric constant of soil (its charge-storing capacity) | Extremely accurate; suitable to a wide range of soils; relatively unaffected by salinity. | High cost (but falling); complicated to set up and use; requires a lot of power; requires careful installation without air gaps. | $700 to thousands of dollars for a system with one or more good quality sensors + meter or data logger |
| Infrared satellite imagery | Electromagnetic soil surface moisture, leaf temperature, leaf size | Convenience; accuracy; whole-field monitoring; allows accurate estimate of volumetric water content. | Still new; questions about reliablity, data quality, time lags | ?? | |
| Pressure bomb | Plant moisture tension, water stress | Gives very precise water stress measurements. Useful for high-value crops with precise water requirements. | High cost | $1,500 to $7,000 | |
| Porometer | How open or closed plant stomata are: an indication of water stress | Hand-held; easy to use; give accurate picture of plant water stress. Useful for high-value crops with precise water requirements. | High cost | $6,000 to $12,000 | |
| Neutron probe | Measures number of hydrogen atoms and therefore water. | Extremely accurate; suitable to a wide range of soils. | Expensive; require radiation license and monitoring; safety hazard; labor intensive; require special training. | $5,000 and higher | |
References
Armstrong, D., W.E. Cotching, and C. Bastick. 2001. Assessing your soil resources for irrigation. Wise Watering Irrigation Management Course notes.
Brown, Gabe. 2018. Dirt to Soil: One Family’s Journey into Regenerative Agriculture. Chelsea Green Publishing, White River Junction, VT.
Cahn, Michael and David Chambers. April 23, 2019. Do it yourself (DIY) tensiometer. Salinas Valley Agriculture.
Hardie, Marcus. December 4, 2020. Review of Novel and Emerging Proximal Soil Moisture Sensors for Use in Agriculture. Sensors 20, 6934.
Meter Group. Undated. Soil moisture sensors—how they work. (Also, many other articles on soil moisture monitoring and irrigation.)
USDA Natural Resources Conservation Service (NRCS). 1997. NRCS Irrigation Guide. Washington, D.C.
USDA Natural Resources Conservation Service (NRCS). No date. Web Soil Survey. Washington, D.C.
Further Resources
Soil for Water Project
Peer-to-peer learning network and story collection managed by NCAT, devoted to finding and sharing better ways of catching and storing water in soil. Join the Soil for Water network, participate in the forum, or sign up for our mailing list.
The Irrigator’s Pocket Guide. 2019. By Mike Morris, Vicki Lynne, Nancy Matheson, and Barbara Bellows. National Center for Appropriate Technology, Butte, Montana.
A take-to-the-field reference to help irrigators save energy, water, and money, including guidelines for water management, equipment maintenance, and handy conversions and formulas.
Suppliers
Dozens of companies make and sell soil moisture monitoring equipment. Listed below are a few representative sources of equipment mentioned in this publication. Being included on the list does not imply endorsement by NCAT or USDA.
Art’s Manufacturing & Supply, Inc. 800-635-7330
Source of soil probes, bucket augers, and other irrigation equipment.
Campbell Scientific, Inc. 435-753-2342
Source of soil moisture sensors, data loggers, and weather stations.
Davis Instruments Corp. 510-732-9229
Source of weather stations and wireless soil moisture monitoring systems.
Delmhorst Instrument Company 877-335-6467
Source of gypsum blocks and hand-held soil moisture meters
Gempler’s 800-382-8473
Source of soil moisture sensors, probes, tensiometers, and other irrigation equipment.
Graybar Electric 855-347-2839
Source for direct-burial cable.
GroPoint 833-476-7646
Source for soil moisture probes, sensors, and data loggers, including moderately priced TDR sensors.
Hydrosat
Provides satellite data on soil evapotranspiration rates and calculates soil moisture and carbon flux for precise irrigation scheduling.
Irrigator Pro App
Free app providing real-time irrigation recommendations for peanut, cotton, and corn growers in the United States.
Irrometer Company 909-689-3706
Source for Watermark granular matrix sensors, hand-held soil moisture meters, tensiometers, data loggers, and other soil moisture monitoring equipment.
Li-Cor 800-447-3576
Reputable source of high-quality, precise, handheld, user-friendly porometers.
Meter Group 509-332-2756
Source for data loggers, soil moisture and temperature sensors, weather stations, infiltrometers, and other research tools and devices.
M.K. Hansen Company 509-884-1396
Source for the AM400 soil moisture data logger with graphical display.
Netafim 559-453-6800
Manufacturer of precision irrigation systems, data loggers, and customized irrigation scheduling based on models from your system’s data.
Onset 800-564-4377
Source for widely used HOBO data loggers and weather stations, soil moisture sensors, and remote monitoring systems.
Soil Moisture Equipment Corporation 805-964-3525
Source for soil augers, soil moisture sensors and meters, tensiometers, time domain reflectometers, and other soil moisture monitoring equipment.
Soil Moisture Monitoring: Low-Cost Tools and Methods
By Mike Morris, NCAT Agriculture Specialist
Published August 2006, updated January 2022 by
Mike Morris, Katherine Favor, and Omar Rodriguez
© NCAT
IP277
Slot 277
This publication is produced by the National Center for Appropriate Technology through the ATTRA Sustainable Agriculture program, under a cooperative agreement with USDA Rural Development. ATTRA.NCAT.ORG