
Seeding Root Crops
 Print This Post
By Audrey Kolde, NCAT Agriculture Specialist
As a nongenerational farmer, most of my agricultural experiences before entering the field of farming and food systems had huge impacts on my decision to farm, from childhood memories of wild blackberries to college-age harvesting of carrots.
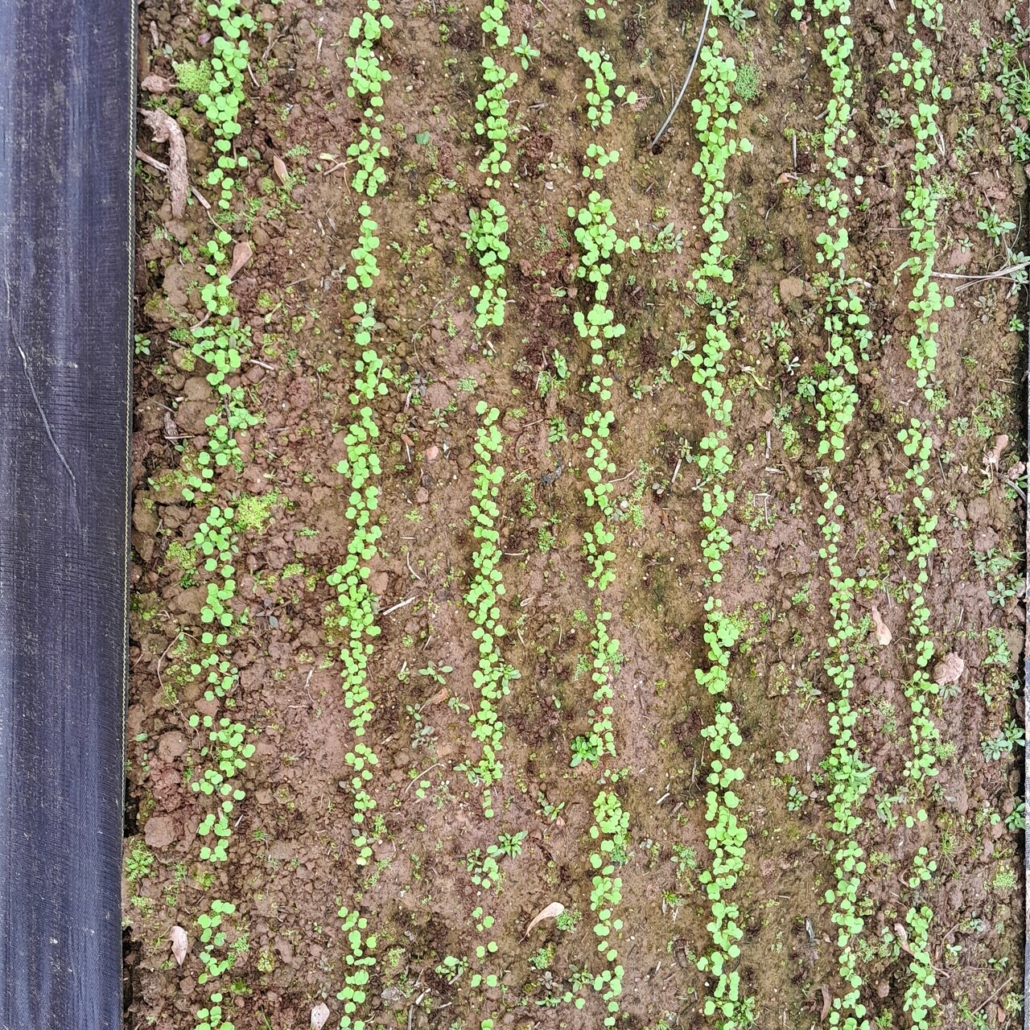
I love direct seeding crops; it feels like an act of faith that the seeds won’t fail, or the weeds won’t choke them out. It never seems to lose its wonder, the careful bed preparation that ends in straight rows of seedlings. Or sometimes, the rushed bed flip is good enough. Please, Jesus, take the wheel. With either farming style, I want to make sure you have the 411 behind-the-scenes of some of my favorite roots.
Prepping my bed can be a quick flip for my later successions, but let’s pretend that I am coming out of the rest period of the garden (July and August for me), so I get to do some TLC ahead of planting. I use a silage tarp to break down plant matter from previous crops. Then, I decrease the seedbed. There are a number of ways to do this, including tilling, flaming, solarizing, and stirrup. Now it’s time to water and sprout, and then repeat the process to kill these sprouts.
As I switch seasons, I also like to keep tabs on my soil temperature with a thermometer or at the nearest extension research center to ensure that my roots will germinate. If I can help it, I don’t waste seeds on soil that is too hot or too cold. It is the best tool to know when to plant since every year brings an irregularity to the climate.
Next, I want the bed to have a near-perfect texture. I want to see no debris or chunks in the bed, a beautiful tilth to the soil, and a level bed top. I need this textural perfection for the seeding tools made for freshly tilled and shaped beds.
How do I make that happen? I remove debris with a rake, use a wheel hoe or a push tiller set at a shallow depth, or add an inch of compost. Then I add a broadfork to break up the tiller pan for deeper roots.
Ready to start planting? The following are some seeding options to consider.
- Hand seeding with shallow trenches: Use the handle end of a rake to make the trenches and then use the back side of the rake to close them.
- EarthWay Seeder: Easy to use and low cost but may result in inconsistent seed distribution due to its reliance on how fast you walk.
- Four-Row Pinpoint Seeder: Easy to use with minimal setup, making it a good choice for quick planting. It’s robust, durable, and effective with various soil conditions and seed types.
- Jang Seeder: Known for its precision and adaptability, it is suitable for professional growers and dedicated enthusiasts. However, it’s higher priced, and it may take some time to master its many options and settings.
And here are some tips for growing a few of my favorite root vegetables:
Beets
Germination soil temp: 40 to 90°F degrees
Soil PH: 6 to 7.5
Days to germination: 5 to 8
Days to harvest: ~40 to 55
Prefers soil 65 to 75°F
Thin to 3” to 4″ apart or 6″ for winter storage
I’ve found that beets bring some challenges to be aware of. The beets’ seeds are dried fruits that contain a cluster of two to six seeds. After planting, thinning them out is essential to ensure healthy growth. When seeding, it’s crucial to stay vigilant because the irregular shape of the seeds can potentially clog up a machine. To address this problem, some seed companies have begun producing pelleted seeds to prevent clogging and ensure smoother planting.
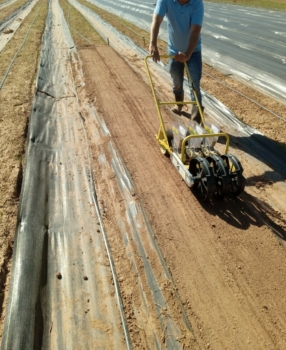
Jang seeder. Photo: Audrey Kolde, NCAT
Carrots
Germination soil temp: 45 to 85°F
Soil pH: 5.5 to 7
Days to germination: 7 to 21
Days to harvest: ~35 (baby) to 75
Prefers soil 60 to 70°F
Thin to 2″ apart
Carrot seeds are tiny and difficult to sow evenly. Some farmers sow carrot seeds with sand or coffee grounds to achieve better spacing. You can use seed tape or pelleted seeds if that makes your life easier and helps reduce thinning and wasted seeds. Personally, this crop is what made me upgrade to a more precise seeder. The real trick to carrots is maintaining the moisture that they require. You can achieve this by watering two to three times per day or laying fabric like burlap sacks over the soil and watering them.
Turnips
Germination soil temp: 60 to105°F
Soil pH: 5.5 to 7
Days to germination: 2 to 5
Days to Harvest: ~38 to 50
Prefers soil 40 to 75°F
Trim to 2″ to 4″ apart
Turnips can germinate at 105°F! That is impressive! And also counterintuitive, since turnips like cooler soil temperatures during growth, but this can be achieved by mulching once they germinate. I like to use insect netting to keep those flea beetles at bay so I can sell the turnips with greens on.
Starting seeds in beautiful, meticulously prepared soil is always the dream. But the reality of farming often has other plans for us. Don’t worry. By better understanding your growing conditions and your tools, you can escape the worst of last-minute panic seeding, with fingers crossed that they germinate. Instead, you can make educated decisions on controlling the weather in your microbiome, like the mad scientist you are. I’m rooting for you!
Related ATTRA Resources:
Equipment and Tools for Small-Scale Intensive Crop Production
Sustainable Weed Management for Small and Medium-Scale Farms
Other Resources:
Vegetable Growing Guides, Cornell University
The Best Vegetable Seeders for Market Gardening — The Earthway Seeder
The Vegetable Gardener’s Bible
This blog is produced by the National Center for Appropriate Technology through the ATTRA Sustainable Agriculture program, under a cooperative agreement with USDA Rural Development. ATTRA.NCAT.ORG.


 Canva
Canva